Please review the site Rules, Terms of Service, and Privacy Policy at your convenience. Rules, TOS, Privacy
Get familiar with the reaction system: Introducing the Reaction System

Flattening a slab

edited June 2019 in Related
Back in January I'm sure some of you noticed that I posted a photo of a nice live edge slab of Fir. Well I'm finally getting around to doing something with it, I need the space so I can build my next speaker project ;)

This is a 3" thick slab of Fir, the old photo from when I bought it and removes the bark. The bark was very nice and came off in one piece even, but I think we're going to leave the bark off, as we're not going for a rustic look in our home. This will end up being a bench when complete, that could easily double as a coffee table, but it will sit under our living room window as decoration, except when we need some extra seating for guests.
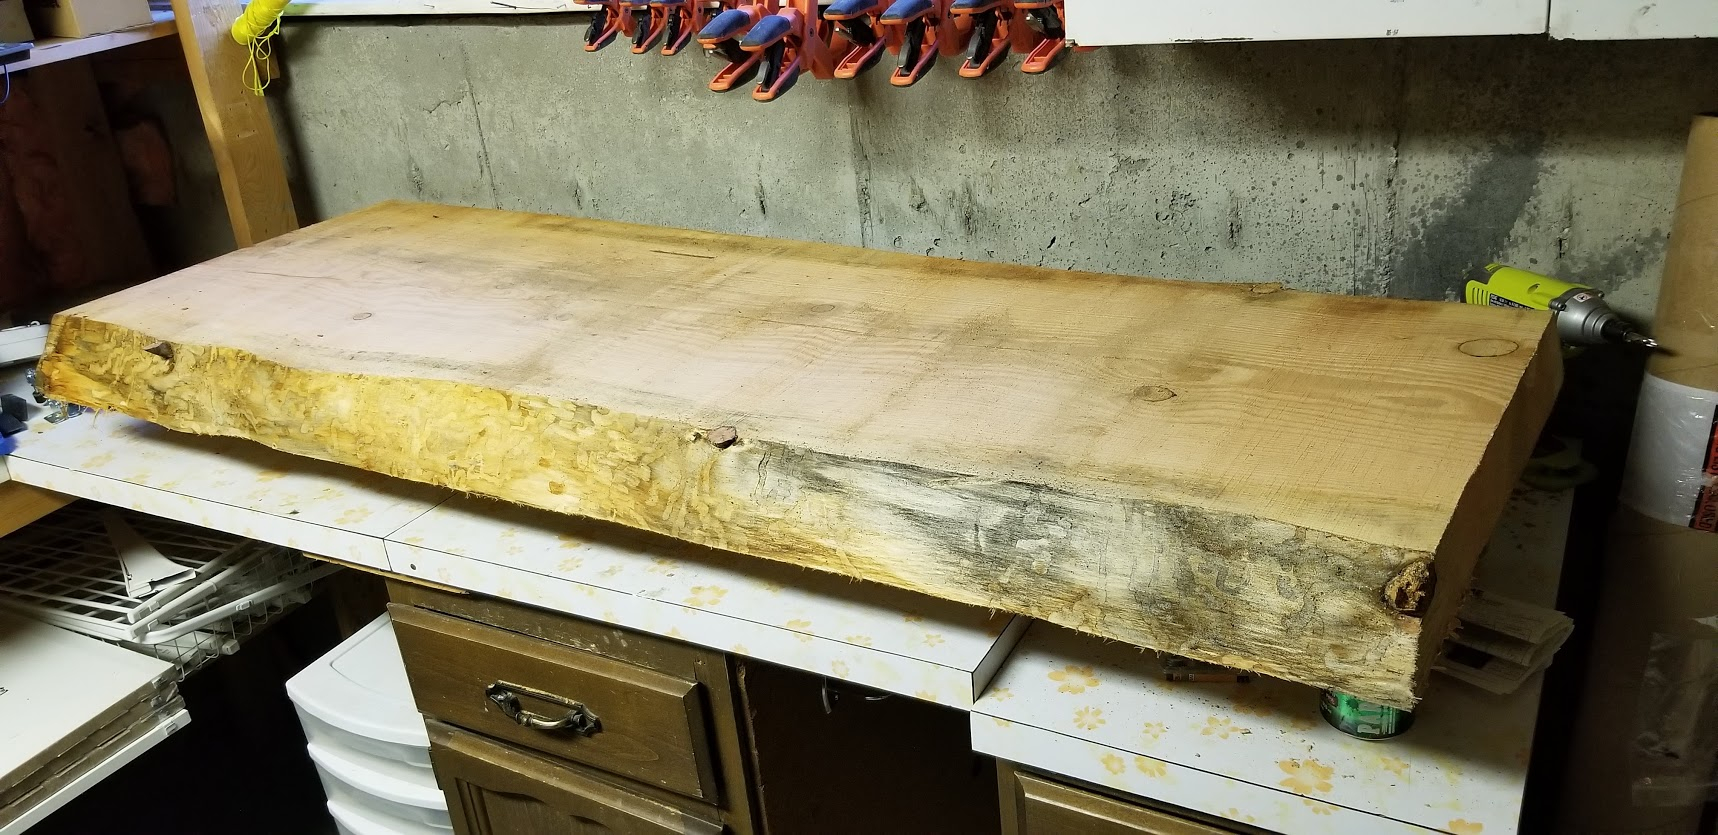

It was inexpensive, but just rough cut, so I need to flatten it big time. I could get a big hand planer and apply a lot of elbow grease to get it most of the way, then clean it up with a belt sander. I decided to build a flattening jig for my router instead, and when I'm done with this I will lightly modify the bed I made and flip it over to use it as a work surface that can just sit on saw horses. I don't have a garage anymore with my new home, just a carport, so it takes a bit more to set up for shop work, but still usable, I just don't have all the storage and table space that I used to.

The mistake a I made was trying to use up some old shelf boards that were otherwise going to the landfill. However chipboard is just too soft, a few of my pocket holes tore out when I screwed into them, and the ribs I added to the base I'm sure do nothing at all, but at least they provide somewhere for the sawdust to collect. This was otherwise fairly easy to build, as none of the measurements really need to be exact. I did use MDF for the router surface and the base because it is flat boards not a old warped shelf, and is much stronger than the chipboard. I just need to add some stoppers to each end, but I'll do that once I have my router bit.
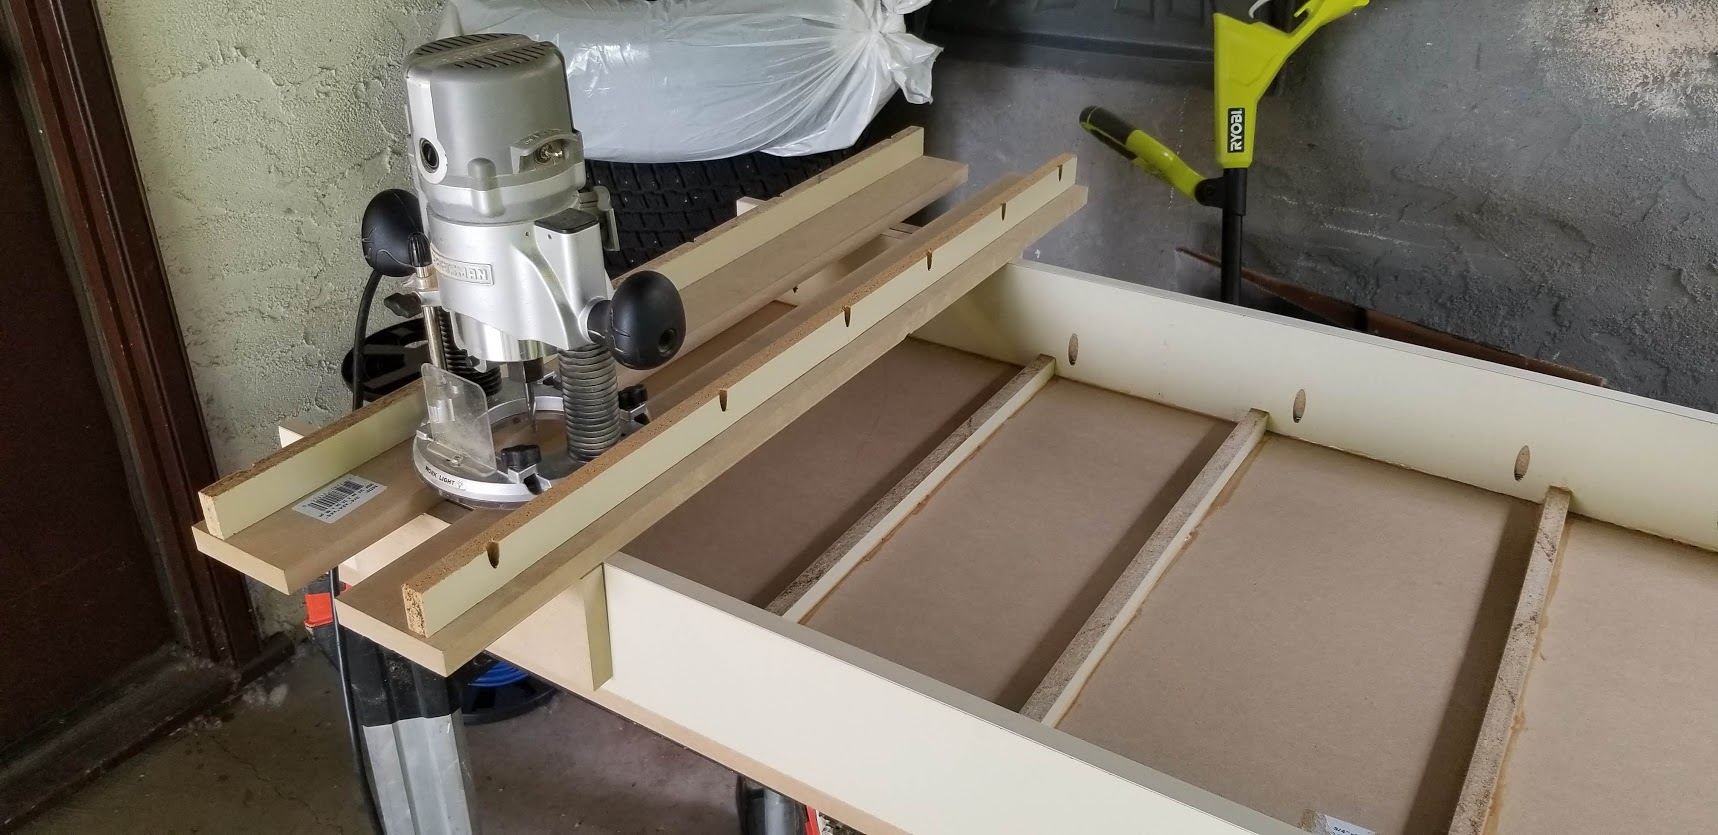


There is something satisfying about drilling pocket holes though...The good thing about using the shelf boards is that they have a laminated edge, so the jig can slide easily across it. Looking at Youtube videos, I think the best tip I found is to take a couple pieces of string and make an X across the jig, if the string touches in the middle then the jig is flat, if they don't touch then it needs some adjustment.

I don't have a fancy high power router, so I'm going with a 1.5" bit, hopefully my router can cope with that:

Has anyone here done this sort of woodwork before?


I'm not deaf, I'm just not listening.

Comments

  • I would have gone the hand plane route, but that sure looks cool.  Let us know how it works out.
  • Not yet, but I may have to.... I have one of those monsters from Javad for under-chamfering that might work in a pinch, or a 3/4" mortising bit.
  • Yup, just did it to my current speaker project. It wasn't quite as large of a surface as that, but similar task. It worked fine. I used parchment paper on the edge to make it slide smoothly. You'll be fine , I used a 1/2" spiral bit.
  • I got a bit confused looking at the router manufacturer name.
    I've done exactly what you doing manually and also on the CNC table lately. Find the highest spot. Drop the router in steps and find out how much of the torque your machine will tolerate. 1/16" is prob a good start. I don't remember what you have for dust collector.
  • My tip would be to shim the backside to get the first side as level as possible to your rails.  
     John H, btw forum has decided I don't get emails
  • I've built a couple of those jigs - seems like I keep finding corner cases where the previous version won't work.
    I built a TM with a butcher block oak baffle, and got great results. Pieces of HDPE on the bottom help it glide smoothly.

    But Chahly - Stahkist don't want speakers that look good, Stahkist wants speakers that sound good!
  • Perfect, well I've ordered my router bit, with any luck I'll be able to try this out next weekend.

    @R-Carpenter I'm not sure why you're confused, but it's a Craftsman router. My dust collector is the ground beneath my feet. I work outside in my car port so there's a breeze, the space doesn't fill up with dust like a garage. If the mess gets to be too much I can always attach a shop vac to the router.
    I'm not deaf, I'm just not listening.
  • I was referring to the name of the router bit manufacturer. Roman is also my name. B)
  • Ah, well stock up on them, they're made specially for you :)
    R-Carpenter
    I'm not deaf, I'm just not listening.
  • Initial impressions of the "Roman Carbide" brand of router bits is very good. The bit looks very nice, and came in a hard plastic case. Made in Taiwan by Woodstock International.


    I'm not deaf, I'm just not listening.
  • Just think, you could have 8 bits with your name on them for the price of that one ;)
    I'm not deaf, I'm just not listening.
  • Replaceable cutters.....cool.
    ............. could you hum a few bars.
  • Seems a little excessive for a one-off job.  

  • Yeah if you're talking about the fancy surfacing bit that Roman uses, for sure it's overkill for what I do. For my use the CAD$30 bit is money well spent. If this works well it may be put to use again in the future for some shelves or a mantle piece or something like that. Maybe even a speaker baffle, who knows ;)

    Looks like it'll be a cold dreary day tomorrow, but still good enough to get started with this. At 1.5" removal, I'm 40 passes with the router per side best case to cover the whole bench, ugh.
    I'm not deaf, I'm just not listening.
  • IME, this kind of work is fun and precise. Can't complain.
    But Chahly - Stahkist don't want speakers that look good, Stahkist wants speakers that sound good!
  • MartyH said:
    Seems a little excessive for a one-off job.  

    Time will tell. Surfacing can bring up a few issues with the bits.  Run the speed to fast and push it too slow, the bit will start heating up and dulls up very quickly. There are hidden dangers inside the slabs too. Carbide is brittle and can get damaged by a hard nut or mineral. Fir should be ok tho. It's not a large slab either.
    I wasn't suggesting a $200 for one job and the slabs or surfaces I work with are a bit larger and often harder. The insert knifes in that Amana tool are also 4 sided so with one set of inserts it's 4 bits. :)
  • I'm looking for a door manufacturer where I can run my (planned) river slab table through.  This video has some good ideas.
    https://www.youtube.com/watch?v=aa0dzZlPsGM

    kennyk
     John H, btw forum has decided I don't get emails
  • This slab is now flat, my crappy jig worked perfectly for this job. I got a fair bit of chipping, I think just because the wood is quite soft, I'll sand the crap out of it which should clean most of this up.


    jhollander6thplanetkennykrjj45R-CarpenterThumperTomS7910
    I'm not deaf, I'm just not listening.
  • edited June 2019
    One step closer. Got the surface pretty well cleaned up with a belt sander and some 60 grit, followed by a orbital sander and some 80 grit. For the edges I had bought a wire brush for a drill, but found it was too coarse and made big gouges so I decided to sand by hand with 80 grit which was going just fine until I got blisters on my knuckles and had to stop. I was able to get one edge cleaned up and a good start on the other side.

    Once I get the other edge sanded down, then I need to fill some cracks with epoxy and sand some more. I think the finish will be a wipe on Danish Oil, many coats and light sand/buff until I'm satisfied. It should result in a real amber coloured finish on fir.


    jhollanderrjj45S7910R-CarpenterThumperTom
    I'm not deaf, I'm just not listening.
  • Epoxy and more sanding. Ready for finish now. After sanding I wiped down with a damp rag and lifted some of the grain, so I figure I'll have to do a good sanding after the first coat of finish in order to subsequent coats to build up without lifting the grain.

    Now for some bevies in the sun. Happy Canada Day ;)


    I'm not deaf, I'm just not listening.
  • I’m finishing one for my wife. She was in over her head. Maple, no stain just sanded and epoxied.
    6thplanet
  • Very nice, I hope you hit those bubbles with a torch though. Yeah, the douglas fir isn't the most appealing slabs, but it's cheap and in a few years will darken to a nice red colour.
    I'm not deaf, I'm just not listening.
  • dcibel said:
    Very nice, I hope you hit those bubbles with a torch though. Yeah, the douglas fir isn't the most appealing slabs, but it's cheap and in a few years will darken to a nice red colour.
    Yeah. That picture was the fill coat. Filling in the grain. This is the final. Takes forever to dry.
    PWRRYDdcibel6thplanetR-CarpenterkennykS7910
  • how do you take care of the drips? Did you just pour epoxy on top? Spreading tips?
  • ani_101 said:
    how do you take care of the drips? Did you just pour epoxy on top? Spreading tips?
    I baby sat mine every 15 min. Wiping the drip edge off.
    ani_101
  • hifiside said:
    ani_101 said:
    how do you take care of the drips? Did you just pour epoxy on top? Spreading tips?
    I baby sat mine every 15 min. Wiping the drip edge off.
    was hoping for some super secret wookworker's insider tip! but that works too i guess!
    hifiside
  • Time for some colour. Sun was in a weird spot but its looking good to me!


    hifisideR-Carpenterrjj45kennykS7910ThumperTom
    I'm not deaf, I'm just not listening.
  • I'm calling this slab done now, the finish anyway. I still have plans to paint the square steel legs with Rustoleum Hammered spray paint. I used this Hammered spray paint (burnished amber) on my fireplace and it turned out quite well, and I still have enough left over for this.

    I was finishing this on my patio, and found that my slab still contained a lot of sap. My patio is covered, but every day as the sun goes down there's a good hour or two where the sun hits it, and just cooked the sap out of this slab. I thought there was something wrong with my finish, but came to the conclusion that it was sap seeping through. So my solution was to simply leave it out in the sun for a week or so to bake, then clean the board and sand and finish a few more coats again. Looking good today, unfortunately it's raining now so I don't have great photos, but a couple good shots of the final sheen. Also the slab sitting in the sun for a few days did get some red colour out of the fir as well which is great.


    kennykjhollanderR-CarpenterTurn2ThumperTom6thplanetrjj45
    I'm not deaf, I'm just not listening.
Sign In or Register to comment.