Site Links
Howdy, Stranger!
It looks like you're new here. If you want to get involved, click one of these buttons!
Quick Links
Categories
Who's Online (0)
Using VituixCAD/EQ APO to Simulate a Passive Xover

Now that I have my 2 channel measurement system set up and working well with VituixCAD, I've decided to take the next step and begin listening to my xovers before ordering parts. So far, I have downloaded and installed EQ APO on my Win 7 laptop and have clicked around a bit through the various menus and screens. I have also ordered a Soundblaster X3 from Best Buy. This is an external USB soundcard with discrete 7.1 channel mode, 32bit/192kHz DAC and drivers/software for Windows 7, 8, 10, and 11. Soundblaster also has an X4 version of this soundcard, but it will not work for me because it only has drivers for Windows 10 and 11.
I also printed dcibel's two papers on the subject "Filter Simulation with VituixCAD and EQ APO" and "Mirror EQ with VituixCAD" I'll be using these papers as basic references during the set up. It looks like a fairly straight forward process. (I'll put a link to these papers in my next post).
For a 3 way speaker, the plan will be to level match three separate stereo power amplifiers and then control the overall volume with the X3. Questions and comments are welcome. I will report my progress as I go along.

Comments
Here is a link to dcibel's papers on this subject:
https://diy.midwestaudio.club/discussion/2073/minimum-phase-is-a-waste-of-time-p/p1
Here is a link to another thread on this subject:
https://diy.midwestaudio.club/discussion/1836/mirror-eq-with-vituixcad-and-apo-eq-replacing-ue/p1
You've got the "min phase is a waste of time" linked above, which is fairly unrelated to EQ APO. I think the first link you are looking for is this one:
https://diy.midwestaudio.club/discussion/1832/simulating-crossover-filters-with-vituixcad-and-eq-apo
In any case, for ease of access these instructions are now published at HTGuide. I'll provide a general link to the DIY Article section below, so you can see all that's available there.
https://www.htguide.com/forum/articles/do-it-yourself-diy
Just an FYI for anyone reading through, this instruction is fairly unrelated to passive crossover development, but more for implementing a PC as a DSP system, covering the same functionality of UE which is an inverse transfer function filter to fully normalize the speaker response to a target slope in one fell swoop without the need for fine tuning different filter bands.
Thanks for the clarification, dcibel. Looks like I messed up the links pretty bad. I think what happened it that I am also looking into using my laptop as a DSP system as well. My main goal is to create a passive crossover, but I want to experiment with active crossovers as well.
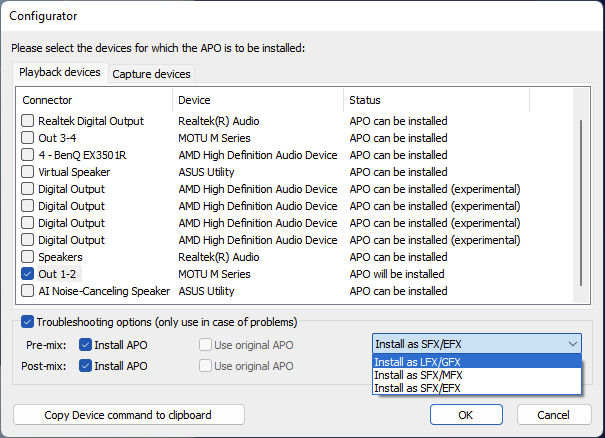
One thing I don't mention in the EQ APO document because it's more just "how to install EQ APO", at least on my system, I have to select the advanced troubleshooting options in the configurator and select "Install as LFX/GFX" instead of the default "SFX/EFX" to get it to work. YMMV, just something I thought I'd mention if you're having trouble getting EQ APO to work.
Other thing to note is that ASIO driver use will bypass EQ APO, which doesn't really affect everyday playback at all, but if your taking measurements or other recording purposes, use WDM audio device.
I used to do something similar with LspCAD. Not as advanced, I'm sure.
Progress report: My Soundblaster X3 arrived via UPS yesterday & I finally got the drivers and software working today. I had to turn off driver signature verification at the command prompt to get the drivers installed! Win 7 is no longer supported by Microsoft, so the signature database on my laptop is completely outdated. I also picked up 3 Monster 6 foot long Mini to RCA breakout cables. These will be connected to the rear panel "Front," "Side," and "Rear Line Out jacks to send the analog signal to three separate stereo power amps.
Here are a couple of the Soundblaster Control Panel screens. Note that 7.1 surround must be selected. The default format is 24bit, 96000Hz and this must match the sample rate used to export the impulse file from VituixCAD.
Before moving on to the next setup step, I'd like to review the setup of the X3's topside mechanical buttons. The X3 has a "Mode" button just below the big volume control knob (see pic). When you press and hold this "Mode" button for 2 seconds, an orange LED above the button lights up to indicate that you are now in the "Direct" mode. The direct mode, as I understand it, shuts off all audio enhancements such as EQ for SXFI, Music, Movies, Footstep enhancer, etc. There is also an EQ - off mode where the LED is off, but I did not try that mode.
And here is a screenshot of my Soundblaster playback settings, which match my Win7 Control Panel settings:
So, after I had the Soundblaster software and drivers installed and working properly, I moved on to the next step, which was to export some "test" Impulse Response files from VituixCAD. I opened my finished "Retro Speako" project in VituixCAD. This is a 3 way project that I demo'd at InDIYana last year. They use a 12" Audio Concepts woofer (re-coned to 9") crossed at 650Hz over to a 3" dome midrange (Vifa D75MX-21). The mid is crossed to a one inch dome tweeter (Morel MDT-33) at about 4300Hz. Dcibel helped me with suggested revisions to this xover, which I have included in the final design. Below are VituixCAD screenshots of the Impulse Response and Export settings used. I pretty much followed Dcibel's suggested settings for all entries.
Almost done. Next up, I opened the EQ APO Configurator (not the Configuration Editor!!) to make sure the Soundblaster X3 was selected as the default device (see screenshot below). This is important because, sometimes, I would forget to plug the X3's USB cable into the side of my laptop, which would cause the laptop to default back to the Realtek High Definition audio device. This, in turn, would cause the EQ APO Configuration Editor to crash when launched. As long as I checked the configurator first and then plugged in the X3, I was good to go. This was the only problem I experienced. I did not have to use the troubleshooting options as mentioned by dcibel above.
Finally, I opened the EQ APO Configuation Editor and, following dcibel's instructions, set the preamp gain, copy channels, selected channels, and convolution with the three IR wave files. I verified that the IR files looked good using the EQ APO Analysis screen (see screenshots below). I then hooked a mini to RCA breakout cable, sequentially, one at a time, to each one of the three X3 outputs and played some music files through one of my Zonker full range speakers. It seemed to work perfectly. High frequencies, above 4300Hz, were coming out the X3's L and R outputs. Midrange frequencies, from about 650 to 4300Hz, were coming out the X3"s SL and SR outputs. And the bass frequencies, below 650Hz, were coming out the X3's RL and RR outputs. Success!!")
That's where the project stands right now. Next, I need to set up my 3 power amps and try this out on a real speaker building project. But this will take me a while to get it all set up. The plan is to use a Dyna ST400 amp for the bass channels, a Heathkit AA-1640 for the midrange channels, and a pair of SWTP 207A amps for the tweeters. Hopefully, the Soundblaster X3 will have enough gain to drive all amps to moderately loud listening levels without distortion. I am also looking into buying a 7.1 channel AVR specifically for this purpose, connecting the X3's optical outputs to the AVR's optical inputs. At this point, I'm not sure which method would give me the best sound quality.
And a special thank you to dcibel for the excellent instructions. This will help me a great deal on future speaker building projects!!")
If you find a cheap AVR with HDMI you can send audio directly over HDMI, skip the soundblaster and optical stages.
With 3 different amps for each speaker keep in mind gain/attenuation may need to be adjusted accordingly for each amp. Easy to check gain adjustment needed by simply running 50-60Hz generator from software (REW or ARTA) and then measuring amp output with a multimeter.
My laptop has one HDMI output. So then, if I find a cheap 7.1 channel AVR with HDMI inputs and I plug one of the inputs into my laptop, will Windows7 automatically find a 7.1 channel driver for this?
Wow. SWTP 207A amps. I built some for friends and built a couple of Tigersaurus amps for myself.
Ron
The audio output capabilities over HDMI is part of your video driver. Based on the selection above in EQ APO, no.
My older brother built my pair of 207A's back in 1973. I replaced blown outputs on one and recapped both of them about 10 years ago. I have always wanted to find a pair of Tigersaurus amps with blown outputs to see if I could rebuilt them, ever since I read Benjamin Poeland's two part series "Taming the Flaming Tyger: A Restoration Odyssey: Part I & II" (Audio Amateur 1/90 & 2/90). You have probably read that article. That amp was 250wpc and the output transistors pairs were fully exposed on the back, idling at 38V DC each with respect to ground!! No output protection relay either. On your pair, did you ever blow the outputs and fry your woofers?
The Tigersaurus amps had a direct coupled input and an input with a cap. I was trying to run them with a DIY preamp that had a nasty turn off thump hooked up to the capacitively coupled input. That's when I learned that the 10uf tantalum cap they used as a coupling cap is a dead short depending on the polarity of the signal. The turn off thump dumped enough DC to fry the outputs. Tantalum caps will literally explode if the polarity is wrong. They also sound dreadful in the signal path. I rebuilt the amp and replace the tantalum cap with a film cap.
I did see that article but left mine stock. Are you familiar with the Leach Double-Barrel amps? I built 4 of them and 3 are still running the last time I fired them up. They need a home if anyone is interested.
https://leachlegacy.ece.gatech.edu/superamp/
They have large toroid transformers, big caps and big heatsinks. I used to run some 2 ohm ribbons with a pair fused at 3 amps. A very solid 250 watts as I recall.
Ron
Please help me out here guys - What does this ^ amp have to do with the subject matter?
(I am subscribed to the thread because it was dedicated to a subject I am trying to learn).
Thanks.
Sorry about that. Back on subject, I just remembered that I had one other setup problem with the EQ APO software package. When I exported the IR files from VituixCAD, I exported them to the desktop. Then, when I attempted to open the file to Convolute with Impulse Response in EQ APO, I would get the following error message: "The file is not readable for the audio service. Change the file permissions or copy the file to the config directory." I then moved the D1, D2, and D3 wav files over to the C:\Program Files\EqualizerAPO\config subdirectory, re-opened them from that subdirectory, and the error message disappeared.
Has anyone tried using a video card with hdmi audio capabilities and a HT receiver to achieve the same technique? I imagine the receiver would have to have a way to bypass any processing for each of the channels. It may be obvious but to clear things up in my head, you connect each individual driver to an amp, with the driver mounted in the box? I'm restoring/updating some McIntosh Ml4Cs which are a 5-way system with 4 woofers, 1 mid-base, 2 low midrange, 2 upper mid-range, and 2 tweeters. I have a spare 9.2 marantz avr to see if this will work.
The HDMI to 7.1 ch HT receiver idea is on my agenda, but I have not tested this type of configuration to see if I could get it to work.
There should be no problem with that configuration as long as your HDMI video output on your computer supports 7.1 PCM audio.
The main downside of HDMI for audio is that the audio information is just inserted in-between video frame information, so you sort of need to send a video signal along with the audio, even if it's just a blank screen, it can't be audio-only.
I was able to get it working with Lspcad using ASIO. At least I could direct the logical channels to different physical channels. Have not tried with EQ APO yet. I could not find an asio control panel or configurator in this software.
Nevermind, EQ APO does not use ASIO.
Correct, an APO sits in-between the application and the audio driver, where ASIO creates more of a direct connection from the application to the hardware. Standard windows audio will run through the APO, where use of an ASIO driver will bypass it.
I did use it to measure my active xo for the coax build.