Site Links
Howdy, Stranger!
It looks like you're new here. If you want to get involved, click one of these buttons!
Quick Links
Categories
In this Discussion
Who's Online (0)
Advent Legacy II Restoration Project

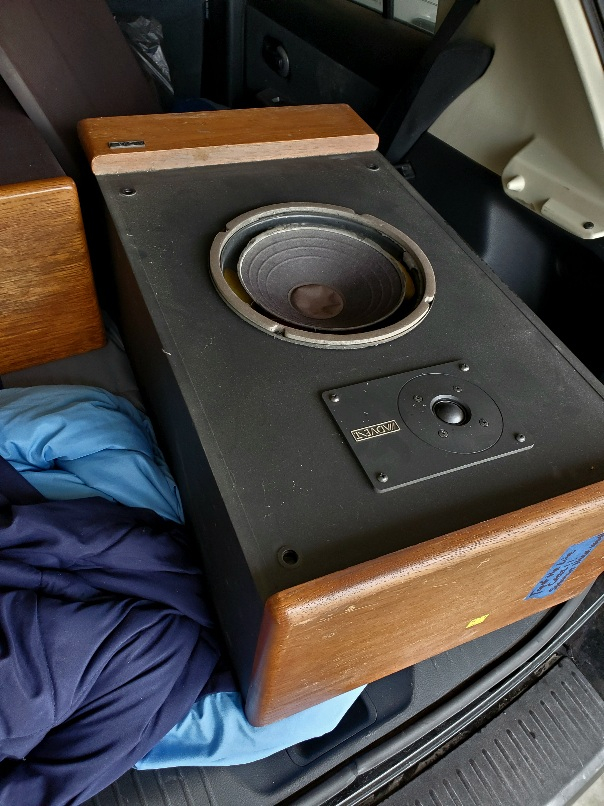
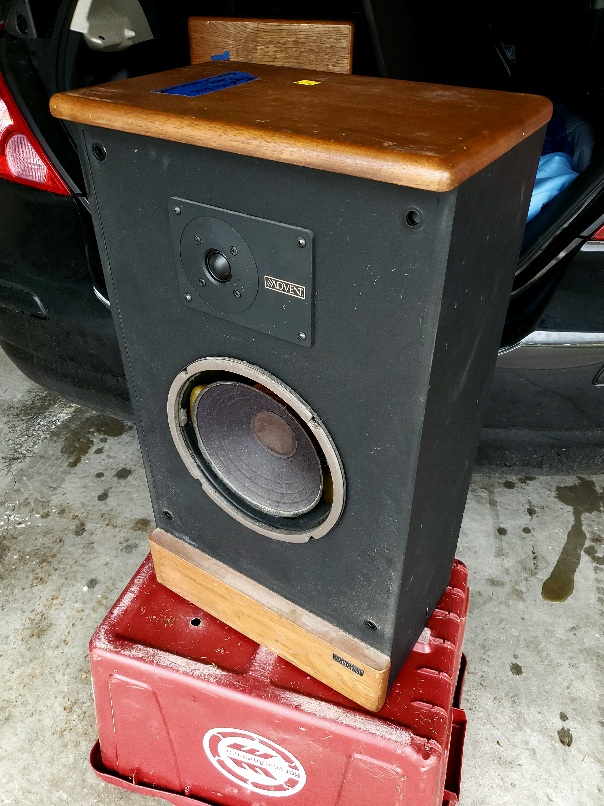
Look what I found at my local Habitat Re-store. A pair of vintage Advent Legacy II's. This is a sealed two way with 10" woofer and 1" mylar dome tweeter. They are solidly contructed of 3/4" particle board and measure 16.25" W x 9.75" D x 28.5" H. They originally went for $398/pr in 1991. Using an on-line CPI calculator, this is $892 in today's dollars. I paid $15 each. The sales clerk told me to keep my receipt, in case they did not work. Said I could bring them back for a full refund!


Comments
The cabinets and grills are a little scuffed up and dirty, but no major dents or cuts in the grill cloth. The sides are black laminate. The top and bottom front panels are solid 3/4" oiled pecan.
One tweeter dome was pushed in, but I was able to pull it most of the way back up. Still a little deformed looking. You can still get replacement tweeters on-line for these speakers for $60 each, but I can't see spending that much. I have an idea to fix it completely myself using a 3/4" ball bearing.
The bad tweeter:
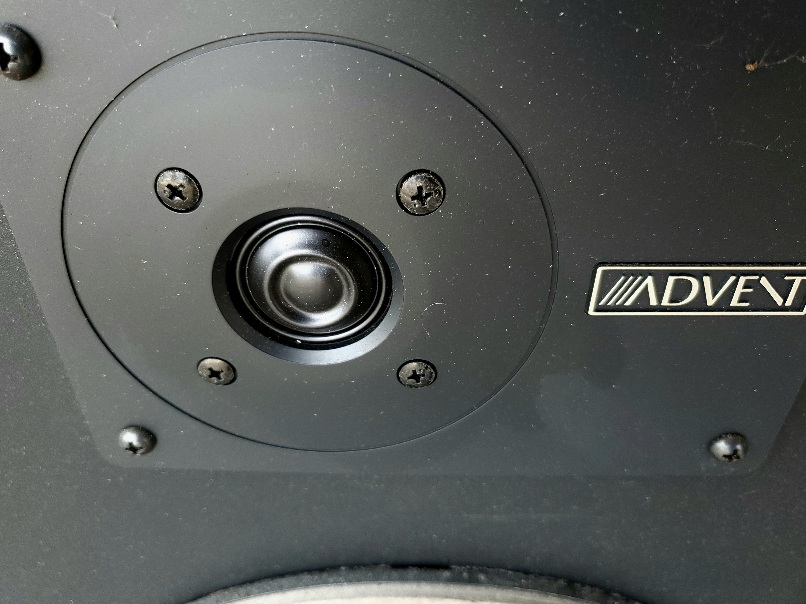
This is what the good tweeter looks like:
Voice coils check good on all tweeters and woofers. The woofers have no foam, so that is why they have a wonky looking low frequency peak.
I did a 1 meter on axis FR measurement on each one, applying a 5ms gate. The woofer VC's rattled a little bit during the sweep, which probably makes the curves look a little wonky. Once I get them refoamed, I'll do an A/B curve comparison.
1 meter on axis FR with grill cloths in place. EDIT: The purple trace is the one with the crushed tweeter dome, which causes that huge glitch from 8-20Khz:
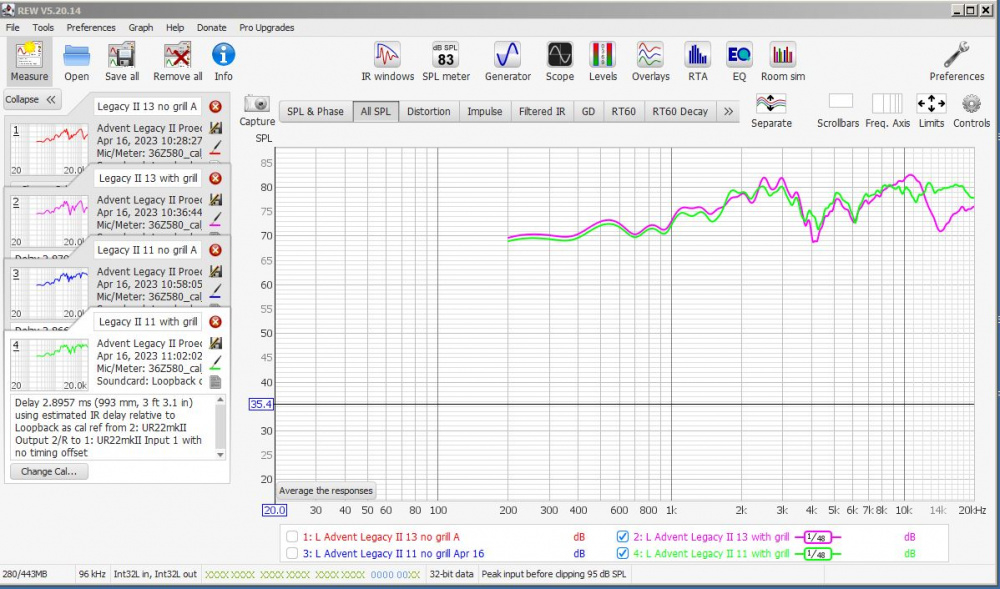
1 meter on axis FR without the grills. EDIT: The Red trace is the one with the crushed tweeter dome, which causes that huge glitch from 8-20Khz:

Nice find !!!
Not sure what direction you want to go with these, but possible woofer replacement ?
https://www.madisoundspeakerstore.com/approx-10-woofers/seas-prestige-a26re4-h1411-10-paper-cone/
Yes, that is what it is. Solid Pecan. A little scuffed here and there, but no dents. Should be very easy to sand down and refinish.
I haven't taken the input cups off yet. Below is a link to an old Audiokarma thread where they discuss rebuilding and recapping one of these. Looks like a very simple circuit with a couple NPE electrolytics, a resistor, and an inductor. There were 3 versions of the Legacy: Models I, II, and III. I thing mine are model II's, but not sure. The box size for the I & II's are the same, but the tweeter orientation was flipped from horizontal to vertical on one of the two versions. I know that they are not Model III's because that model used a taller, thinner cabinet.
https://audiokarma.org/forums/index.php?threads/advent-legacy-rebuild.426282/
Tweeter repair:
I first attempted to snap the crushed dome back by gently pinching the dome with my thumb and index finger. As you can see in the pic below, this did not restore it completely. This dome was probably crushed several years ago, so it will no longer snap back into its original position.
So, I picked up a small bag of 1 inch diameter wooden knobs from the wood craft department at Hobby Lobby. They measure .988 in diameter. Then I took the tweeter apart by removing the 4 screws. It comes apart easily, no glue, held in alignment with 4 pins. Ferrofluid in the gap.
The idea here was to take one of these circular wooden knobs and push it into the dome from the underside of the voice coil, forcing the plastic mylar dome back into its original shape. The plastic faceplate with voice coil and dome weigh 85 grams. Using a thin strip of 0.5" thick particle board as a fulcrum, I set the faceplate and wooden ball down onto a flat surface and forced the wooden ball into the dome with a force of 29 grams.
If I move the fulcrum to the outside edge of the faceplate , the force becomes 40 grams. Neither weight flexes the rolled edge VC suspension out of alignment, but I decided to go with 29 grams because this was enough and I didn't want to risk damaging the VC.
As you can see in the pics, this completely restores the shape of the dome.
My plan is to leave the tweeter in this fixture for several weeks, with 29 grams of pressure applied, checking it periodically to see if the dome retains its shape when the pressure is removed. Right now, if I remove the pressure, a few small dents reappear on the top of the dome after a few seconds. So, it needs more time to acclimate.
In the meantime, I put the tweeter magnet into a small box for safe keeping. This will keep dust from getting into the voice coil gap and messing with the ferrofluid. The amount of ferrofluid in the gap still looks good.
In case you decide to rebuild or want woofers that will be similar but not identical to the originals, you might be able to find what you need through this company:
https://www.humanspeakers.com/index.htm
Wonder if a little heat might help the dome retain shape?
Great idea using those knobs to reform the dome! Like Kornbread, I was wondering about using a hair dryer to help things along. I suppose it depends on the coating of the dome.
Thanks, Charlie & @tajanes for the links to possible woofer substitutions. Looks like either the Human Speakers PRO 031 or the Seas A26RE4 would be physical drop-in replacements for the Advent 10" woofers. Might have to mod the xover a bit to get them to blend with the tweeter, but that would be no problem. My current plan is to re-foam the existing woofers using a Simply Speakers Advent Legacy re-foam kit. If I botch the refoaming job (rubbing VC, etc.), the PRO 031 or Seas will be my backup plan.
https://www.simplyspeakers.com/advent-speaker-foam-edge-repair-kit-fsk-10a.html
Exactly what I was thinking. Not a heat gun, but maybe a hair dryer for a few seconds to just begin to relax the plastic enough to start losing the "memory" of the old crease. possibly a few heat/cool cycles to slowly work it out without overheating.
Thanks Tom & Kornbread. This sounds like a good idea. But a hair dryer could be a little risky if I get it too close to the dome. I would have to be very careful not to warp the VC or melt the dome. But what I was thinking is that, since my furnance is still cycling on and off, I would place the faceplate and fixture on a board and set it about 2 feet from a heat register. When the furnace cycles on, the heat on the dome would come up to about 90 degrees and when the furnace cycles off, the temperature would drop back to 70 degrees or so. This thermal cycling would reform the dome without damage. How does that sound?
Thanks Drewsbrews. Good idea. Looks like we posted at exactly the same time. See my furnace register cycling suggestion above.
You might be right about too much heat. I had some Radio Shack dome tweeters mounted in DIY wooden pods that I screwed down to the back deck of my Toyota in the late 70s. They got seriously baked in the Summer heat and the coating on the domes flaked off in chunks.
Progress report:
Removing the woofer gasket was extremely difficult. They really glued that thing in tight at the factory! I used a 1.5" steel putty knife and pushed it in under the glue line, slowly working my way around. I had to be very careful to stay underneath the gasket to keep from destroying it. After going around 5 or 6 times, I was finally able to pry it off. I got both gaskets off without breaking or destroying them, which is great, because they don't give you new gaskets in the re-foaming kit.
I took quite a while to clean off all the glue. I softened it with rubbing alcohol and scraped it off with an old chisel.
Someone on an old Audiokarma thread recommended putting a 4" PVC end cap over the magnet to keep the woofer stable when refoaming. I didn't have an end cap, but I found a small cut-off that fit perfectly over the magnet.
So that is where the project sits right now. The re-foaming kit is on order, should get it sometime next week.
If you had to make a gasket, I wonder about using a jasper jig and making another gasket from some of that thin foam board that you put on the floor to workout on?
That PVC kind of makes the woofer look like the old Radio Shack 12" subwoofer - it had a huge plastic cup covering a small magnet lol.
Clever way to stabilize the driver.
That plastic cover over the little magnet cracked me up when I first seen it. Ahhh the Shack.... how I miss thee.
I have never re-foamed a speaker so I could be totally wrong... but I seem to recall seeing a re-foam video and they had to cut off the dust cap and use shims (they used pieces if playing cards) to make sure the voice coil was perfectly centered in the air gap. When the surround glue was fully cured they removed the shims and glued a new dust cap on. Maybe that's not necessary if the spider remains untouched?
correct. IF the spider is remaining, then the coil will stay centered.
The gasket is .325" thick and the metal lip around the top of the woofer measures .20". So cutting a circular ring out of .25" thick masonite or thin foam board would probably work well. But since I saved the gaskets, I'm going to glue them back on. This will make the woofers look almost exactly like the originals.
Here is a pic of the magnet with PVC removed. It is a small 20 ounce ceramic. These were designed for small, sealed boxes. I'm guessing, but Fs was probably about 20-22Hz, Qts was probably about .5, and VAS was probably fairly high, maybe 3 cu ft or so. This would yield an Fc in the low 40's in a 1.9 cu ft. box. These boxes were stuffed with quite a bit of fiberglass, so the effective internal volume was probably about 2.5 cu. ft. After re-foaming, I'll measure Fs, Qts, Vas and Fc and see how good my guesses are.
I have re-foamed 7 or 8 woofers over the past 7 years or so. I cut out the dust caps and used alignment shims on all of them and have had no problems with rubbing or buzzing when done. I think shimming is the best method, because the shims not only center the voice coil, but they keep the cone from wobbling in the vertical dimension as well. If you try to refoam without shims, the spider will hold the VC in position, but it will not prevent the cone from wobbling off to one side or the other as the glue dries. You have to keep tapping around on the cone as the glue dries to make sure it stays properly centered.
The downside of using shims is that you have to glue a bigger dust cap over the old one to cover up the mess. This changes the TS parameters and high frequency response of the woofer. So now you have to modify to crossover over to fix this problem.
Yeah and if the foam is totally gone and been sitting that way for a while the cone weight would put torque on the spider, probably sagging it and taking set in that orientation.
Now I kinda feel bad for tossing my wife's Sony 8" + poly dome sealed bookshelvs. I had thought of refoaming them but figured I could probably build something better anyway. Would have been a good first try for refoaming.
Got the refoaming kit from SimplySpeakers.com. I decided to go with the non-shim method, leaving the dust caps in place, to see how it goes compared to the shim method. Here is how it went:
SETUP: Initial setup showing lazy susan, glue, new foam surrounds, and battery pack, ready to go:
Step 1: Flip foam upside down & apply 1/8" bead of glue along entire inside edge:
Step 2: Smooth out glue while rotating the lazy susan:
Step 3: Flip foam over and connect one AA battery to push cone up 1/4" into the wet glue:
Step 4: Rotate lazy susan & press foam edge into the glue:
Step 5: Put two more batteries into holder, boosting applied voltage up to 4 volts. This pushes the cone up to it mechanical limit (+ Xmech). I then applied a 1/8" bead of glue around the outer frame beneath the foam.
Step 6: I then removed the battery pack, causing the outer foam edge to drop into the fresh glue:
Step 7: This is the critical (make or break) step. As the glue began to set, I pressed the cone up and down along it full VC travel, which caused the VC to "self center" as the glue began to thicken and set up. I lightly tapped along the side of the cone to confirm alignment. After about 5 minutes, the VC self centered, and no more rubbing could be heard.
Step 8: Another 1/8" bead of glue along the top of outer edge to secure the gasket.
Both woofers done. No VC rubbing. Still need to pull a few small dents out of the dust caps:
So no frequency generator usage to check for rubbing/voice coil alignment?
No, not during the glue up process. I was thinking about using a generator during the glue up process, but the hookup wires got in the way when trying to spin the lazy susan. So, I just went by feel, listening for scraping noises, as I tapped on the cone sides and then pushed the cone in and out to its mechanical limits. Later on, I ran frequency sweeps with my generator and they seem fine. I was following the below linked instructional video from simplyspeakers.com, where they show the non-shim, non-generator method: