Rjj45, try taking very light cuts, especially the final cut. Light pressure on the final cut combined with painters tape should result in a very faint bearing mark. Any time that I ended up with a severe bearing mark was do to my operator error, applying too much pressure against the side.
Thanks everyone! The square bearing looks like a real possibility. I think I have also seen flush trim bits with 2 bearings on the bottom. That should help a lot. The idea of using a damp cloth to swell the veneer sounds great.
But Chahly - Stahkist don't want speakers that look good, Stahkist wants speakers that sound good!
@ugly_woofer said:
Rjj45, try taking very light cuts, especially the final cut. Light pressure on the final cut combined with painters tape should result in a very faint bearing mark. Any time that I ended up with a severe bearing mark was do to my operator error, applying too much pressure against the side.
Yah - mea culpa! But I really do make light passes.
But Chahly - Stahkist don't want speakers that look good, Stahkist wants speakers that sound good!
@6thplanet said:
Big bit, big bearing....size matters.
Square bearing, had to look that up...🤷🏻♂️ Anyone actually use one yet?
I have one for laminate trimming and it works as well as you think it would. You end up with a smooth piece of plastic 1/2" long against the wood and it leaves no marks.
With the big chamfers on the front baffle I'm not understanding the need for the flush trim, you cut off all the excess in the chamfer. I guess it just makes setting the stop a bit easier, you can make a few cuts without having to adjust the stop.
I use those exact square bearings on my flush trim bit for wood veneer so it doesn't mark the veneer. Steel bearings leave indents in the wood when they spin. They don't last as long as traditional bearings though so buy extras and keep an eye on them
I've had no issue with round steel bearings on my Freud trim bits. An old one seized up once (think it got glue in it), it was real obvious as it left major marks and a little burning. You don't need to apply much pressure, just enough to hold the bit against the edge. Better to make 2 passes then press so hard that you leave a permanent mark.
@dcibel said:
With the big chamfers on the front baffle I'm not understanding the need for the flush trim, you cut off all the excess in the chamfer. I guess it just makes setting the stop a bit easier, you can make a few cuts without having to adjust the stop.
It's critical that the maple layer is exposed evenly all the way around. I left the glue squeeze out and some of it was almost past the edge of the bevel. By cleaning up the overhang and the glue I had a repeatable reference to place a stop block on the crosscuts and a flat edge to put against the fence for the rips. For the first cut I could sneak up on the length of the cuts to expose as much of the 1/4" maple as I could without cutting into the plywood it was glued to. Once I was satisfied with the first cut I could set a stop block and use the fence for the rest of the cuts. As it was I ended up hand sanding the bevels to even up the maple reveal as some ends of the reveal were fatter than the other end or didn't quite match the width of the adjoining maple.
I've found that while using a larger router bit and bearing can help minimize denting, by far the best way to eliminate it is to use a small, light trim router.
Because it is so small and light, as well as being a one-handed device, I always use less pressure during operation, and therefore get no bearing denting.
All of my flush trim bits have 1/2" shanks and my Bosch Colt router is a little light to flush trim front baffles. I've been using a double bearing bit that leaves a minimal mark that's easily sanded out.
I got the rebates finished today and have a trick for pulling drivers out of recesses.
How do I pull a driver out of a recess? I just start a big screw until it catches. If it leaves a mark on the frame it's hidden by the mounting screws.
The router bit always leaves some burrs and the quickest way to deal with them is a little light sanding. I'll put another coat of poly on the fronts and be ready to mount the drivers and start measuring.
Between an out of town wedding and an out of town guest I've been able to design the crossover and buy the parts. I had to work around some back order issues to get the inductors I needed. I ended up with a 24db/oct crossover crossed at 2250Hz and 6Khz.
I took measurement of the bread boarded crossover today and it's not the flattest response I've ever come up with but it sounds pretty good. I'm looking forward to hearing a pair.
It's going to be plenty of work putting all the crossover parts together.
Comments
Rjj45, try taking very light cuts, especially the final cut. Light pressure on the final cut combined with painters tape should result in a very faint bearing mark. Any time that I ended up with a severe bearing mark was do to my operator error, applying too much pressure against the side.
Maybe add an extra couple layers of masking tape? (Old school, Boys)
Thanks everyone! The square bearing looks like a real possibility. I think I have also seen flush trim bits with 2 bearings on the bottom. That should help a lot. The idea of using a damp cloth to swell the veneer sounds great.
double bottom bearings.....
https://www.amazon.com/Bosch-85601MC-Double-Template-Trimming/dp/B000GYDXD6/ref=sr_1_4_sspa?crid=2036FTLDYGUSG&dchild=1&keywords=1/2+inch+flush+trim+router+bit&qid=1624194247&sprefix=1/2+inch+flush+tr,aps,157&sr=8-4-spons&psc=1&spLa=ZW5jcnlwdGVkUXVhbGlmaWVyPUFHWkYwSFVCV1c0MTImZW5jcnlwdGVkSWQ9QTAwODMyNjkzM0hHTENVSEJLSE9CJmVuY3J5cHRlZEFkSWQ9QTA1MjYwOTIyUElYM05YRkZTM0ZQJndpZGdldE5hbWU9c3BfYXRmJmFjdGlvbj1jbGlja1JlZGlyZWN0JmRvTm90TG9nQ2xpY2s9dHJ1ZQ==
What Ken said I use a large bearing flush trim 3/4". https://www.amazon.com/CMT-806-690-11B-Double-Bearing-Cutting/dp/B009WSDWRY
I've also noticed that I get the bearing marks when using the router table more than the hand held router.
Still can't believe Ron doesn't have a plan...
Big bit, big bearing....size matters.
Square bearing, had to look that up...🤷🏻♂️ Anyone actually use one yet?
Yah - mea culpa! But I really do make light passes.
I have one for laminate trimming and it works as well as you think it would. You end up with a smooth piece of plastic 1/2" long against the wood and it leaves no marks.
Ron
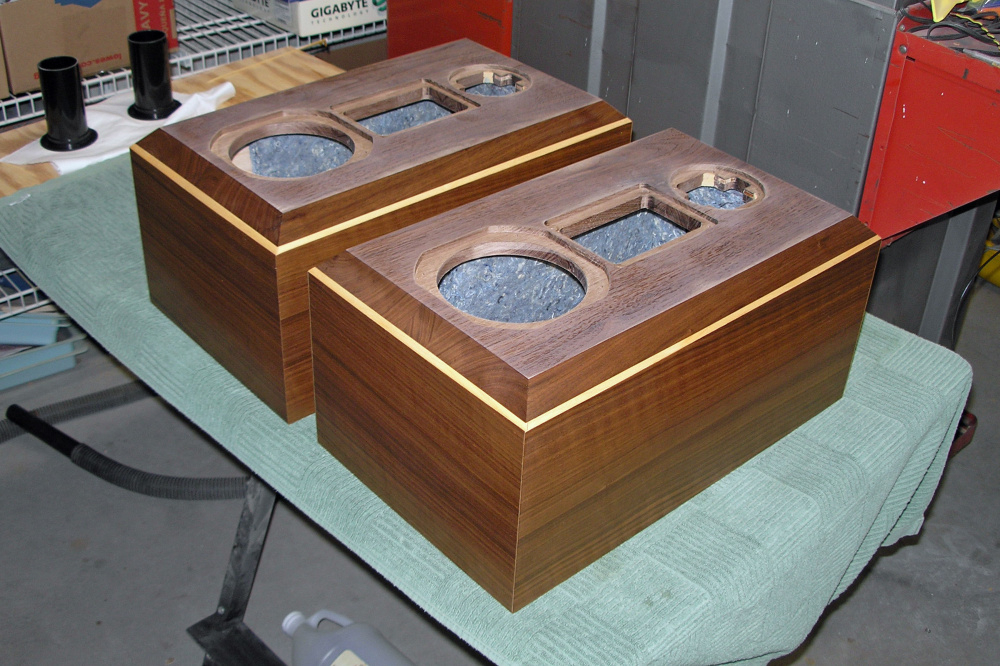
I got a lot done today. I flush trimmed the front baffle, cut the 45 degree bevels and finish sanded the cabinets. They're ready for the finish.
Ron
I prefer to trim baffles on the router table also - it eliminates 1 degree of freedom versus a hand held router.
With the big chamfers on the front baffle I'm not understanding the need for the flush trim, you cut off all the excess in the chamfer. I guess it just makes setting the stop a bit easier, you can make a few cuts without having to adjust the stop.
I use those exact square bearings on my flush trim bit for wood veneer so it doesn't mark the veneer. Steel bearings leave indents in the wood when they spin. They don't last as long as traditional bearings though so buy extras and keep an eye on them
Guys, the bearing shouldn't spin against the workpiece.
I've had no issue with round steel bearings on my Freud trim bits. An old one seized up once (think it got glue in it), it was real obvious as it left major marks and a little burning. You don't need to apply much pressure, just enough to hold the bit against the edge. Better to make 2 passes then press so hard that you leave a permanent mark.
It's critical that the maple layer is exposed evenly all the way around. I left the glue squeeze out and some of it was almost past the edge of the bevel. By cleaning up the overhang and the glue I had a repeatable reference to place a stop block on the crosscuts and a flat edge to put against the fence for the rips. For the first cut I could sneak up on the length of the cuts to expose as much of the 1/4" maple as I could without cutting into the plywood it was glued to. Once I was satisfied with the first cut I could set a stop block and use the fence for the rest of the cuts. As it was I ended up hand sanding the bevels to even up the maple reveal as some ends of the reveal were fatter than the other end or didn't quite match the width of the adjoining maple.
Ron
The finishing begins.
Ron
Which is?
Nice use of those cardboard corner reinforcements👍🏻
The finish? Minwax Wipe On Clear Satin Poly applied with a foam brush.
Ron
I tried to remove the bearing from a flush trim bit and the screw easily broke off.
Ron
Ouch! Wonder if it had threadlocker on there.
I've never had that happen... Yikes!
InDIYana Event Website
I made a template for the tweeter rebate and started cutting rebates.
Ron
Looking really good Ron!
I've found that while using a larger router bit and bearing can help minimize denting, by far the best way to eliminate it is to use a small, light trim router.
Because it is so small and light, as well as being a one-handed device, I always use less pressure during operation, and therefore get no bearing denting.
TomZ
**ZARBO AUDIO ** https://www.youtube.com/channel/UCEZUyvobRaFQSTl6NdOwgxQ
All of my flush trim bits have 1/2" shanks and my Bosch Colt router is a little light to flush trim front baffles. I've been using a double bearing bit that leaves a minimal mark that's easily sanded out.
Ron
I got the rebates finished today and have a trick for pulling drivers out of recesses.
How do I pull a driver out of a recess? I just start a big screw until it catches. If it leaves a mark on the frame it's hidden by the mounting screws.
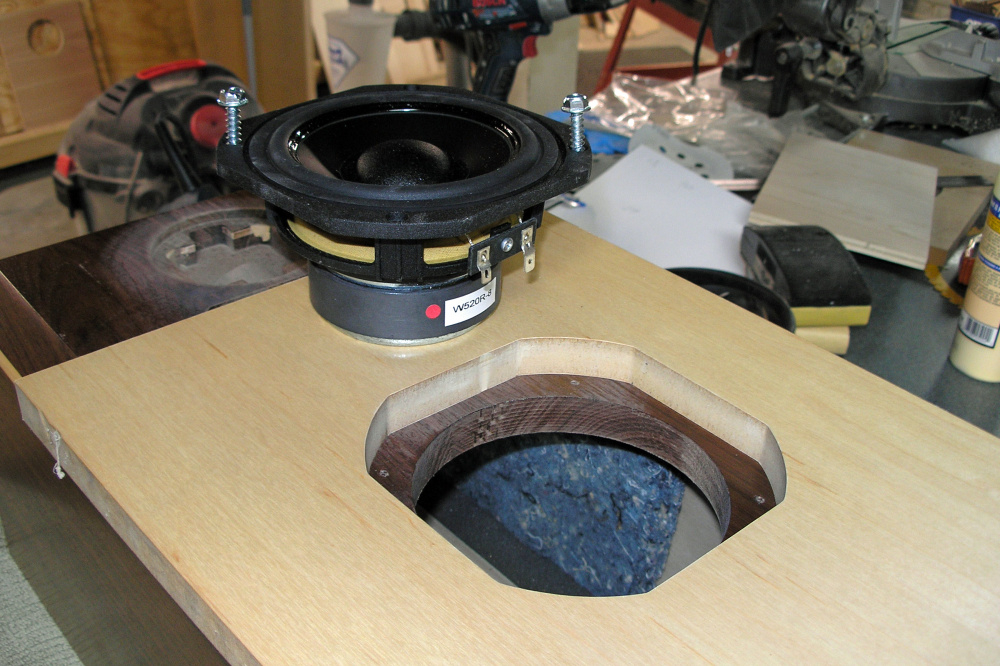
The router bit always leaves some burrs and the quickest way to deal with them is a little light sanding. I'll put another coat of poly on the fronts and be ready to mount the drivers and start measuring.
Ron
Beautiful!
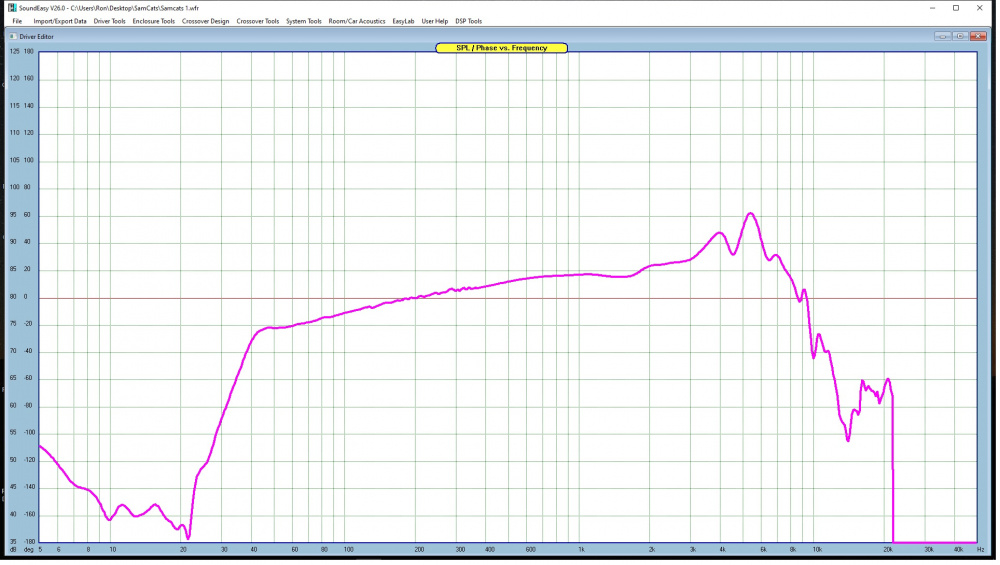
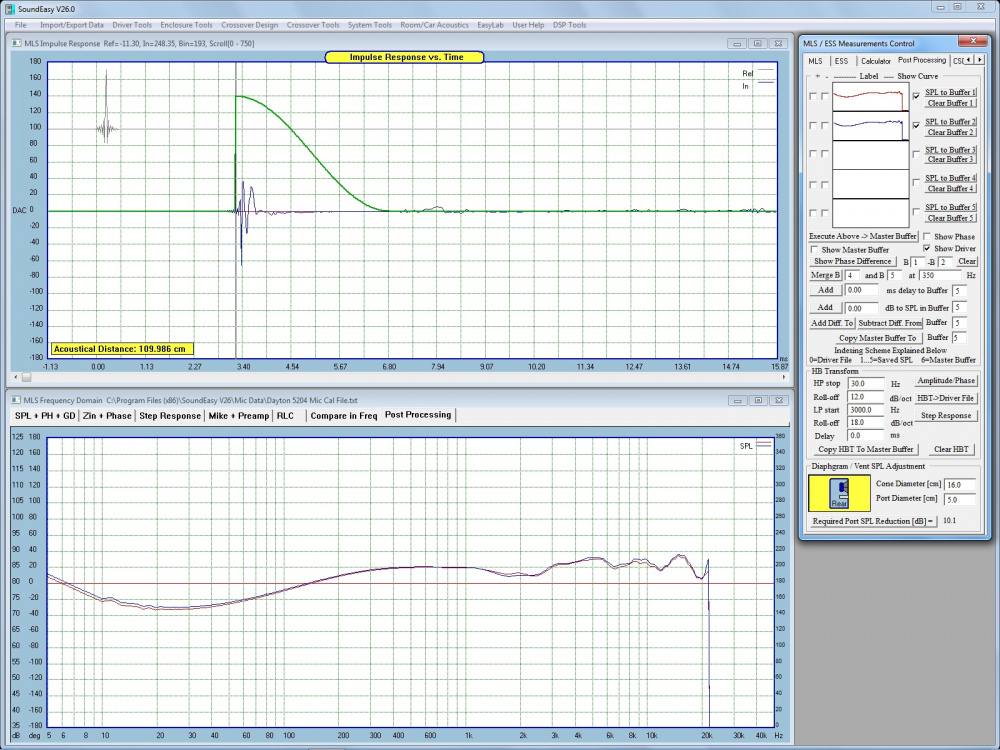
I got a box together and took some measurements. I'm not real pleased that the faceplate on the mid is glossy.
The woofer 1M FF with summed NF + port + baffle step sim.
The midrange.
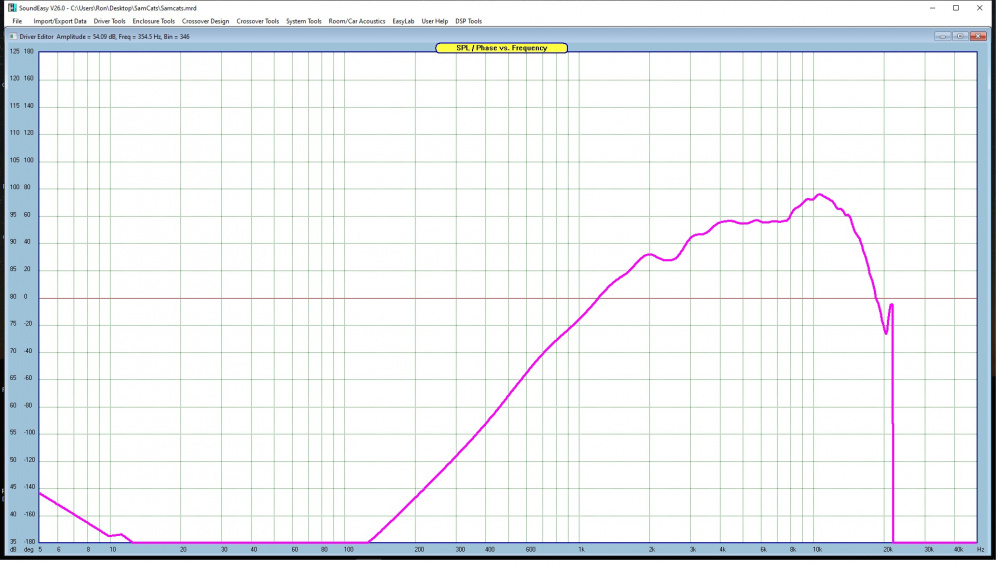
The tweeter.
Ron
If it helps at all with your "mid", the faceplate is easily removed if you wanted to try and repaint it.
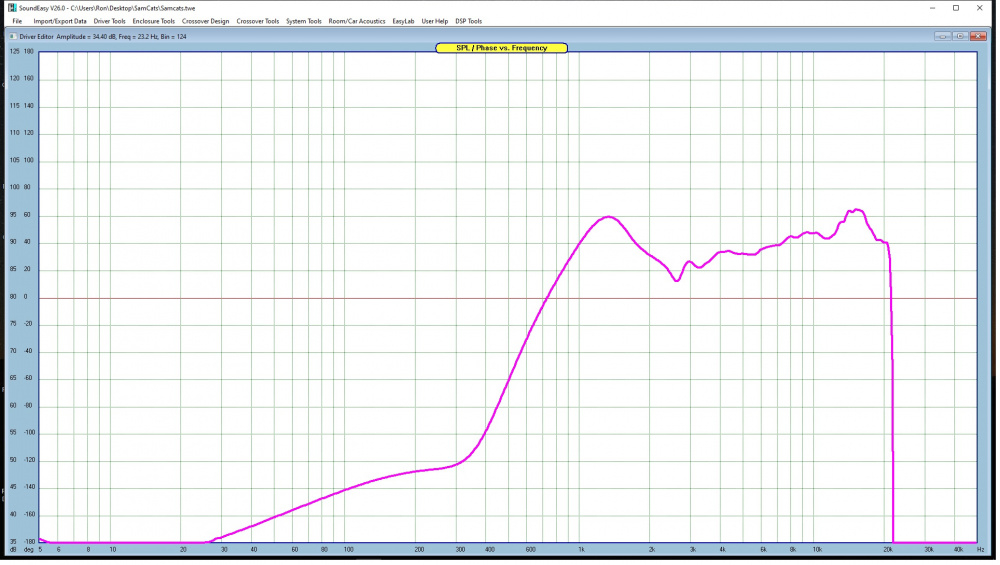
Between an out of town wedding and an out of town guest I've been able to design the crossover and buy the parts. I had to work around some back order issues to get the inductors I needed. I ended up with a 24db/oct crossover crossed at 2250Hz and 6Khz.
I took measurement of the bread boarded crossover today and it's not the flattest response I've ever come up with but it sounds pretty good. I'm looking forward to hearing a pair.
It's going to be plenty of work putting all the crossover parts together.
Ron
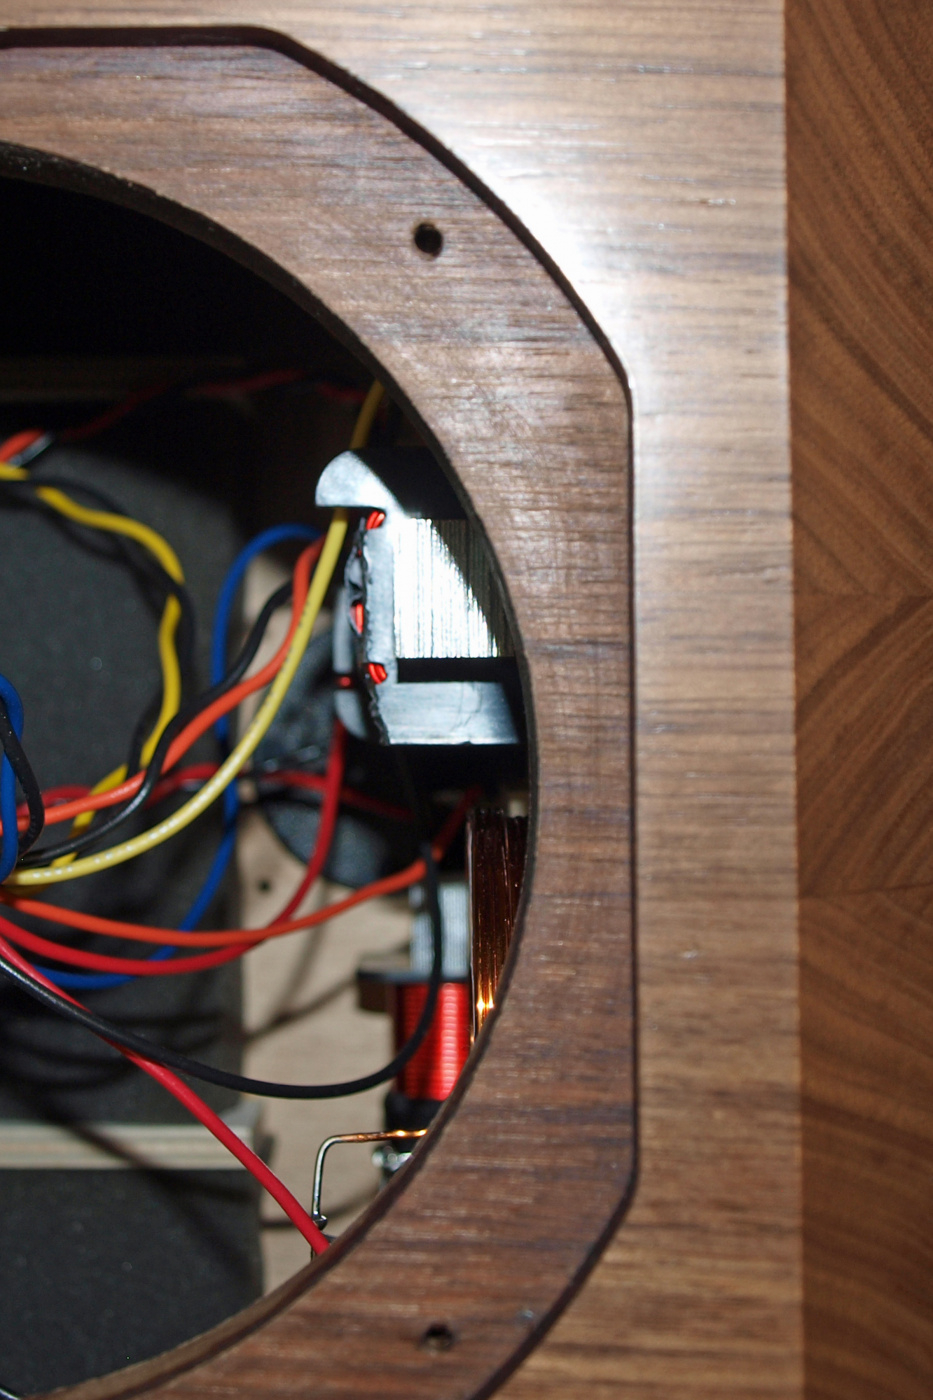
I got the crossovers together and after a little surgery on an iron core inductor got the board mounted and the drivers installed.
Crossovers
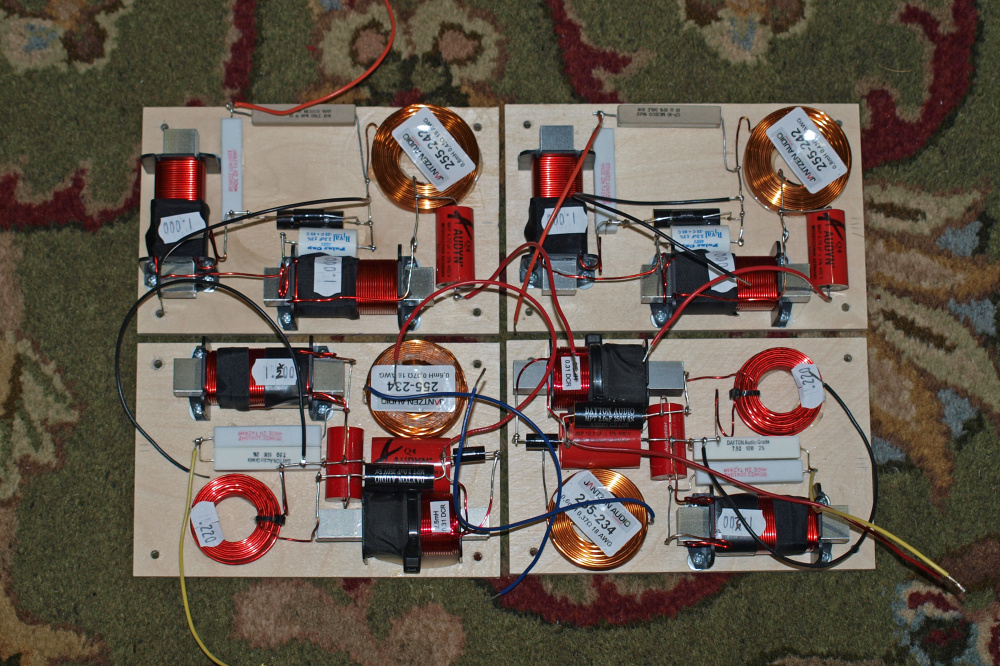
Modified inductor that was interfering with the woofer frame.
Right and left channel FR good down to 300Hz
Ron