Site Links
Howdy, Stranger!
It looks like you're new here. If you want to get involved, click one of these buttons!
Quick Links
Categories
In this Discussion
Who's Online (0)
Davids Kartunes InDIYana 2025 "Tweeterectomy" entry build.
Hello,
For this years InDIYana event I have decided to use the Kartesian Wib120_vHE 4.5" full range driver and a pair of Dayton Audio Epique E150HE-44 5.5" woofers.
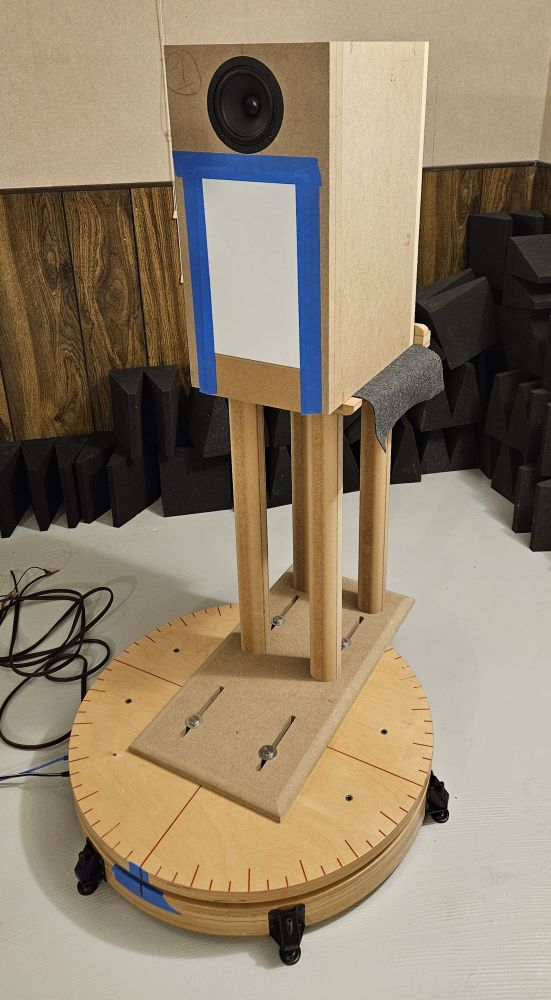
Wasn't sure what enclosure shape to use, so I made a prototype and tried various "foreheads" to see how that affected the full range responce.
Prototype baffle size is 10" wide by 20" tall.
(Not sure what happened to all my data, most of it seems to have disappeared, save for 8 slides)
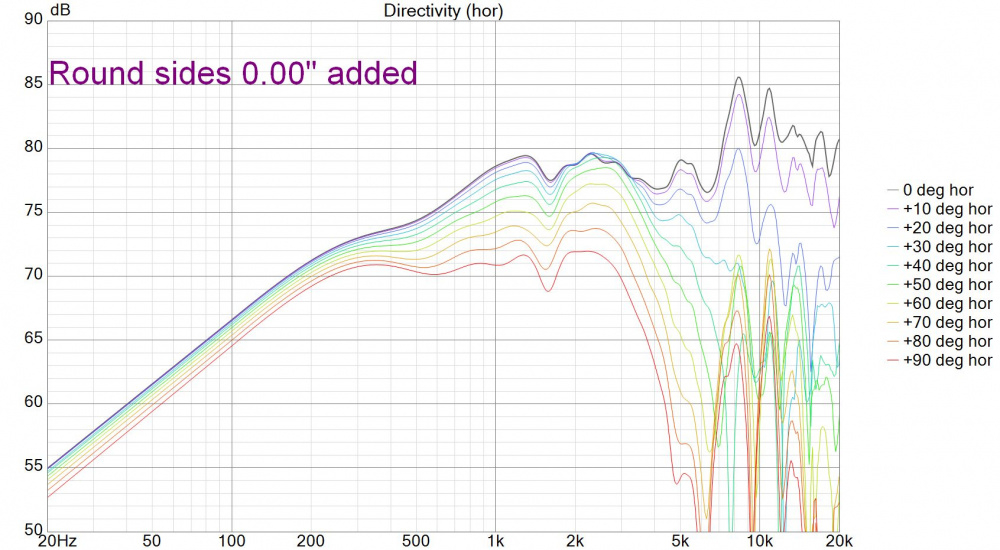
Test 1) Started with box with all square edges, made box top taller in 3/4" increments to a max of 4.5" taller above full range.
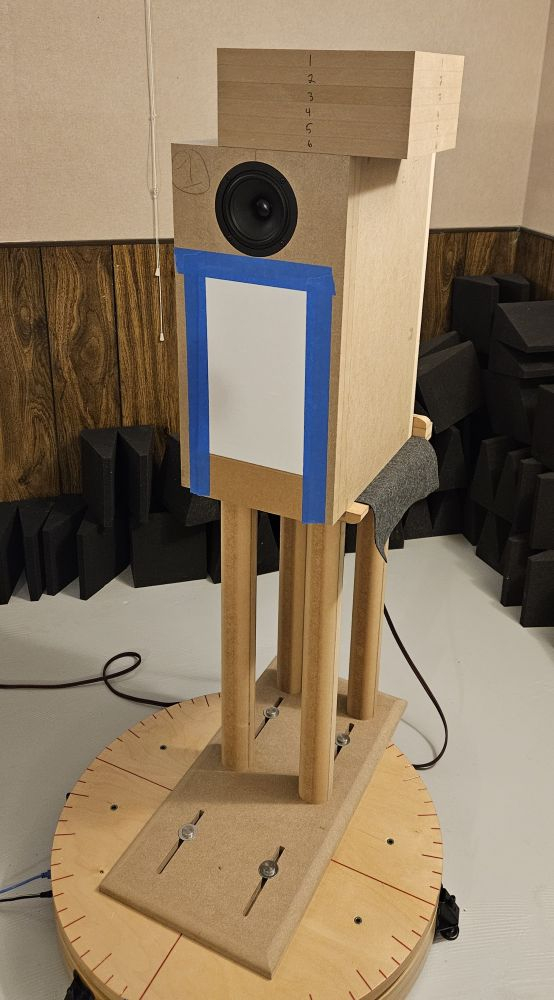


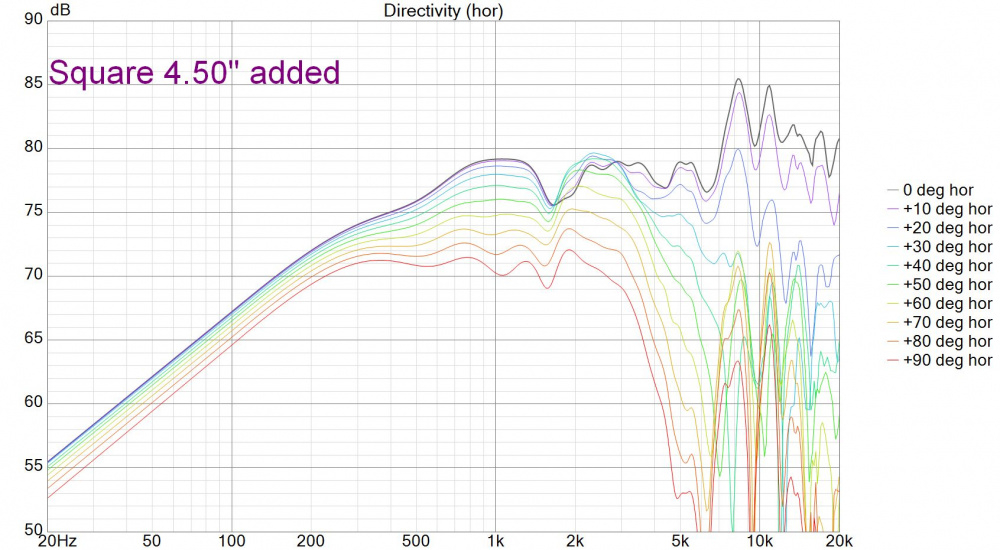
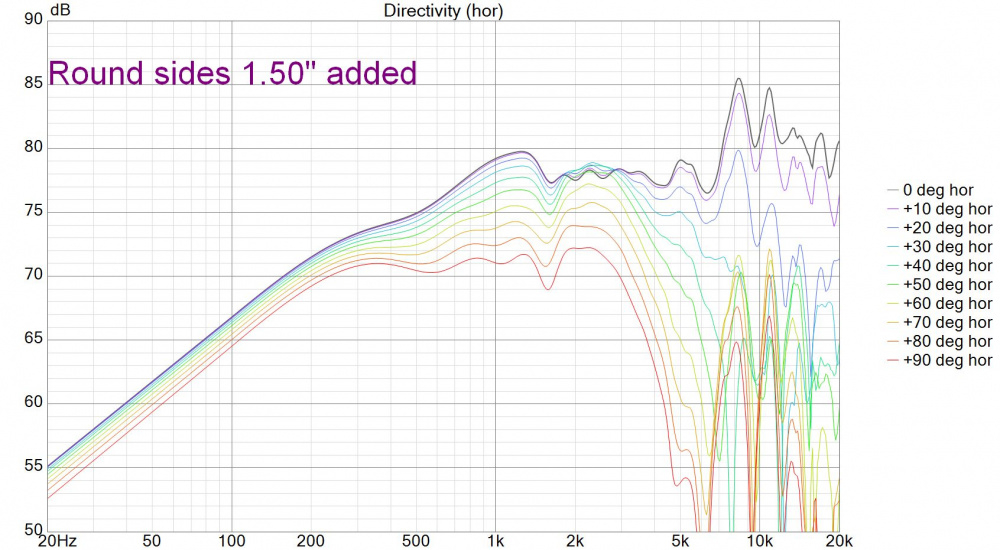
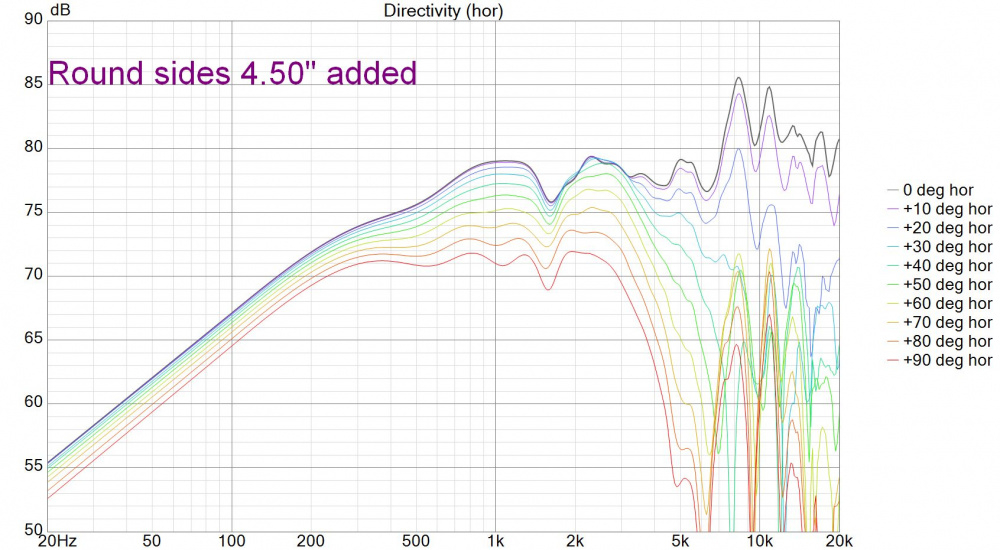
Test 2) Then added a 1.5" roundover to the sides of the box, again making taller in 3/4" increments to a max of 4.5" taller above full range.
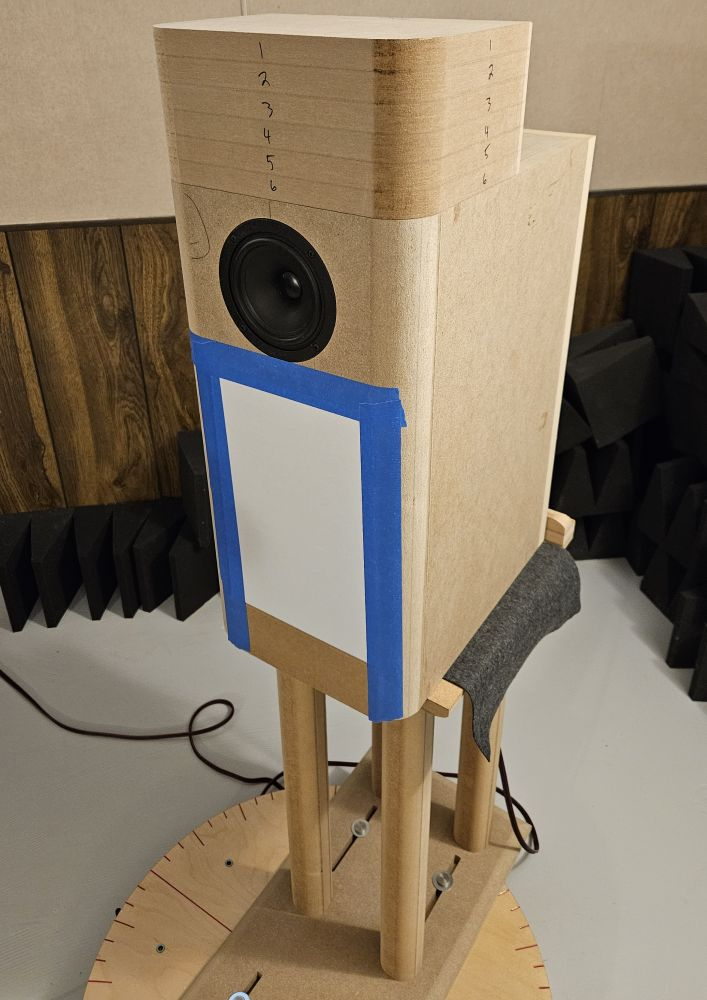
Test 3) Rinse and repeat, this time with a 1.5" round over on the top, going up by 3/4" at a time, until 4.5" taller above full range.
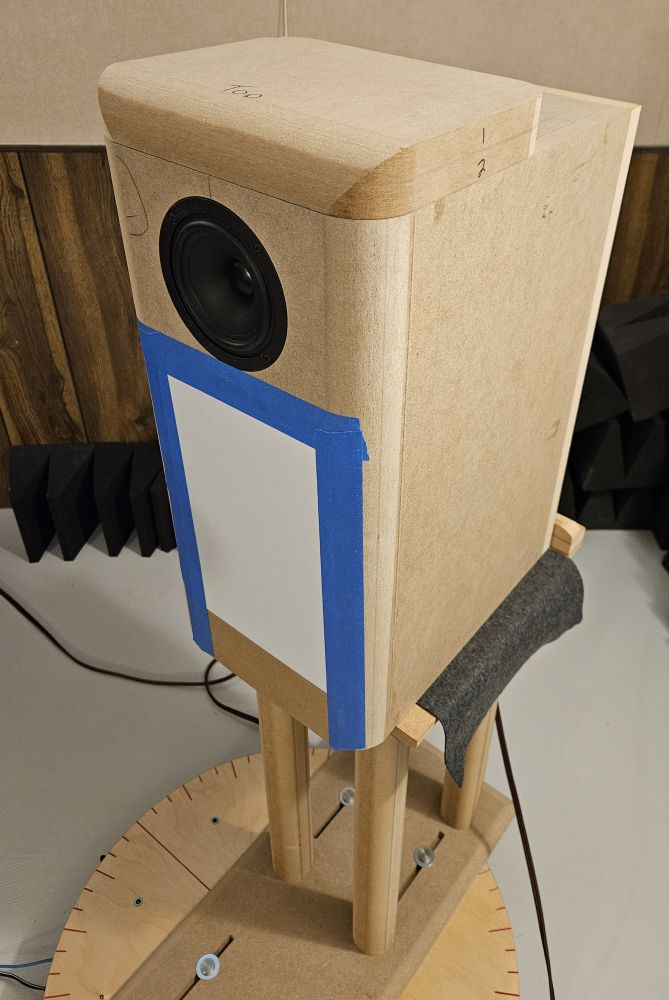
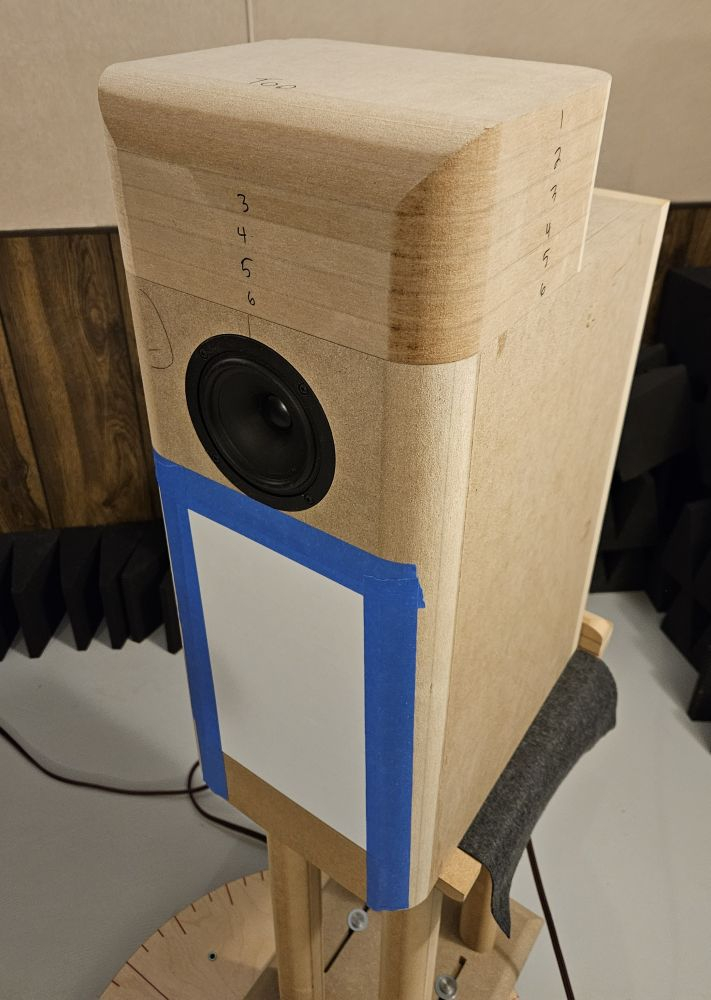
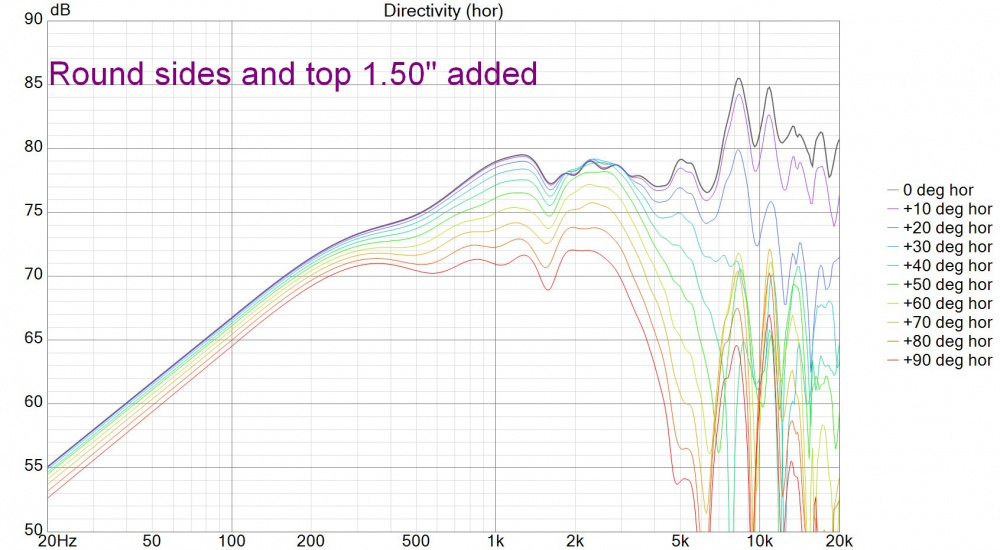
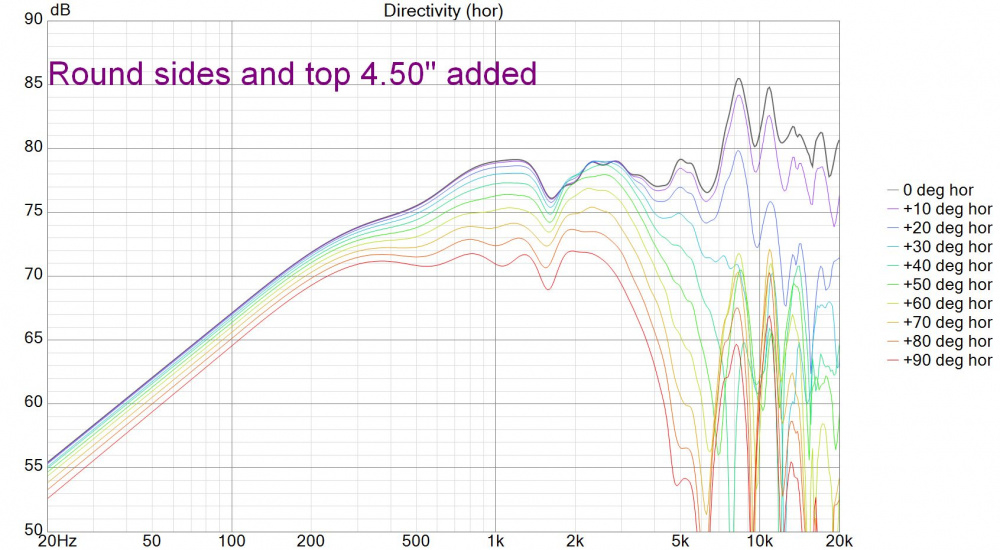
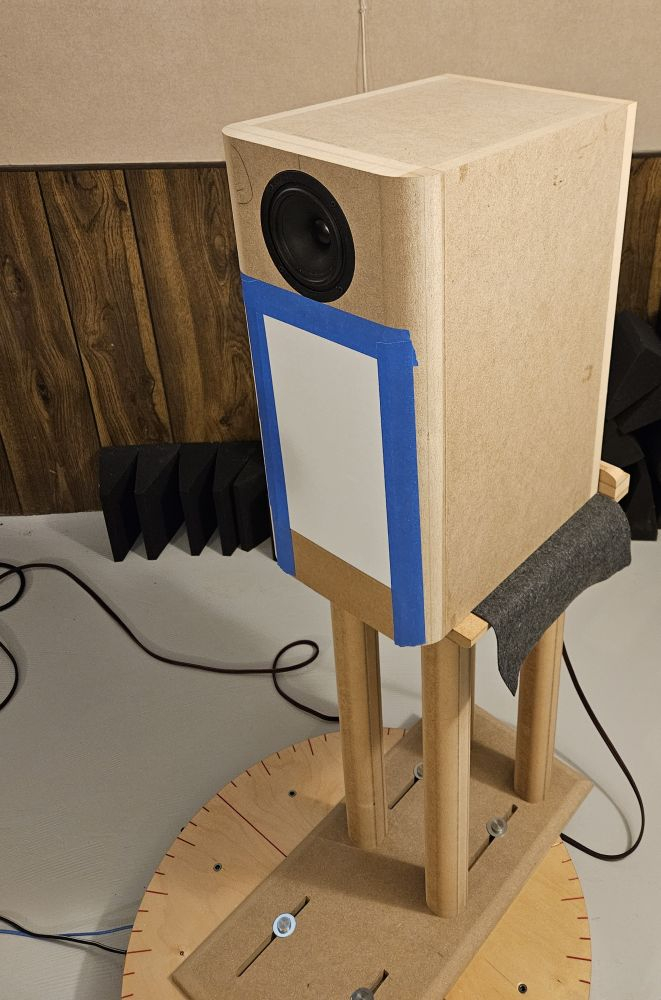
To my eyes, round sides with minimal square top seemed the best, plus it also works for the box size limit Ben has perscribed, so that's what I am going with.
Thanks for looking,
David.


Comments
Interesting set of measurements. Thanks for sharing. Moving the driver closer to the top seems to improve the diffraction signature, all else being equal. Did you try a 3/4" roundover on the top edge without using any of the six 3/4" extensions?
Unfortunately no, just square and 1.5" roundover.
Good stuff! On mine that is why I did an offset to my drivers with biggest roundover in the sides I dared. I figured if I wasn't going to do much about the factory response profile I would atleast do the best I could to no mess it up with the baffle.
I tend to do the same thing again and again when building,
So, standard 1:1 scale drawing on children's giant graph paper,
One of my best purchases, even though there are other options, and I barely scratch the surface of its functionality, an optimized cut list generated by "Cutlist Plus Fx",
All sheet parts cut to size with all the little 1/8" dados I use to line things up,
Walnut that will be the edge banding for the back of the box,
Milling the edge banding using the CMT ply edging set,
Milled walnut edging,
Milling groove in the back of the ply to accept the edging,
Gluing up the ply box,
Resawing walnut veneer for ply back,
Gluing up back veneer,
Gluing walnut edge banding on back,
Trimming off banding overhang,
Gluing in strips the support the back of the cabinet, they have a little 1/8"x1/8" tab that engages in a similar dado just inside the back inside edge of the cabinet,
Sanding veneer back of cabinet,
And now I have a box with a veneered back edge and a veneered back.
Still a long way from being an actual speaker cabinet.
Thanks for looking, David.
Wow - that's amazing work and an amazing shop!
. . . The beauty of stationary tools on mobile bases . . . = Productivity.
Continuing to work on the back of the speaker and some internals, here is the port and internal braces,
I had a prototype box with a 6" long 2" dia port that was too small diameter, so I scaled it up to 3" i.d.which is 225% bigger, and maths said it should now be ~14.5" long, so I will start with that length on this box.
If you have ever looked inside ABS couplings, there is a 45º bevel that would make for an irregularity on the wall if the mating pipe ended in a 90º, so I chamfered the end of the straight pipe to 45º degree as well so it slid in all the way for a smooth transition.
I am using a 3" long elbow for as smooth a bend as possible, but it really protrudes into the box and was going to run into the sealed chamber that has the full range driver. The solution to this was to "tilt" the port 15º so it bent back and away from the upper chamber. Sounded easy when I thought of it, turned out to be lots of work.
Make a 15º bevel block for the port to attach to,
If you figure out from ^this pic how I did it, it is not suggested practice on a table saw.
There was no real way to clamp the block in place, so I temporarily screwed it in place,
Turns out I would now need a 15º ramp jig to drill the back of the box to attach the port and then to flush trim the opening to the pipe. Bashed the jig together out of scrap material with a 23g pinner, 15.05º, close enough.
Pipe looked like it needed a little support,
Flush trimming the back of the box to the port,
I skipped over adding the threaded inserts to make the back removable,
Adding internal braces, the top one has been opened up more since this pic, front area at the top is for the sealed full range,
Next up, Baffle!
I'm Baffled!
My idea was to make a white poplar baffle.
A centre 2 x 3/4" ply panel with a 1/8" thick veneer made up of strips of quartersawn poplar flanked with solid blocks of 1-1/2" poplar so I could do a nice roundover on the baffle edge. Got so far as to actually make such a baffle, and noticed it had an over all lime tinge. I was expecting the green stripes, and I was fine with that, but my plan was for a vanilla baffle with mint stripes, not a lime sherbet baffle.
Plan B was to use up some bamboo panels I had leftover from a previous project, I thought that would match the walnut veneer better,
Once I cut into the bamboo, the inner core had LOTs of voids.
I gave a shot of filling them with black epoxy,
but realized that when I cut out for the drivers, I would have to deal with more void issues and the possibility of wrecking the face as I cut a driver hole into supported material. I gave up on this one too.
Plan C, I screwed up the original translam baffles I made for my Midwest Audio Fest entry last year, by making the tweeter through hole off centre with the rebated ledge. Caused me to have to remake them and I shelved the screwed up ones.
They were thicker than I needed for this project and the full range is a larger diameter than the tweeter I messed up with last year, so I decided to see if I could repurpose them.
Needed to glue in something I could make a new "centre" in to swing the router and also had some holes to fill in. Fitted a piece of MDF into the middle of the old tweeter opening and filled the holes with dowels and epoxy.
Could not run this through the planer, so loaded up 36 grit in the drum sander and took 1/4" off the face of the old baffle until the tweeter rebate was gone,
This shows how much smaller the new baffle is,
New larger full range opening totally works in this baffle!
I didn't want to do a translam baffle again this year, I didn't plan to do a translam baffle this year, but it looks like I am...
I didn't cut all the way through the baffle for the "cut out" with the spiral bit because the 1/4" bit I was using was not long enough, so I finished the cut with a jig saw, and flush cut what was left,
In the end, you can see how much was left from filling the original tweeter holes,
Test fitting the drivers,
I used a "Vix bit" to center the pilot drilling of all my driver mounting holes, and finished up on the drill press,
Undercutting the back of the baffle so the drivers can "breathe",
I used a combination of a rebating bit, a 30º and 45º chamfer bit,
Drill for some dowels for the baffle to the front of the box, Use a chunk of walnut I drilled on the drill press as a guide,
Did my usual lapping of the front edges of the baffle on the giant sanding block,
Ready for glue,
Titebond does not have a poly glue any more, so I thought I would try a new brand we carry at work, Akfix PS370,
Goes on clear rather than yellow,
Both boxes with baffles glued on in clamps overnight,
Flush trimming baffle to box,
Done for today,
Next up, Veneer sides, top/bottom!
Hope it is not too many pics.
Outstanding effort and skills, Sir!
(We can NEVER have too many pictures of this sort, btw . . .).
It's never too many pics!
Agreed! Looking good👍🏻
+1 on the pics, keep them coming! They tell a very detailed and interesting story of how you build speakers. Nice repurposing and repair of an old, unusable baffle board. Also, I like your idea of using a thick chunk of walnut as a hand held type "drill press" guide. Good way to keep the bit going straight!
Time to cover this naked box with some shop made veneer!
Start with a plank of walnut,
Dress a face/edge of the board and start resawing off slices,
Glue slices up,
And run through thickness sander,
Looking for about 3/32" dressed thickness.
Grab my torsion box setup, tape the veneer down (it swells a bit with the glue),
Apply a little glue,
Place speaker box on veneer, add platten to top of box and clamp with a few clamps,
Flush trim off the veneer on each side once glued on,
Along the way, I noticed there was a rather large air pocket/bubble under one side. To highlight it, I ran some coloured pencils over it and the sanded with a flat board to highlight the raised portion,
Decided to inject some glue under the veneer with some blunt #14 gauge needles.
Needles measured out to be 0.071", so I used a #50 drill bit which is 0.070" to drill some holes in the veneer and inject some glue,
Needed a couple of extra holes,
Clamped the bubble down,
Cleaned the area up with sandpaper, sprinkled some sawdust over the holes and added CA glue,
(repeated this a couple of times)
Cleaned up with a chisel plane, sanded, and now it can pass for some filled worm holes,
Both boxes all veneered,
Now time for a little roundover,
Made a few passes,
How they sit now, waiting for final sanding and finishing,
Next up, sanding and finishing.
You are seriously talented- amazing work.
Sanding, finishing and installing drivers, Not much to write, the pictures mostly speak for themselves,
Sanding,
Applying Osmo finish with white Scotchbrite pad,
Drilling into sealed chamber for full range,
A little lambs wool insulation at the back for damping, hot melt glue to seal the wire,
Installing woofers,
Me,
Using banana sockets rather than binding posts, always taking into account these have to travel 450km in the back of my car to InDIYana, and I worry about binding posts breaking off, they get hot melt glued in should they need repair rather than epoxy,
And Boxes are Done!
Next up, Measure and Design/Build a Crossover...
Outstanding, looking forward to seeing them in a few weeks.
Stunning! I have a new camera phone that wants to take multiple high rez shots of these next month (a Google Pixel 8 pro). It can shoot optical high rez 50MP with all three lenses.
So what's your plan for excursion control for the full range driver?
Since an electrical high pass is not allowed, I'm hoping the undersized sealed enclosure the full range is in will accomplish that.
There are designs out there with this full range driver as a pure full range, no xo, so I'm hoping it is robust enough for whatever is thrown at it in Ft. Wayne.
Plus, every other entry will be up against the same problem, so we will see how it goes.")
I took the route of small enclosure to control Xmax, it took a surprisingly small enclosure to actually help, but I'm also using a 3" FR.
I expect the worst will be thrown at them.
It won't be too bad, guys.
What, no Techmaster PEB? No Bass 305? 😛
>
No 1812 Overture or opening to Phantom of the Opera then?")
No Jurassic Lunch? 😁
InDIYana Event Website
Won't be a walk in the park, either.
Thanks again for making the theme cut, JR! You typically peg the possible issues with just the right tracks.
InDIYana Event Website
Finished up today with loads of time to spare, Since last update,
Did some measuring,
Testing,
More testing,
Layout for XO,
Build XO,
Hate XO and change it,
Final testing,
This is the XO,
Love the Dewalt bendy right angle drilly thing,
CA glue on standoffs for the XO,
Dewalt right angle drilly thing can also screw,
Wrapping up the wiring,
First listen to a Stereo Pair today!
Some more random final pics including the panel banana jacks,
See you all tomorrow!
David.
Indy Friday lunch:
Sorry David, I posted this in the wrong thread!