Please review the site Rules, Terms of Service, and Privacy Policy at your convenience. Rules, TOS, Privacy
Get familiar with the reaction system: Introducing the Reaction System

New DIY woofer with DIY titanium VC

edited January 2020 in DIY
Project name: Domin8 TiCu

Since I no longer am in as much of a rush to complete my InDIYana project since I can’t make it, I decided to shift gears a little and put together a new woofer (which I now plan to use for said project and keep the peerless quad together).

One of my hang ups in making more of a woofer than a sub is the voice coils available to the average joe. The easily available ones are typically sub coils, which means long wind lengths and/or four plus layers. This is all fine and dandy for some circumstances, but can make for low sensitivity, high qes/qts, and high inductance.

Some normal coils are available, but not typically what I’m looking for and may need to come from China. China isn’t a big deal but I hate the unknown and long shipping times for a product of unknown quality. I looked into having them wound at a place like Precision Econowind, but the MOQ is prohibitive.

I turned to the encyclopedia that has taught me so many skills - YouTube, and started considering DIYing a coil.

Ebay had the titanium, since thats what the cool kids are into, and the magnet wire. 

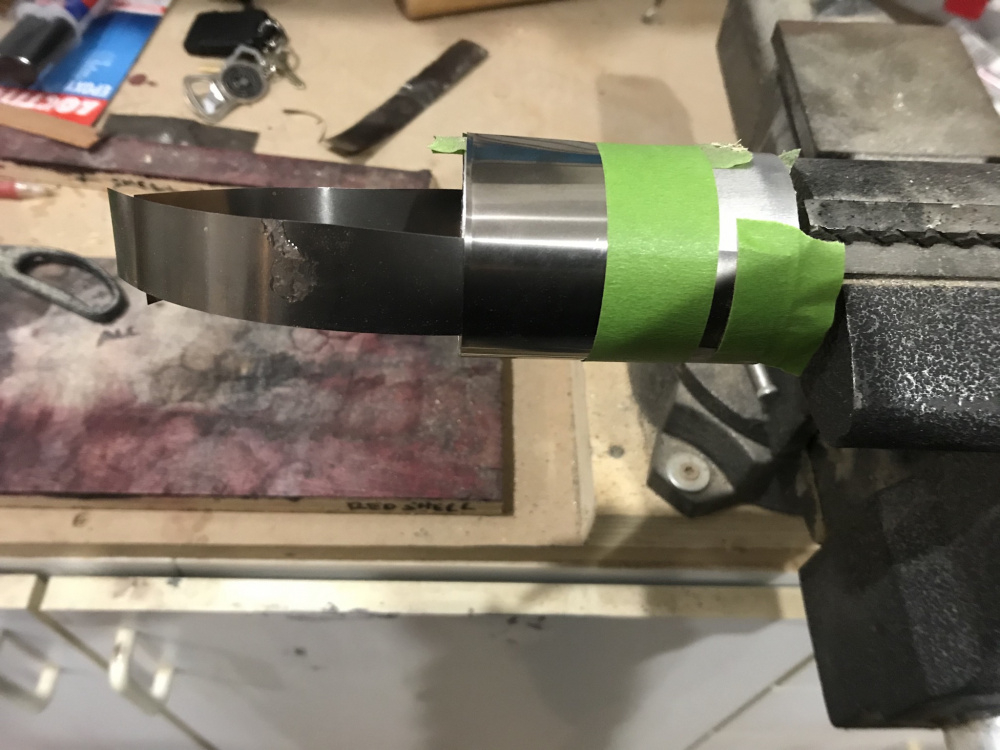
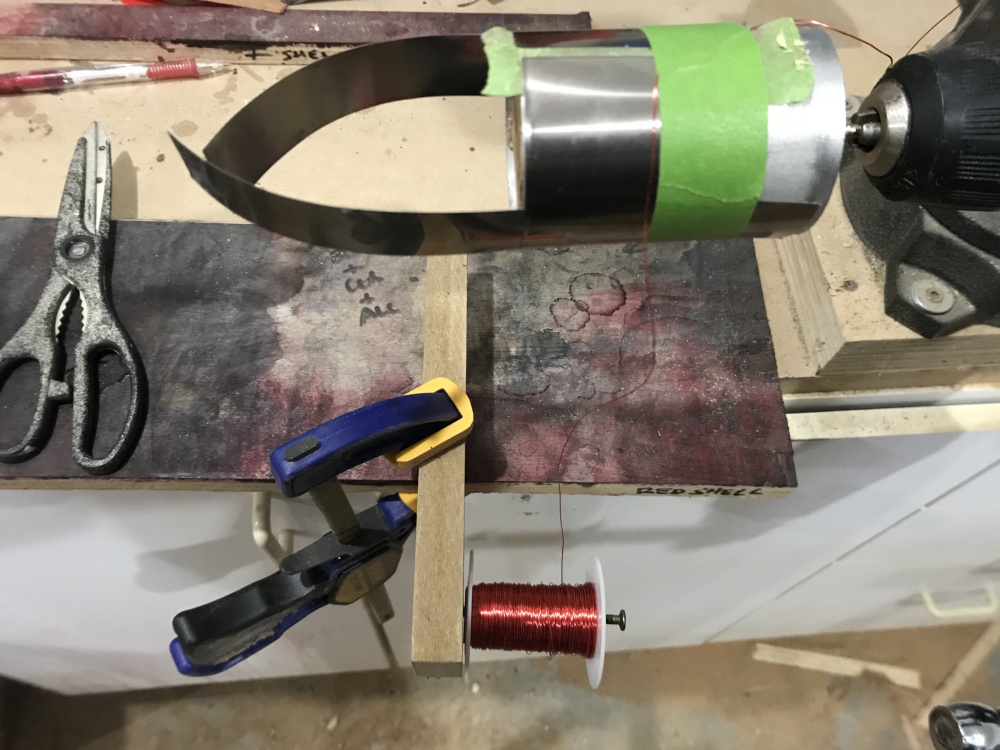
I made a “winding machine” from a piece of aluminum tubing, drill, some scrap wood, and misc fasteners. Worked out ok. 


6thplanetNicholas_234thtry

Comments

  • I used standard temp wire since it isn’t a sub and the motor and frame I’m using is substantially vented (gap, pole, and under spider).

    I went with a 28mm wind length, which gives me 9mm of overhang. This is still a bit much, I was shooting for 6, but miscalculated a bit on the wire DCR, and the 22mm wind was too low. I made two practice coils first to dial in the length and get the hang of it. It is a two layer coil. I used regular 5 minute epoxy to adhere the wire. 


    4thtry
  • Finished coil:


    The collar is simply copy paper adhered and reinforced with the same adhesive I use to assemble the driver. If this were a high power application I’d choose a material with a higher ignition point, but this is nice and light, and the wire insulation will fail at 311 degF, long before the paper.

    4thtry
  • I used the same motor as I used for my Annihil8 project. It’s nice because it’s relatively cheap and is an exact fit for these frames.

    Downside is it is unnecessarily large and has a massive gap. This is nice if you want to shove an 8-layer coil in there or need a ton of slop room, but when you don’t the qes suffers.

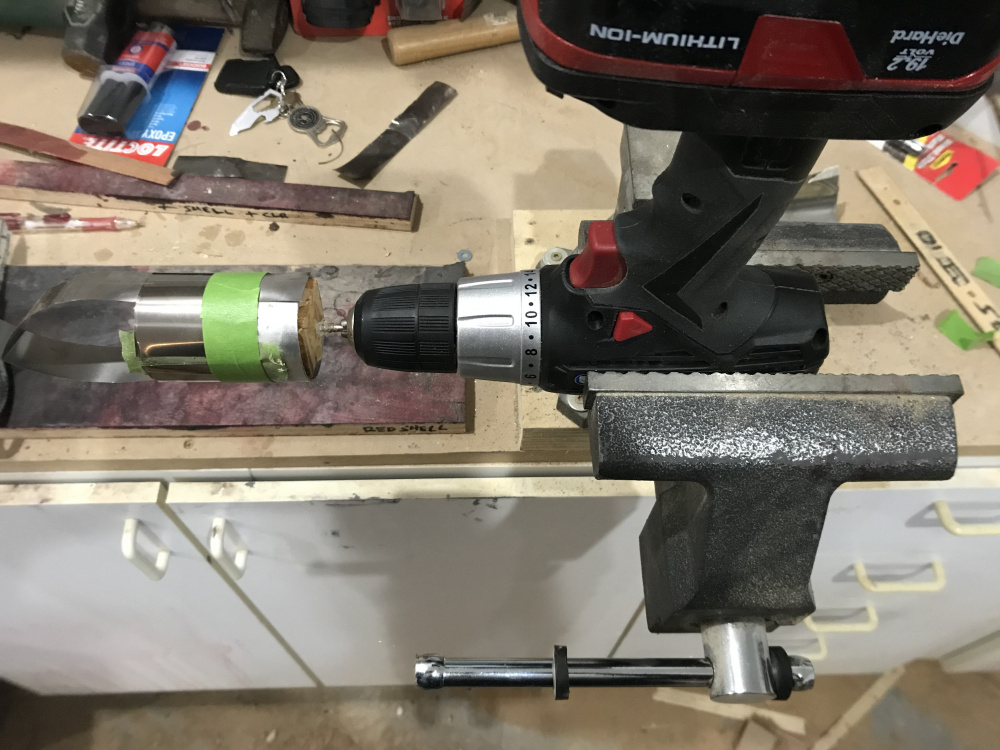
    I did use it to my advantage to hammer in a copper sleeve. The pole is too big to allow it between it and the coil, and can’t be turned down on the preassembled motor. I found that if I get a 2” copper pipe coupling sleeve and take it down some in a drill press with some emery cloth I can press fit it to shroud the coil.

    Im sure it is not nearly as effective as if I could get it between the pole and coil, but does provide a place for some stray currents to short and also provides some heat sinking.


    6thplanet4thtry
  • Some assembly photos:


    hifiside6thplanetjhollanderNicholas_23S79104thtry
  • Making a little handle from tape makes dust cap installation much easier.


  • Finished product:


    hifiside6thplanetNicholas_234thtry

  • Mic at 12"
    kenrhodestajanesjhollanderNicholas_23dcibel4thtry
  • Christ almighty, that's sweet! Thanks for the build pics. Still can't believe  that you wound that coil without any gaps or (what's the other problem) winding over the previous length (words are not coming as they should, LOL). Awesome.
    But Chahly - Stahkist don't want speakers that look good, Stahkist wants speakers that sound good!
  • Looks great! What was the finished coil weight? The Le looks pretty good for those motors.
  • No doubt, that's fucking awesome!!!
  • Maybe the coolest thing in audio I've seen.  Nice job.
  • Very neat ! +1 on the Ace of spades for the VC spacer lol  B) Lemmy would approve 
  • "and don't forget the joker!"
  • "Here's a quarter.  Go downtown and buy a rat to gnaw that thing off your face" (Uncle Buck).
  • Hey thanks guys!

    I didn’t weigh the coil. It’s not super light with the copper wire but doesn’t seem bad. I’ll try to remember to weigh the other one when I make it.
  • edited February 2020
    rjj45 said:
    Christ almighty, that's sweet! Thanks for the build pics. Still can't believe  that you wound that coil without any gaps or (what's the other problem) winding over the previous length (words are not coming as they should, LOL). Awesome.
    Thanks! I messed up both of the first coils by rushing them and not letting the epoxy dry enough on the first layer. When I would wind the second layer it had a tendency to push the winds of the first layer apart and squeeze between them.

  • edited February 2020
    The cost of an individual coil is actually really cheap. Obviously a spool of wire, roll of titanium, and tube of epoxy all cost more for the whole thing, but the material used from them to make a single coil probably doesn’t exceed $3.

    I would estimate whole driver cost at around $85, with the bulk of it being the motor at $37
  • Low-HD goodness from the Ti former application! Thumbs up!
  • Thanks Ben. I was surprised how cheap the titanium was being that only premium level (priced) drivers use it in their formers.. 
  • Rare is a tweeter that uses it for < a Benjamin....
  • hifiside said:
    Looks great! What was the finished coil weight? The Le looks pretty good for those motors.
    27.5g for the coil, which is ironically within tenths of a gram of the cone/surround weight.
  • I figured mid 20’s since the mms was 50g the cones look similar to some I have and there 26g. Very cool.
     Thanks!
Sign In or Register to comment.