Site Links
Howdy, Stranger!
It looks like you're new here. If you want to get involved, click one of these buttons!
Quick Links
Categories
In this Discussion
Who's Online (0)
flush mount options for non-round drivers

After botching a couple of ¾ inch Baltic ply baffles attempting to rout them for surface mounting a Beyma 5in coaxial (non-round, see attached pic) I’m thinking about top mounting and placing ¼ in felt on the baffle to line up flush with the driver. Has to be better than just top mounting and somewhat in par with flush mounting for this driver? Note, this coax’s tweeter is an actual horn (which protrudes slightly out from the mid), so its promulgation is different, I believe, from that of a non-waveguide tweeter on a baffle.
Thoughts? Other than buying a CNC machine (which would no doubt be great). Maybe just rout it round and carefully hand cut out the wings?
Comments
Javad has a two part method to precisely rebate odd shaped driver flanges. I'll see if I can find a link to his tutorial and report back.
Found it. See page 2 of Javad's Pretty Persuasions thread as follows:
https://techtalk.parts-express.com/forum/tech-talk-forum/1357891-pretty-persuasions-indiy-coax-build-thread
thx.
Javad has the skills (and the balls) to cut into a finished box...
Another method is the craftsman bushing set. With it, I can make recess templates for very small, odd shaped drivers. The fit, however, is only as good as my ability to carefully follow the traced line with my band saw.
http://www.searshometownstores.com/Craftsman-64180-12-pc-Router-Bushing-Centering-Cone-Set
First, I trace the driver flange onto a piece of 1/4" thick masonite and then cut it out on my band saw using a 1/8" wide scrolling blade. Notice that I trace the line by running the pencil inside a small, #6 washer. This gives me the necessary offset to match the particular bushing and bit used:
It's not that bad, give it a. Shot. If you happen to mess it up, fill it back in and try again.
A CNC machine will only be as good as your CAD files, and complex shapes are not super-easy to generate. In Bill's example, there are a lot of places to go wrong when creating that drawing. Note: manufacturer CAD drawings are not always very accurate so you have to learn how to measure these types of drivers.
For some of them, they are cheap enough you can buy a third driver and sacrifice it to build a template. Surface mount the driver in a large panel and run the router around the edge of the driver. Center the resulting template over your baffle and run the router around the inside of it. So I have seen it done. That very well could be the method Javad uses, and is essentially Bill's method with the removal of the bandsaw process. In the past, I flush mounted the square framed MCM 5-1/4" Barbie Girl woofers by cutting a straight-up 6-1/4" rebate and backfilling with Bondo. Worked really well, especially since I had a driver that had been damaged during shipping so I removed the soft parts and used the bare frame for that purpose. You can use the regular driver, just have to take extra care to protect it using tape and plastic bags of some kind.
There is probably some bushing needed on the template method.
Do you have a 3d printer?
I may give the Javad approach a go, but the rout for the full outside diameter and backfill could be done and cover with a thin piece of felt…
(no on the 3d printer)
Javad made a video of the method here: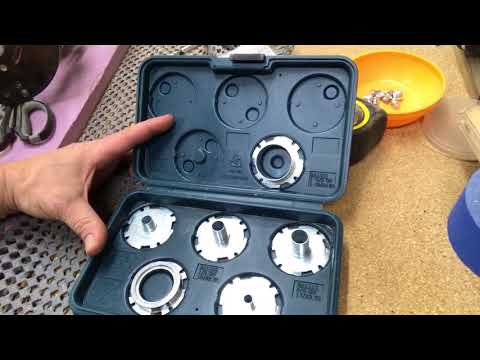
Here is a reddit Tutorial: https://www.reddit.com/r/diyaudio/comments/4ysmms/tutorial_how_to_flushmount_irregular_shaped/
I have the same Craftsman bushing set as 4thtry, and I don't like that the collars are different lengths. If you want to use a wide bushing, you also need a real thick template, it just doesn't make sense to me.
This doesn't apply to the drivers in the OP, but for "truncated" frames where the shape is a circle and some straight lines, I have just traced the driver shape onto the board, then use a circle jig for the circular parts, and then use a straight edge for the straight parts. Clean up the corners with a chisel. It worked well enough for me without all the waste material of a template.
This is the method I've used.
Why does everyone seem to cut from the top with the entire width of the router base as waste material? I guess not everyone has a router table, but I would think to trace the driver, rough cut the shape with a jigsaw, then flip over and use a flush trim bit on a router table. You should now have a flat wood slug in the shape of your driver that you can use with your bushings to create a template that is about 1ft less wood waste.
Thanks for the tip. I'd like to give this a try on my next build. I have a router table, but I am having trouble understanding the procedure. I understand the rough cut with jigsaw and then flipping over and using a flush trim bit on a router table to create the flat wood slug in the shape of my driver. So far, so good. But here is where I get into trouble. Using the Craftsman bushing set, if I use the 7/16" bushing with a 1/4" bit to create the template, this creates a minimum offset of 0.46875 inches. In other words, the template is 0.46875" inches oversized compared to the driver flange. Javad's high waste system creates a 1/4" oversizing of the template, which allows him to use a 3/4" bushing and a 1/4" bit, which matches the offset. But if my offset is 0.46875 inches, then I need a much bigger bushing diameter to match the offset. The largest bushing in the Craftsman set is 3/4" So, I think I would need to find a .968 diameter bushing to get this to work. Or am I missing something?
Oh, wait. Egg on face. I think I found my mistake. To create the template, I would screw the slug matching the flange to the template board and then use a 1/4" flush trim bit to create the template. Then the offset would be 1/4". The 3/4" bushing and a straight 1/4" bit could be used to create a perfect match to the flange. Sorry for the brain fart.
I didn't go through your numbers above but yes, something like this would be my idea. The "slug" is the same shape/size as the driver, but flat so you can place the router on top. I don't have a flush trim with a top bearing, so I would use a pair of bushings of the correct offset to get where you need to be on the 3rd cut.
1st shape cutout is simply outline of the driver.
2nd shape cutout is with bushing, driver shape + offset, similar to what the above instructions are doing, but the offset here is just the bushing offset, not the entire router base, so much less waste. Wood is expensive these days...
3rd shape is your driver cutout with the correct bushing size to make it work.
Also I find the flushing template ends up a little tight, so I wrap a layer or two of masking tape to the diameter of the driver before making the first template.
FWIW I'll be doing this exact process fairly soon for some elliptical waveguides. I am just in the process of rebuilding my router table base, it got some snow on it over the winter and is no longer flat, so I'm cutting a new top board. Will probably have to get out the bushings and cut a template for the router base insert as well..its just a square hole so I might be able to get away with just a straight edge for that though.
Pics!, please?
I'll be starting an odd shaped flange build fairly soon as well. I'm using a Bosch 1617 router mounted in their RA1181 table. If I can get this to work, I'll post some pics showing each step in the process. All I have right now is a mental picture of how I "think" it is going to work. I always knew that there had to be a better way to do this, thanks to dcibel for pointing the way.")
Math exam time. I may not have a bushing big enough to follow my plan above without making another step of cutout.
The biggest bushing I have is 51/64" and the smallest is 5/16". If I think about cutting the driver cutout using 51/64" bushing and 1/4" bit, the offset required is 35/128"...er slightly less than 5/16".
But...here's why I hate figuring out these bushings, because a 5/16" bushing doesn't make a cut with 5/16" offset. The bushing is 5/16" diameter, so with a 1/4" bit it cuts an offset of ((5/16 - 1/4) / 2) + 1/4 = 9/32.
Anyway:
35/128 = 0.2734375
9/32 = 0.28125
Remainder = 1/128" which if I've done this right is an excess gap in the cut, not an undercut that needs to be opened up. Should be fine...have to think this oddly specific size of 51/64" in my kit is for a reason...
If only it were that easy")
A bushing of 7/16" diameter with 1/4" bit makes for an offset of 0.34375" or 11/32". It's half of the difference between 7/16" and 1/4" plus the 1/4" bit.
This confusing drawing shows the outside cut at 5/16" bushing to create the template, inside cut at 51/64" bushing for the driver cutout, and excess gap left over for driver wiggle room.
.... and now I feel like even more a failure at basic shop math!
OK, I forgot to reduce my calculation by half of the 1/4" bit, so the offset using the 7/16" bushing is 0.34375 and not 0.46875, as you indicated.
Regarding the 5/16" bushing, your offset calculations are correct. However, when using this bushing, you also need to consider the proximity of the 1/4" bit to the inside surface of the 5/16" bushing. The collar of the 5/16" bushing has a thickness of 0.025" (using my classic dial calipers) and an inside diameter of 0.259 inches. You can slide a 1/4" router bit into the 5/16" bushing collar, but it is a very close tolerance. My guess is that the bit would be immediately destroyed when you turn on the router. The collar of the 3/8" bushing has a thickness of 0.04" and an inside diameter of 0.290 inches. Again, this might be too close to a 1/4" diameter bit, because the bit will wobble slightly as you are making the cut.
a small chisel, a sharp scoring knife and a dremel for the 'screw wings' section of the driver (after round routing) is moving up the chain of options...
Sorry for hijacking your thread with all the calculation confusion. Going back to your felt idea, perhaps you could simply cover the entire baffle surface with 1/4" felt and then surface mount the drivers onto the felt. The felt would also serve as the driver gasket. When you tighen the driver screws, the felt would be compressed under the flange and this would automatically flush mount the drivers to the plane of the felt.
EDIT: Cut simple driver holes, then glue felt onto baffle, then mount drivers on top of the felt.
Yes, clearance is small, but I'm not sure it'll be immediately destroyed. Alternative is to use an 1/8" router bit for the template cutout, otherwise I'd need a bushing larger than 51/64" for the inside cut.
I actually really appreciate these calculations, drawings and links- thx.
I've ordered a bushing set and as previously mentioned, I do now have a couple of junk baffles that I can practice on the back side.
I have used this method several times for non-circular drivers. Of course, sometimes more successfully than others...
Now I think I see how it can be simplified...
Instead of felt, you could cut the driver openings a little loose and cover the baffles in leather, in order to hide any imperfections.