I think the wood would have lots of character even without the marks. Older growth like that often has much tighter grain than the faster growing species used for commercial wood. Thus it usually looks much more unique than what we are used to seeing.
You might want to consider stabilizing the wood before you proceed. Without stabilizing the wood you might be fighting this warping every time the wood moves.
I would also consider a MDF template with a top bearing bit. That will be easier than routing from a center point.
I have already epoxied the backs, and will do the same to the front when I am done recutting the holes. That should be enough to stabilize the wood. I don't know what else I could do.
Those baffle boards look really cool! Could make a very nice looking project. Do yourself a solid and try veneering the boxes. Your previous painted projects don't deserve baffles like that.
Well, I epoxied the fronts a little bit ago. I could not risk them moving further. I will flatten the faces to the center thickness. Then just recut rebates and holes like the boards were newly cut from the joist.
I feel like this is another opportunity for saying that fixing mistakes well makes the wood worker worth it. It also should be said that safety is a must. Do not do what i did here as follows;
Since the 1/4" shank flush bearings normally use a 1/2" bearing diameter, this makes trying to flush trim in a half inch wide recess very problematic if not impossible. This was one thing I tried on one baffle and failed. I was thinking the bearing would ride on the wider areas deeper within and straighten out the warped hole for the woofer. When that failed, I got out a straight bit to widen the circular recess so that the flush trim could ride. Suffice to say, once I moved the router it grabbed the opposed face of the crevice and really chewed some wood where it shouldn't have. There is one small shallow blemish in the face where it hopped, but the resurface may remove most if not all of that, as well as it being located where one of the baffle mounts will be. The one outside adjacent edge got some rash too, but it will be chamfered and removed. The outer surface of the through hole took most of the carnage, but they (plural) will be under the woofer flange and not visible. I will have to fill a couple voids there for best use.
I should have told myself this was not a good idea and changed course of plan. I could have been hurt too, happily was not. I'm glad I had a firm grip on the palm router when it happened. This wood is so hard it does not just yield like MDF does under this kind of process. Sometimes hardwood just looks at the woodworker and shrugs.
I also want to say that this is one of the reasons I typically use a 0.75" bit for cutting rebates and holes. It allows a 1/2" bearing bit to be inserted from the rear of the baffle to remove the center of the hole. Because the bearing can glide and the flutes won't grab the opposing surfaces at the same time.
Maybe a long shot but if you think you might do this kind of thing alot. Could invest in a vacuum cylinder setup. Soak the wood in epoxy and put it under vacuum to draw the epoxy in all the pores. That should really put the brakes on movement and chipout.
Okay, here is an update....
Yesterday, I reflattened the backs as they warped another 1/16". No big deal.
Then I flattened the faces, which really took some elbow grease.
Then I rerouted the rebates, and finished the holes on one baffle. Turned out the mid rebate was just undersized, so I screwed the plug from that one to the uncut baffle center aligned at the center point. I used wood shims around the perimeter to keep it centered under routing, and enlarged the rebate. It's a hair large now, but room for finish application is present. I also enlarged the through hole a smidge with the rabbet bit set for 1/8". I still have to manage relieving the back sides, allowing for mid chambers, and the front bevels.
I don't know how it happened, but there is a slightly less than parallel difference from the front to the back, where the baffle slopes to one side, albeit surfaces are flat. Or at least were flat late last night when I finished. The good news is they are angled in a mirror image direction, a happy accident.
Another note, when I clamped one baffle down to route it, one of the epoxied cracks re-split a little below the woofer. I epoxied the backs again for sealing as well as the holes, so I'm hoping that is good enough. If anyone has any advice about this sort of thing, I'm listening. I wonder if the corrective waffle-staples are worth it in this type of case.
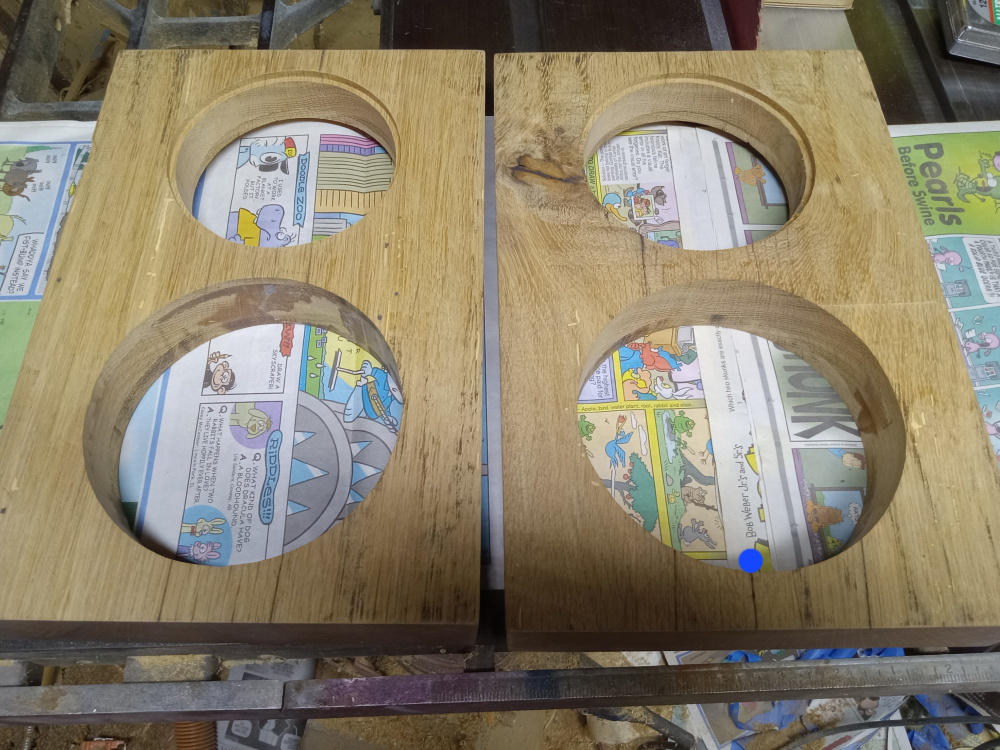
At present, before epoxy coat on backs:
I also have to say, I am sore today! This oak does not prefer to be machined like mdf. The trim router fought with it doing the remaining trim on the through holes. It was almost too hot to hold by the time I was done. Hands and arms were cramping by the time I finished, but I worked on them for about 10 hrs with breaks yesterday.
The blue dot (I believe) signifies the Crack which gave.
Little note-
To make the woofer mount atop the coaxial properly, I have to make the screw in the bottom mount of the coaxial very low profile. Using a flush-head screw is appropriate, and making the mounting hole internally beveled is required. The front ring is aluminum atop the fiberglass reinforced frame, but using a bit to bevel the hole was no challenge.
Just in case anyone is wondering, the nubs on the coax frame's face are for the machine screws that go through the frame from the rear to sandwich the surround between the plates. The nubs have an integrated threaded inside wall that the short screws are installed into. I'm sure there is adhesive too, but this has to speed up physical alignment procedures during manufacturing.
When I first saw the driver a while ago I was annoyed at the aesthetic choice of the nubs.. Then I noticed the frame seemed different material and the ring was aluminum. So eventually figured out it was built-in nuts for screws. Still think they could have come up with something nicer looking, but interesting if that is how it holds onto the surround.
I now have the baffle mounts bored, edge chamfers done, and 2 soaks of Danish oil on the baffles. The baffles due to warping earlier were allowed the resulting 5 to 10 degree angle, and an additional 22.5 degrees for edge treatment. Due to the initial movements, this made the baffles a hair shy of 8.5" wide, and also due to where the mounts have to go, I was not really able to add much more of an edge treatment. This chamfer transitions to the existing round over on the preexisting cabs, with a small gap to either internal mating surface. I plan on filling this with some dark felt or something similar for both looks and absorption.
I ended up going with 4" endcaps for chambers because they yield more net volume for the chamber. They were $16 each at HD!! I truncated the upper most point for clearance reasons on the chop saw.
I wiped off the excess a few minutes after the photos.
If I had a fireplace, I would be making a mantle from this stuff. Since I don't, I can't. However, I am willing to sell some of this stuff as I have quite a bit. There is a lot of pine siding and a good amount of floor joists. Shipping is of course out due to size and weight.
Yesterday, I relieved the woofer cutout with a 22.5 degree bit for better air flow. I also managed to cut the rebate for the midrange chamber cap, and then singly coat the newly exposed areas and the fronts with oil based polyurethane. I may go back and hit the exposures with epoxy too. I just had to seal them quickly before moisture entered and I was doing the fronts anyway.
I did a loose bolt-on today for both baffles, and everything fits as well as looks very good. No photos until cabs are painted. There is plenty of room internally for airflow around the chamber. I will likely relocate the multipurpose barrier strips to a different mounting to get them away from the brace's edge.
Since I am done with the baffles, the painting will commence on the cabs...
Comments
InDIYana Event Website
I think the wood would have lots of character even without the marks. Older growth like that often has much tighter grain than the faster growing species used for commercial wood. Thus it usually looks much more unique than what we are used to seeing.
It’s going to be a cool looking baffle.
Q: Is the balance of the box going to be black / or something to offset the baffle?
You might want to consider stabilizing the wood before you proceed. Without stabilizing the wood you might be fighting this warping every time the wood moves.
I would also consider a MDF template with a top bearing bit. That will be easier than routing from a center point.
I have already epoxied the backs, and will do the same to the front when I am done recutting the holes. That should be enough to stabilize the wood. I don't know what else I could do.
InDIYana Event Website
Those baffle boards look really cool! Could make a very nice looking project. Do yourself a solid and try veneering the boxes. Your previous painted projects don't deserve baffles like that.
They are made to fit my painted VersaBox, currently epoxied 2 coats.
InDIYana Event Website
Maybe I will just resurface the fronts too. Not happy with the through holes and the fallout.
InDIYana Event Website
Well, I epoxied the fronts a little bit ago. I could not risk them moving further. I will flatten the faces to the center thickness. Then just recut rebates and holes like the boards were newly cut from the joist.
I feel like this is another opportunity for saying that fixing mistakes well makes the wood worker worth it. It also should be said that safety is a must. Do not do what i did here as follows;
Since the 1/4" shank flush bearings normally use a 1/2" bearing diameter, this makes trying to flush trim in a half inch wide recess very problematic if not impossible. This was one thing I tried on one baffle and failed. I was thinking the bearing would ride on the wider areas deeper within and straighten out the warped hole for the woofer. When that failed, I got out a straight bit to widen the circular recess so that the flush trim could ride. Suffice to say, once I moved the router it grabbed the opposed face of the crevice and really chewed some wood where it shouldn't have. There is one small shallow blemish in the face where it hopped, but the resurface may remove most if not all of that, as well as it being located where one of the baffle mounts will be. The one outside adjacent edge got some rash too, but it will be chamfered and removed. The outer surface of the through hole took most of the carnage, but they (plural) will be under the woofer flange and not visible. I will have to fill a couple voids there for best use.
I should have told myself this was not a good idea and changed course of plan. I could have been hurt too, happily was not. I'm glad I had a firm grip on the palm router when it happened. This wood is so hard it does not just yield like MDF does under this kind of process. Sometimes hardwood just looks at the woodworker and shrugs.
I also want to say that this is one of the reasons I typically use a 0.75" bit for cutting rebates and holes. It allows a 1/2" bearing bit to be inserted from the rear of the baffle to remove the center of the hole. Because the bearing can glide and the flutes won't grab the opposing surfaces at the same time.
Learn from my errors.
InDIYana Event Website
Maybe a long shot but if you think you might do this kind of thing alot. Could invest in a vacuum cylinder setup. Soak the wood in epoxy and put it under vacuum to draw the epoxy in all the pores. That should really put the brakes on movement and chipout.
Wonder if you could do it on the cheap with an old pressure cooker and a pneumatic vac pump.
https://amazon.com/YaeTek-Pneumatic-4-2CFM-Operated-Conditioning/dp/B074DTG4N6/ref=sr_1_25?keywords=venturi+vacuum&qid=1685236189&sr=8-25
Good luck, Ben.
BTW, do you have a planer?
You could keep the arc and your current plan but flatten the back to keep the surface mounting plan . . .
I do not have a planer. That is why I used the bed flattener for the router.
The backs are still flat after the bed work. Next up, the fronts...
InDIYana Event Website
OK, gotcha.
You can't use a planar to flatten one side and leave the other with an arc.
You can - you just have to shim the arc.
Okay, here is an update....
Yesterday, I reflattened the backs as they warped another 1/16". No big deal.
Then I flattened the faces, which really took some elbow grease.
Then I rerouted the rebates, and finished the holes on one baffle. Turned out the mid rebate was just undersized, so I screwed the plug from that one to the uncut baffle center aligned at the center point. I used wood shims around the perimeter to keep it centered under routing, and enlarged the rebate. It's a hair large now, but room for finish application is present. I also enlarged the through hole a smidge with the rabbet bit set for 1/8". I still have to manage relieving the back sides, allowing for mid chambers, and the front bevels.
I don't know how it happened, but there is a slightly less than parallel difference from the front to the back, where the baffle slopes to one side, albeit surfaces are flat. Or at least were flat late last night when I finished. The good news is they are angled in a mirror image direction, a happy accident.
Another note, when I clamped one baffle down to route it, one of the epoxied cracks re-split a little below the woofer. I epoxied the backs again for sealing as well as the holes, so I'm hoping that is good enough. If anyone has any advice about this sort of thing, I'm listening. I wonder if the corrective waffle-staples are worth it in this type of case.
At present, before epoxy coat on backs:
I also have to say, I am sore today! This oak does not prefer to be machined like mdf. The trim router fought with it doing the remaining trim on the through holes. It was almost too hot to hold by the time I was done. Hands and arms were cramping by the time I finished, but I worked on them for about 10 hrs with breaks yesterday.
The blue dot (I believe) signifies the Crack which gave.
InDIYana Event Website
Aw yeah nice super dense old wood. I bet it will look gorgeous with some finish on it!
Remembered I had a hammer tacker! This should strengthen the problem areas.
And of course, the driver shot!
InDIYana Event Website
Looks good to me.
Little note-
To make the woofer mount atop the coaxial properly, I have to make the screw in the bottom mount of the coaxial very low profile. Using a flush-head screw is appropriate, and making the mounting hole internally beveled is required. The front ring is aluminum atop the fiberglass reinforced frame, but using a bit to bevel the hole was no challenge.
Just in case anyone is wondering, the nubs on the coax frame's face are for the machine screws that go through the frame from the rear to sandwich the surround between the plates. The nubs have an integrated threaded inside wall that the short screws are installed into. I'm sure there is adhesive too, but this has to speed up physical alignment procedures during manufacturing.
InDIYana Event Website
When I first saw the driver a while ago I was annoyed at the aesthetic choice of the nubs.. Then I noticed the frame seemed different material and the ring was aluminum. So eventually figured out it was built-in nuts for screws. Still think they could have come up with something nicer looking, but interesting if that is how it holds onto the surround.
^^^
This
An aluminum ring would have looked better but cost more in material and anodizing.
I now have the baffle mounts bored, edge chamfers done, and 2 soaks of Danish oil on the baffles. The baffles due to warping earlier were allowed the resulting 5 to 10 degree angle, and an additional 22.5 degrees for edge treatment. Due to the initial movements, this made the baffles a hair shy of 8.5" wide, and also due to where the mounts have to go, I was not really able to add much more of an edge treatment. This chamfer transitions to the existing round over on the preexisting cabs, with a small gap to either internal mating surface. I plan on filling this with some dark felt or something similar for both looks and absorption.
I ended up going with 4" endcaps for chambers because they yield more net volume for the chamber. They were $16 each at HD!! I truncated the upper most point for clearance reasons on the chop saw.
I wiped off the excess a few minutes after the photos.
InDIYana Event Website
that’s a great looking baffle
Definitely has some old time character and would look great on a fireplace mantle or in any rustic space.
If I had a fireplace, I would be making a mantle from this stuff. Since I don't, I can't. However, I am willing to sell some of this stuff as I have quite a bit. There is a lot of pine siding and a good amount of floor joists. Shipping is of course out due to size and weight.
InDIYana Event Website
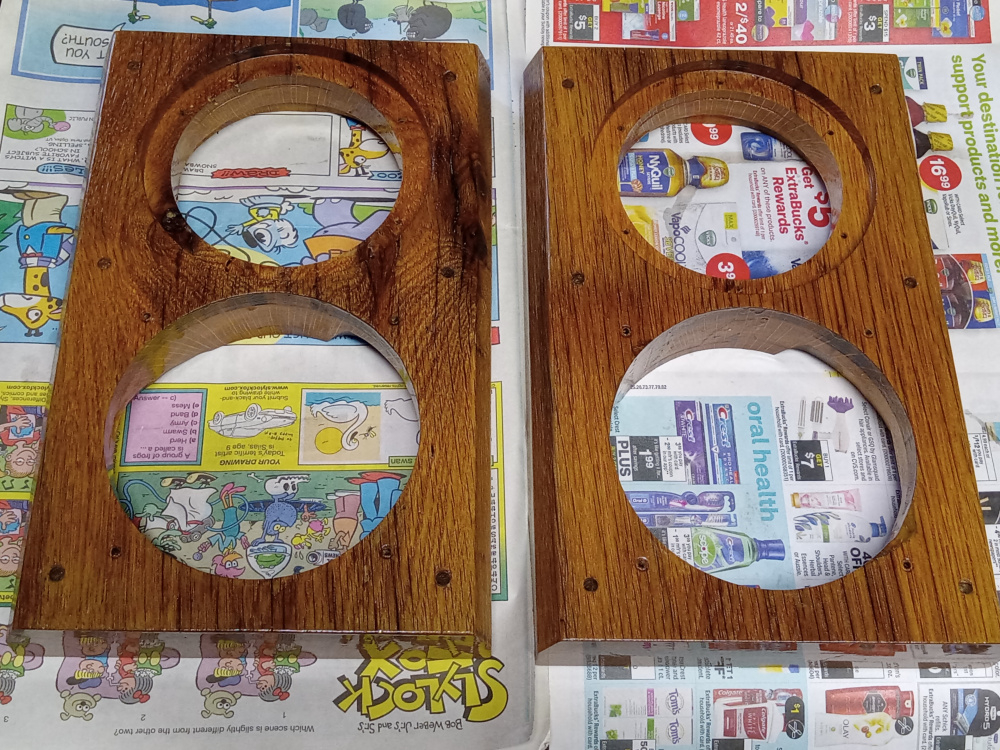
Yesterday, I relieved the woofer cutout with a 22.5 degree bit for better air flow. I also managed to cut the rebate for the midrange chamber cap, and then singly coat the newly exposed areas and the fronts with oil based polyurethane. I may go back and hit the exposures with epoxy too. I just had to seal them quickly before moisture entered and I was doing the fronts anyway.
InDIYana Event Website
I have now very lightly sanded the baffles to remove any raised roughness and slightly dull the sheen from the gloss poly.
InDIYana Event Website
I did a loose bolt-on today for both baffles, and everything fits as well as looks very good. No photos until cabs are painted. There is plenty of room internally for airflow around the chamber. I will likely relocate the multipurpose barrier strips to a different mounting to get them away from the brace's edge.
Since I am done with the baffles, the painting will commence on the cabs...
InDIYana Event Website