Site Links
Howdy, Stranger!
It looks like you're new here. If you want to get involved, click one of these buttons!
Quick Links
Categories
In this Discussion
Who's Online (0)
Rival R176-CP MTM MLTL

I've got a butt-load of Rival R176 drivers on my shelves, so finally time to clear some out.
After busting my chops on the last couple of builds with 3 ways, I know that I can knock out a MTM crossover pretty quickly.
Paul Kittinger was generous (again) and modeled a pair of R176 woofers in a MLTL alignment, and I recently added some
Wavecor TW030WA01 tweeters on sale at PE, so the plan came together.
Paul's model (although I got the same response on my own using Hornresp)
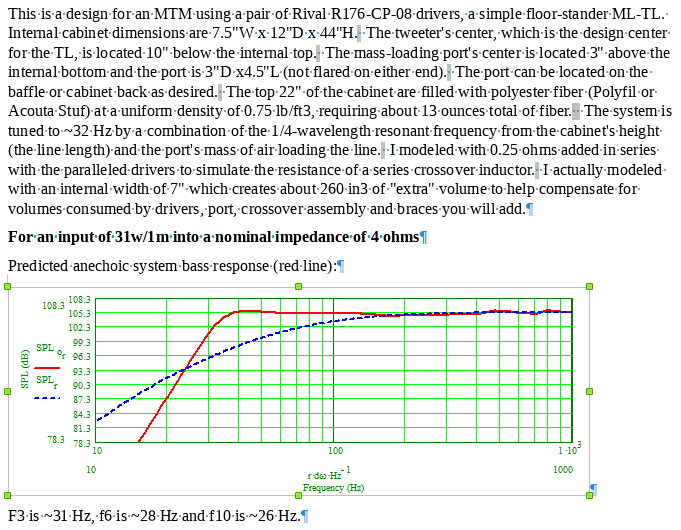
Great dynamic handling (crank it up, dude!), low distortion, and clarity are very important to me, and I have high expectations for these.
But Chahly - Stahkist don't want speakers that look good, Stahkist wants speakers that sound good!
Tagged:
Comments
After busting my chops to improve accuracy in my wood shop, I find that I can make a rectangular box that's square and (mostly) aligned. 18mm Baltic Birch as usual.
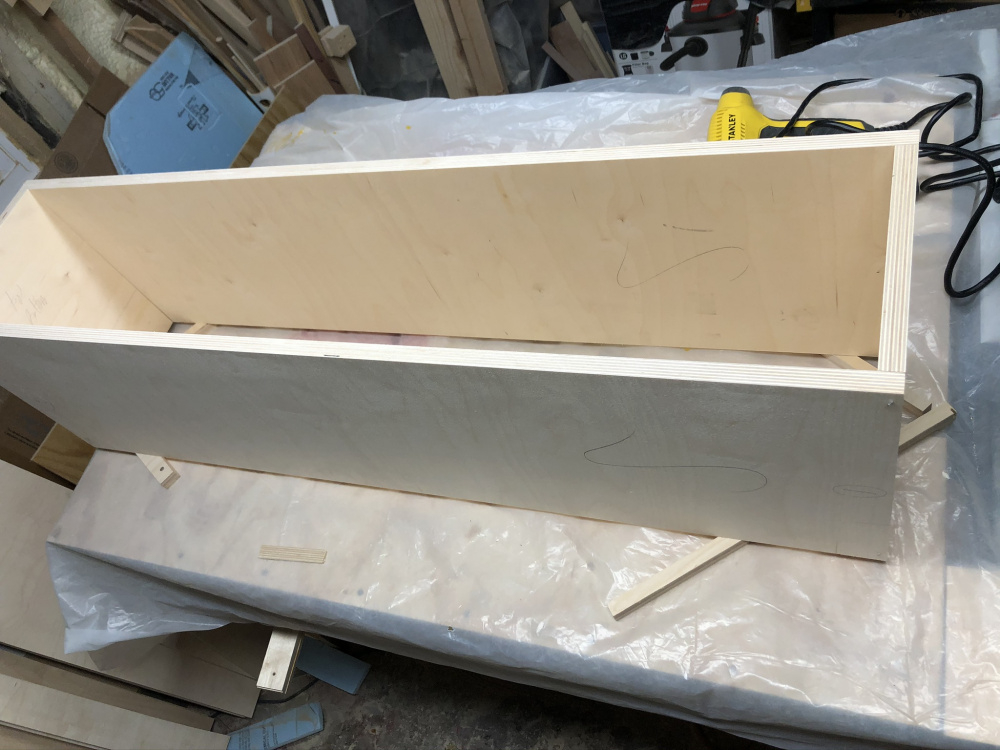
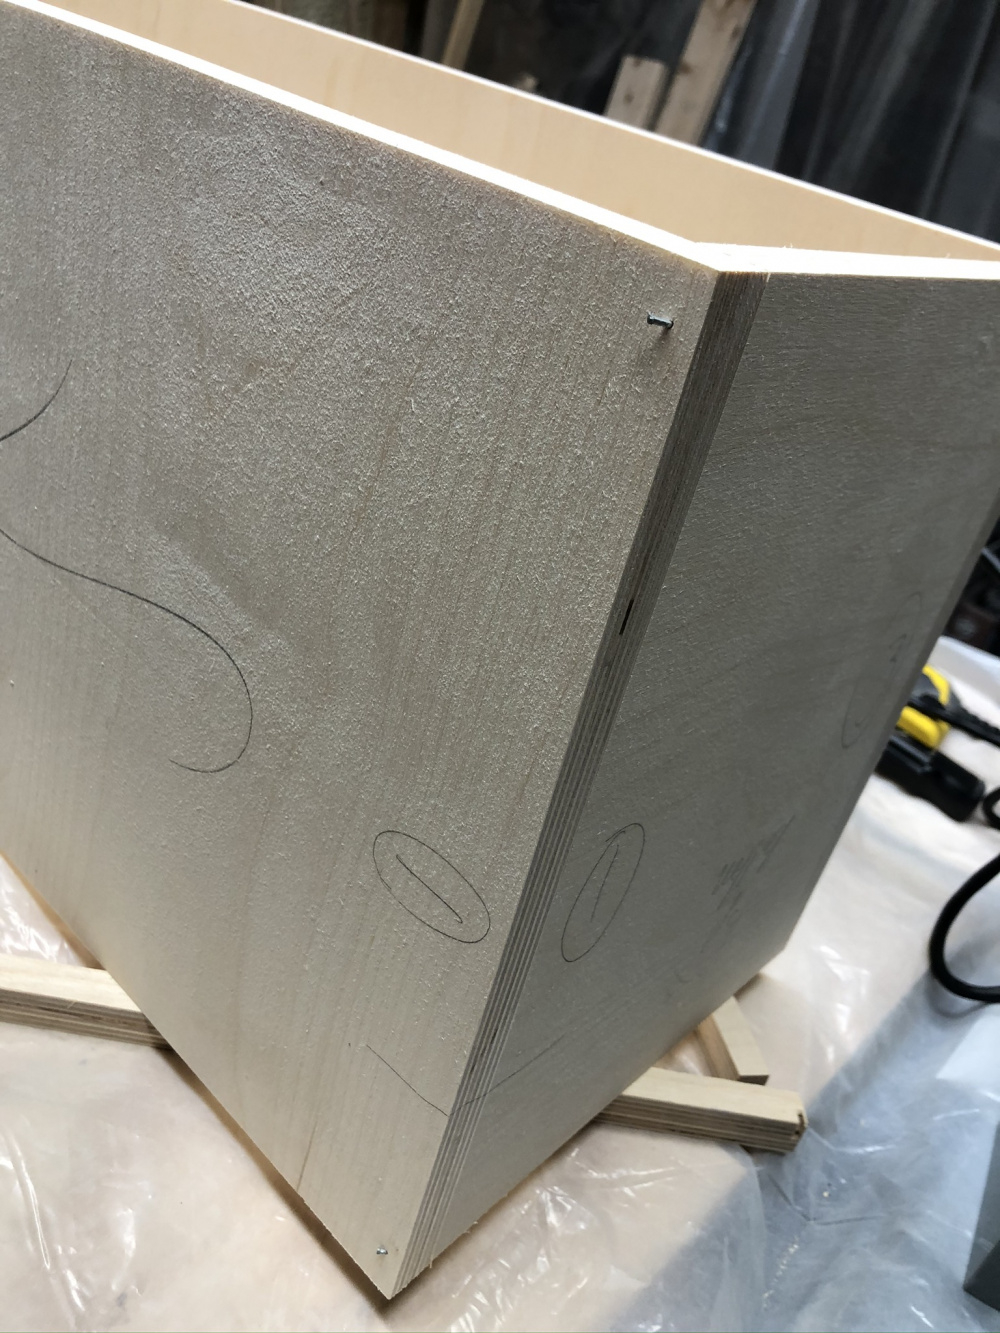
I have tried many methods of box assembly, and have settled on using a brad nailer to align the pieces for a dry fit, then disassemble and do the glue up. Not totally perfect in the end, but the best that I've done so far.
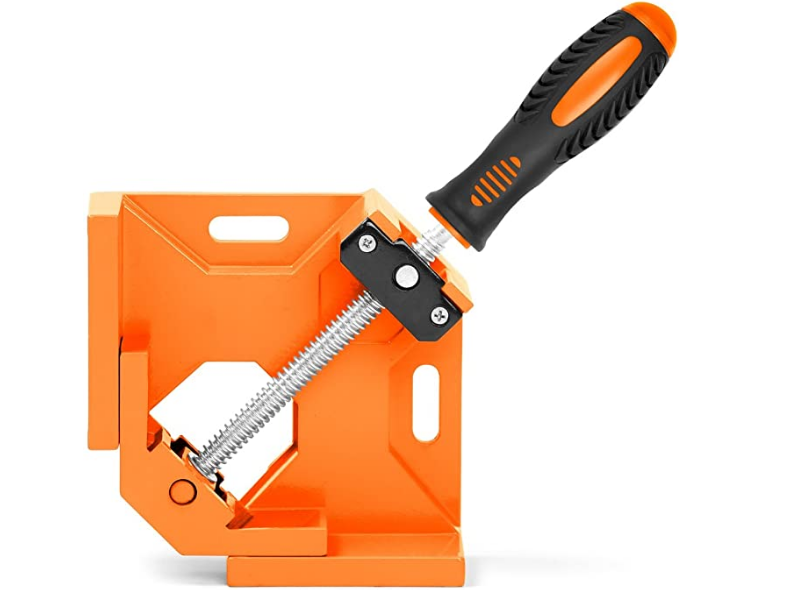
Recently found these corner clamps on Amazon, and they all me to perfectly align the pieces before I shoot the brads.
I've got the cheap HarborFreight corner clamps and still find it possible to screw up the alignment. Interested in this build, keep us posted.
Yeah, me too, with the HF clamp, you can align in 2 dimensions easily, but you do not have access to the top of the joint to align the 3rd dimension very well. This clamp gives you total access to the joint. Once I shoot the brad, it's almost guaranteed to be perfect.
I've used various clamps for butt-joint alignment. Either every tool sucks, or as I suspect I am shit at using my table saw. I've decided to over-size panels wherever possible and use a trim bit to cut to size. I still screw up a ton, but it is less.
This should be a pretty nice build, Don.
Thanks JR.
The single driver 176 builds sound good so this one should kick ass!
Decided (for once) to add an additional layer of connection for the port. Glad I did, it's very solid now.
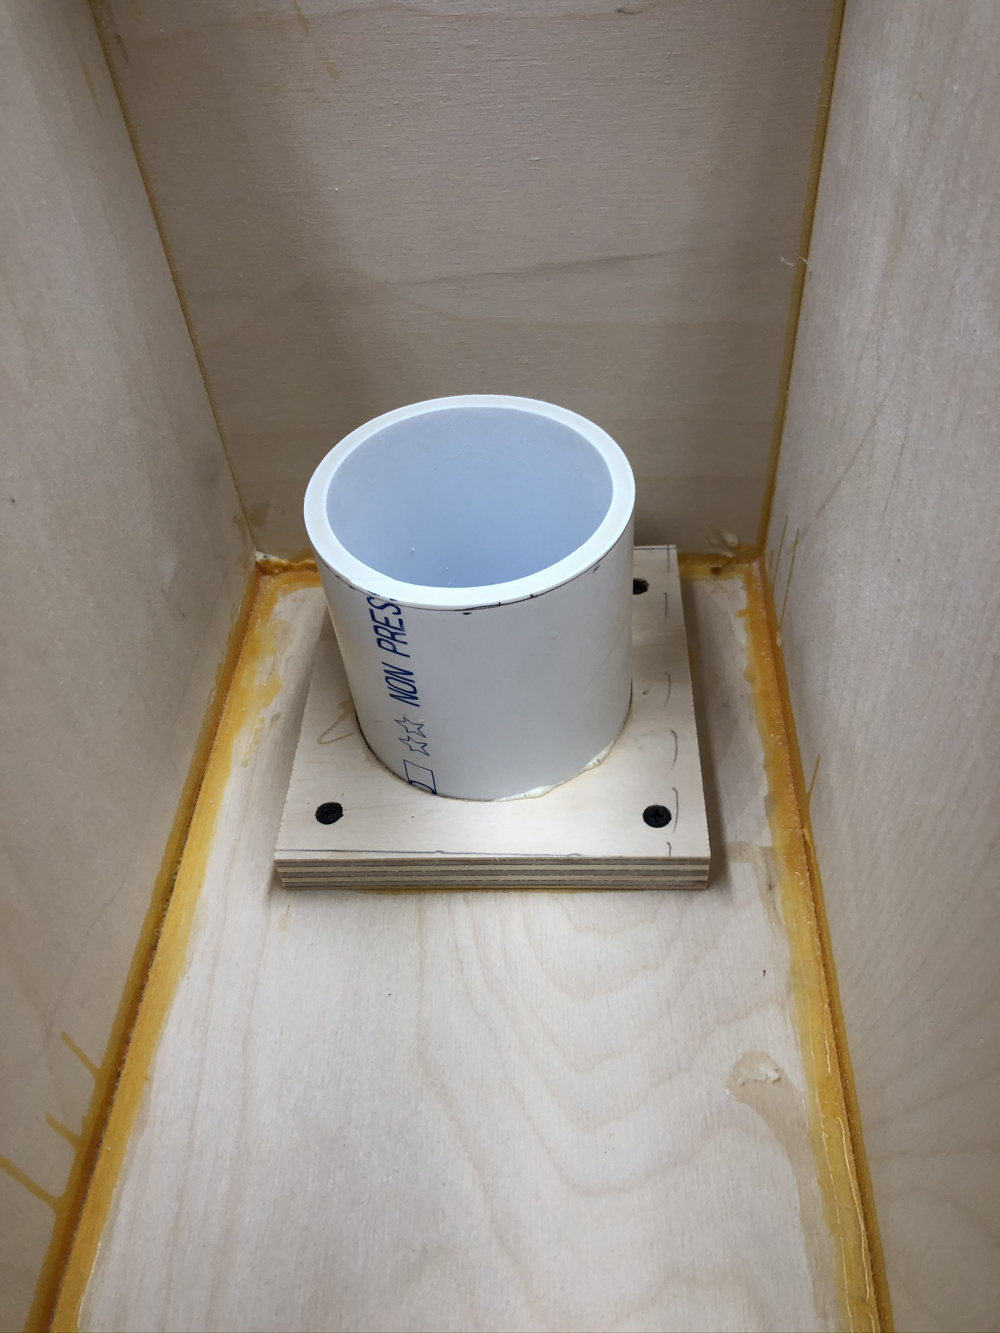
Going to have a removable baffle. Haven't done one of those in a long time!
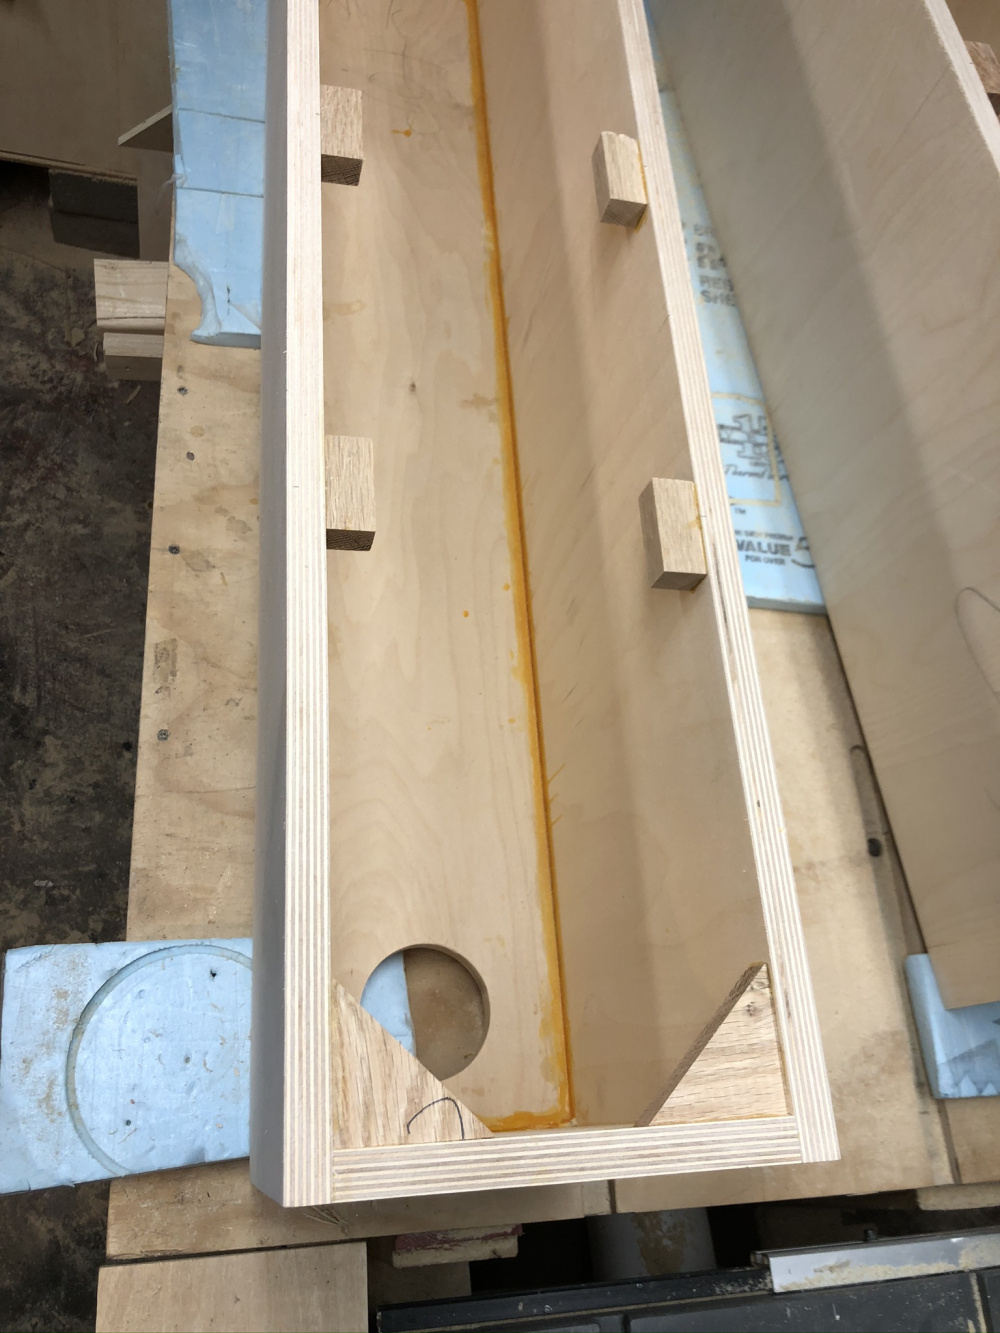
Glued in oak blocks to screw into.
What type of pvc are you using? Looks like it's 1/2" thick. Anyhow, I like to do them the same way for a little more security and use expanding poly glue. Don't trust wood glue with the dissimilar materials. Take lots of pics.
Standard big box SCH40 PVC. In this case, nominal 3" ID, 3.5" OD, .25" walls. Yeah, Gorilla Glue for this use with dissimilar materials. Mo pics coming.
Started the veneer. Flat cut cherry paper backed. After my last couple of builds with oak veneer, this was a breeze.
The old Heatlock used to be a tan color, the new version is a bit pink. Funny, when it's heated and liquifies, it turns light brown.
Since the veneer when coated with Heatlock will always tend to curl, I made a "sandwich" with old pieces of a vinyl window shade and then placed that carefully on the box which had more vinyl strips to physically separate them until I was ready to mate them.
Worked well, not much trouble.
Not to be too nosy, but how much does enough veneer to cover that large of a box cost?
For this project with a painted baffle, I was able get all my pieces from one 48x96 inch sheet.
Cost me $70 plus tax at my local wood porn store. No shipping costs, and I got to choose from several they had in stock.
Locked my baffle into position with dowels - it's the best way to align the box and baffle IMHO.
Trimmed flush with my trusty Bosch router and a 1/2 inch flush trim Yonico bit, and finally have a "money" shot.
Decided that I wanted to try to use some kind of wood screw to fasten the baffle down, rather than threaded inserts.
Found these connector screws on McFeelys with nice deep wood threads, and an attractive dark bronze head.
1/4 inch hole works perfectly, no splitting of 3/4 oak on a piece of scrap
Measured the baffle about 5 times before I used a forstner bit to drill the holes. Yeah, somehow I'd made several mistakes, but managed to catch them all beforehand so I'm good to go on the baffle now.
How did you countersink for the heads?
Search forstner drill bit
Yep forstner bit. The head of the screw was 11/16, so a 3/4 inch bit worked perfectly.
Even though I tried to dial in my drill press, it was surprisingly difficult to get a perfect depth for every hole.
Probably because I was supported a long baffle with one arm while I drilled down with the other one.
Got to be a little bit of play in that operation.
I got a set of forstner bits, but haven't used them for countersinking. For aligning, do you drill first and then countersink or countersink and then drill or it doesn't matter?
For people without drill presses and don't want to eyeball the forstner by hand, I've done small hole countersinks with my router and a bushing. Cut the smallest hole you can with your circle jig into a piece of scrap, then use that as a template with a bushing to get the smaller diameter. Time consuming but worked well for some speakon connectors.
Can do the same without the bushing, but need a much larger template for the edge of the router to sit against.
If you have a brad point drill bit, it will be most accurate (IMHO) to use the Forstner bit first, and then drill the through hole, because the Forstner bit leaves a little dimple at the exact center.
https://www.homedepot.com/p/Professional-Woodworker-Brad-Point-Drill-Bit-Set-25-Piece-46628/300226924?mtc=Shopping-B-F_D25T-B-D25T-25_7_POWER_TOOL_ACCESSORIES-Multi-NA-Feed-PLA-NA-NA-PowerToolAccessories&cm_mmc=Shopping-B-F_D25T-B-D25T-25_7_POWER_TOOL_ACCESSORIES-Multi-NA-Feed-PLA-NA-NA-PowerToolAccessories-71700000056728358-58700005290277020-92700046897694916&msclkid=b69f33c00e4f195a30666c6192d05346&gclid=b69f33c00e4f195a30666c6192d05346&gclsrc=3p.ds
I don't have Brad point drill bits. Thanks for the link, I'll add it to my list of tools to get...
I got a set of brad point drill bits for use when using dowels for joining or alignment. Pretty essential for that application.
I'm a little concerned about sealing the baffle to the box without any leaks, and plan to seal the port after the build and run an impedance check for leaks. It should ideally look like a sealed box impedance plot I assume. Since I only have 18mm of surface on the top of the box, I want to use it all, so I ordered some neoprene 1" x 1/8" weatherstripping for the task.
https://www.amazon.com/gp/product/B071RDDC2R/ref=ppx_yo_dt_b_asin_title_o00_s00?ie=UTF8&psc=1
Regular speaker gasket tape works great. My preference is to hold the tape back from the edge an 1/8 inch or more. Foam tape bulge is impossible to trim and look right. I paint the inside edge so the reveal doesn't show unfinished wood.
Pretty much my plan also. Plan on finishing the veneer and then carefully rolling on some black latex on the box edge and wiping off any drips over the side. But I'll always take your advice, master....
Over time hair and grime and whatnot tend to cling to the stickiness of the speaker gasket tape. But yes, that is also what I use and leaving the tape a bit inside than the edge takes care of the stickiness and also gives it a floating baffle look...
I got a cheapish Wagner HVLP setup, hoping for a very smooth and even surface for my preference to use Amber Shellac on cherry veneer. Spraying was easy, but not really as even as I might have liked. Wiped down the cabs with DNA and then ROS sanded a bit with 220.
Also primered the baffles with Kilz for eventual black paint.
The HVLP sprayer (and probably my inexperience) royally messed up the boxes, so I let them sit a couple of weeks while I pondered the fix. Got back to them and some 0000 steel wool and DNA took out the most egregious runs and drips. Topping off with Tried and True Danish Oil mixed 50/50 with some gloss poly and they are looking pretty good.
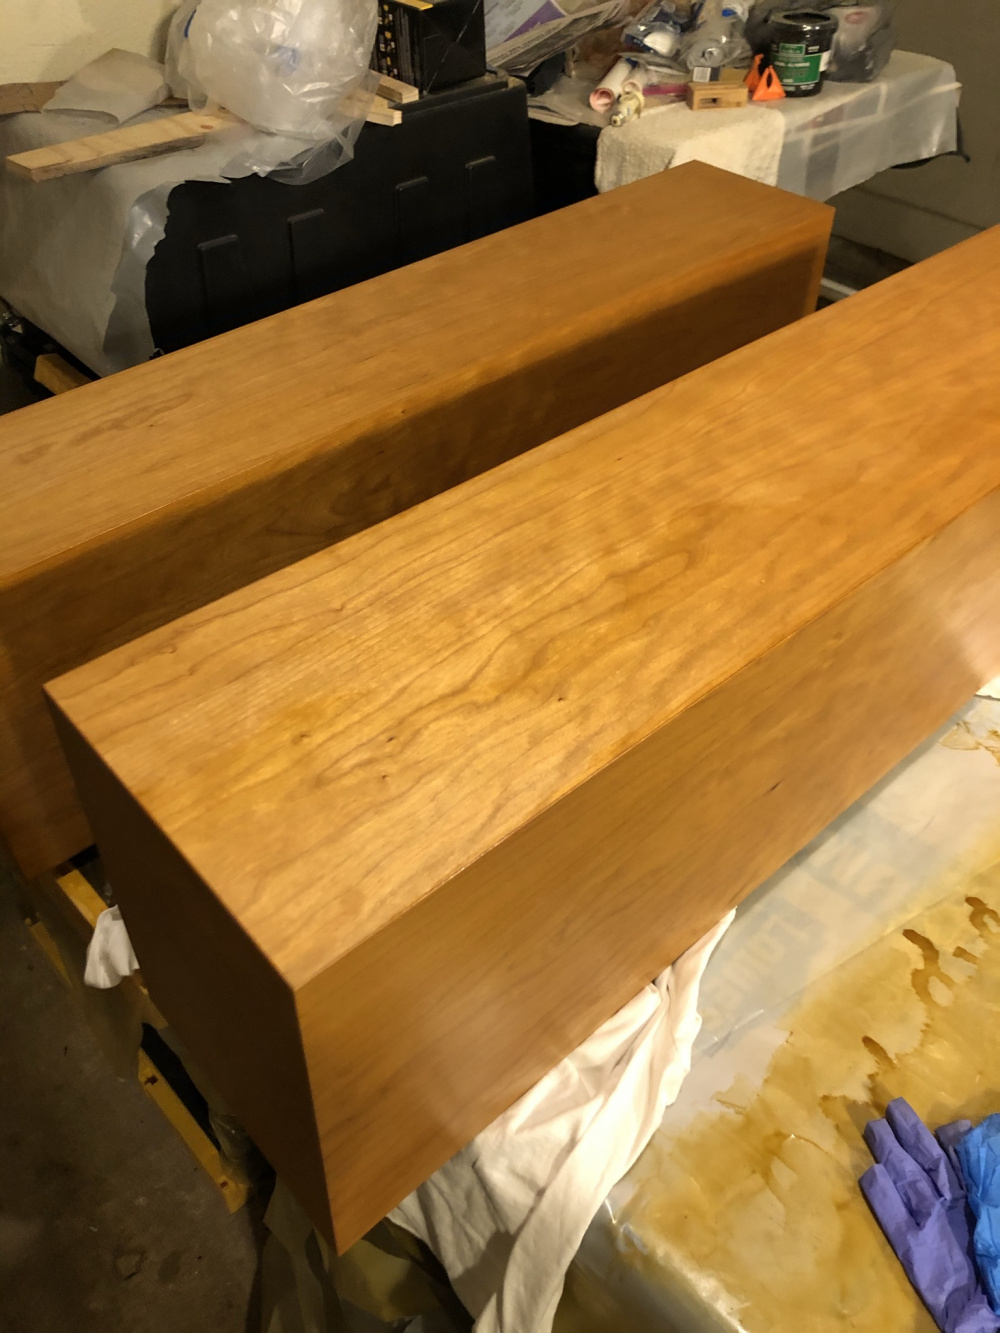
I was originally going to spray the baffles with gloss black Krylon, but decided to try the Krylon "oil rubbed bronze" color. At first I thought it was too brown, then felt that the brown would go fine with the cherry.
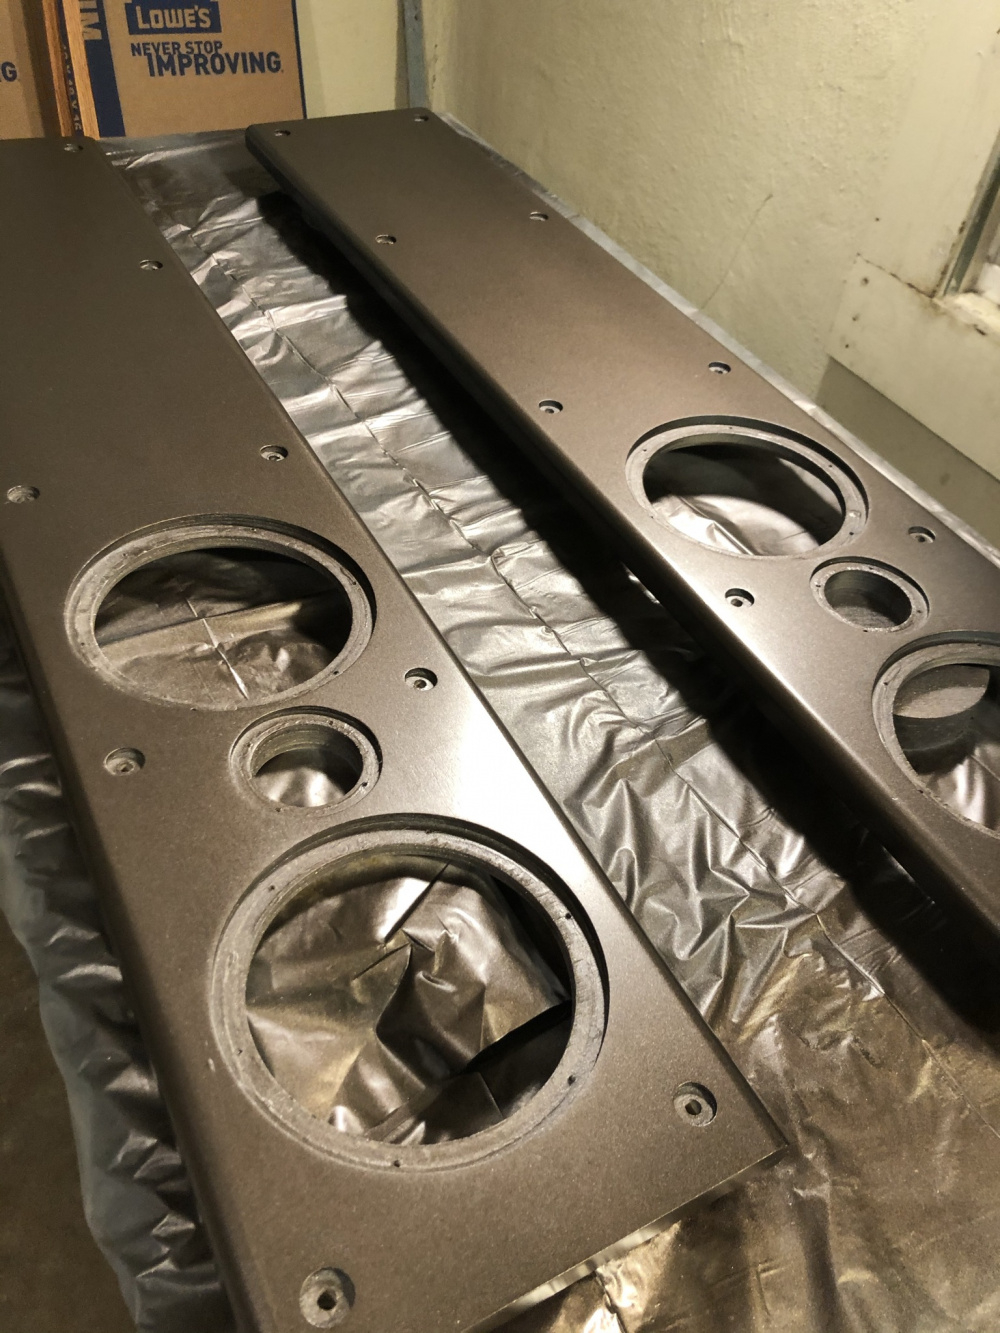
I love how your baffles look! Great choice.