@ugly_woofer said:
Rockler also sells General Finishes.
Good to know, we have one Rockler store in my area. I had been searching around for a local place that sells General Finishes so that I can experiment with Arm-R-Seal. Today I found a local hardware store (Neu's) that carries the complete line of General Finishes. Picked up a pint of oil based semi-gloss for $14.
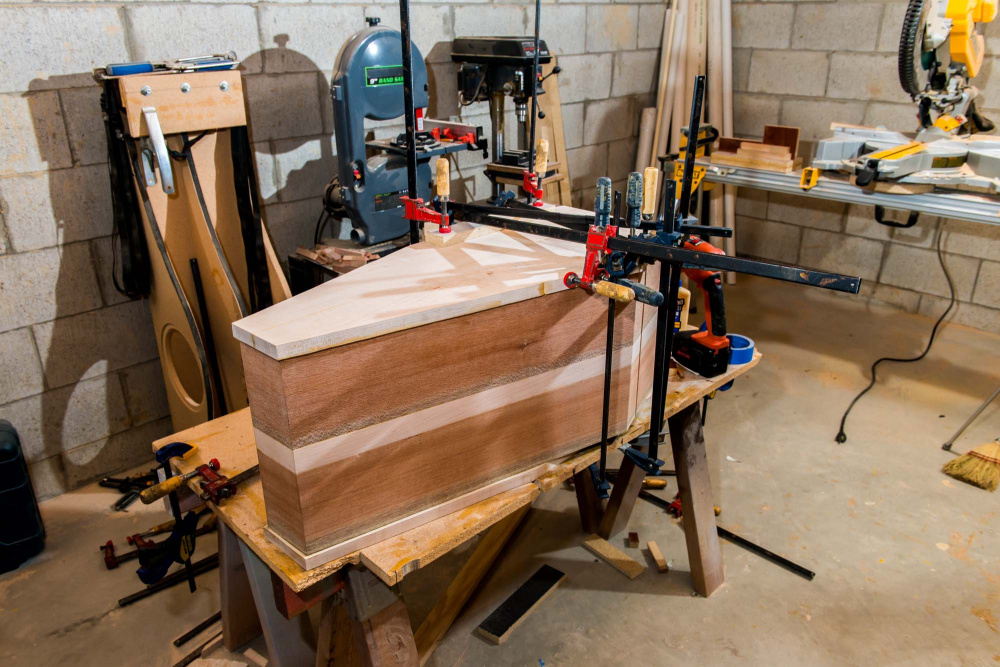
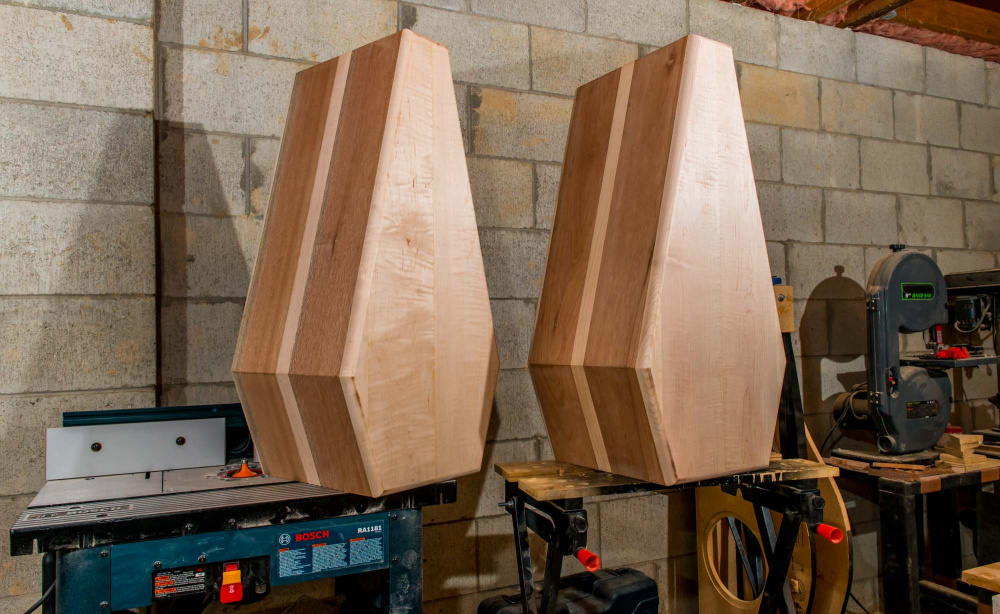
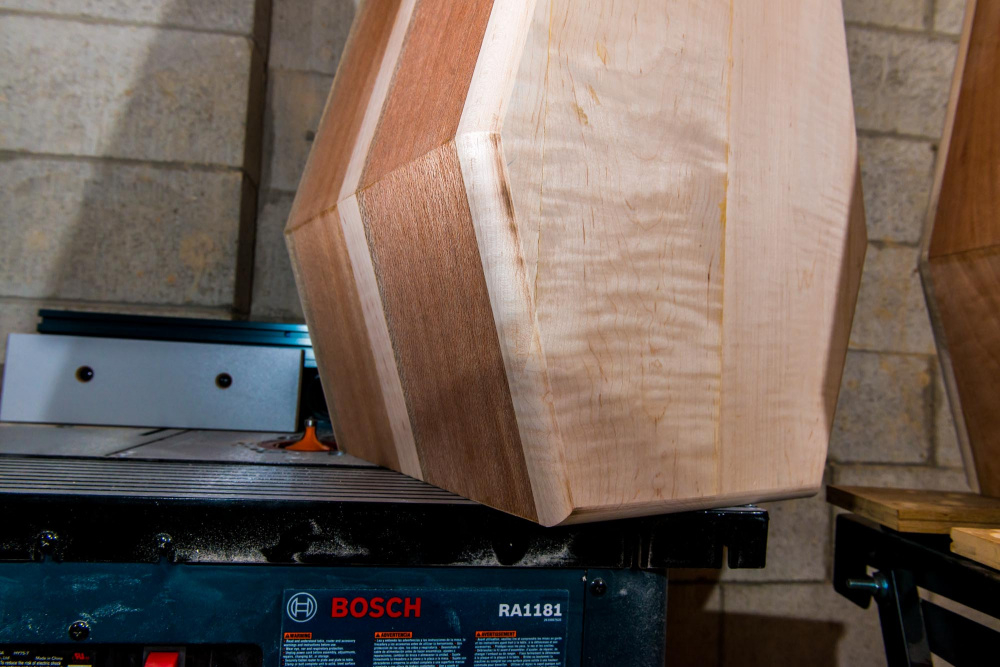
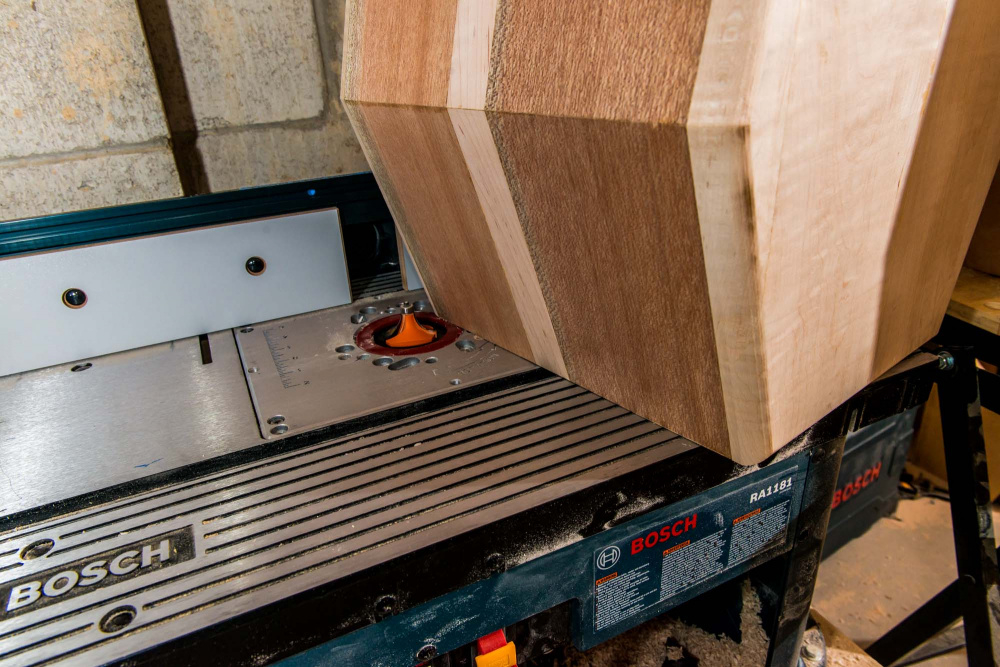
I now have a stereo pair of open speaker shells, ready for baffles & backs.
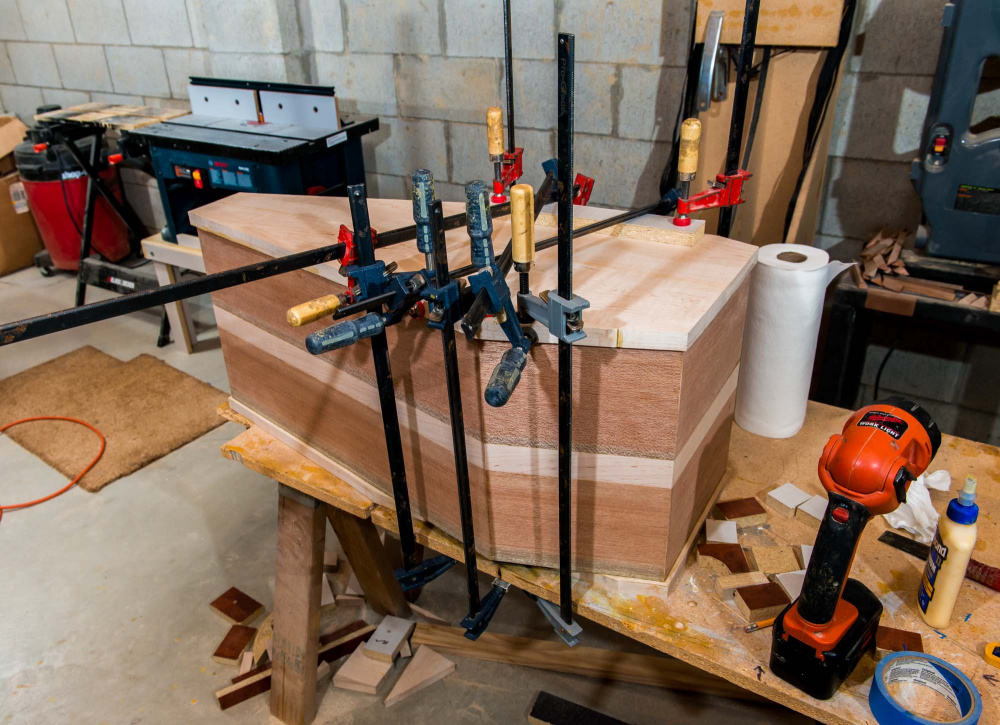
The miters came out almost perfect. After 3 hours of drying, I carefully removed the masking tape on each miter and thoroughly cleaned off any glue that accidently squeezed onto the surface. This is extremely important to do, because any glue left on the surface of the wood will ruin the finish.
I did not clean up the glue on the inside. All the miters are tight and fairly strong, but I will be adding a few glue blocks along the miters and a couple criss-cross type braces for good measure.
Your mitres must be good, I don't see what you've done to make sure that the cabinet is kept straight and symmetrical, other than the mitre fit-up.
My skills are not as good, I wasn't confident in my ability to keep the cabinet straight during glue up, not as easy to just hold a carpenter square next to it like a normal rectangular box, so I had built a frame from scraps and clamped the boards to it during glue-up to make sure they kept to the shape and I didn't end up with a cabinet that was off kilter. They ended up a little off-kilter anyway, but not enough to care about, just enough to let you know it was made by hand.
Ya, I saw that frame in your Northern Pikes write up. There was also a small amount of "run out" on my miters as well, which I corrected with clamping pressure as I went along. If you look back at my first glue-up picture, you will see a few small blocks clamped to the bench around the speaker. These functioned the same as your frame system. I also had longer clamps holding the cabinet down tightly to the bench, but I had removed these clamps before I took that first picture. The 2nd glue up picture shows the longer clamps forcing the frame flat to the bench, but the lower blocks were no longer needed because I was only gluing the bottom panel in place. So, my miters were a little off as well. I made a final "course correction" when I tweaked the bottom panel miters to fit like a glove.
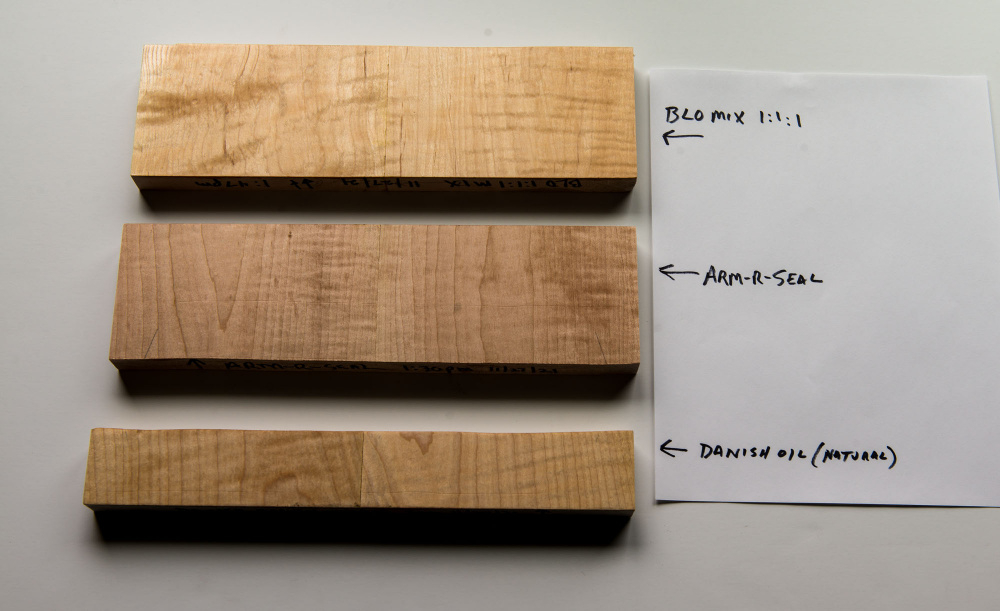
Thanks guys. It got up to 55 degrees yesterday, so I mixed up a batch of BLO/Poly/MS and compared it to Danish oil and Arm-R-Seal. I sanded and tacked the inside surfaces of one of the cabinet shells to use for the test.
1) Arm-R-Seal oil based semi-gloss. This dried to the touch in about 2 hours and produced a medium level of darkening and a very slight reddish cast to the maple.
2) 1:1:1 BLO/gloss poly/mineral spirits mix. This dried to the touch in about 12 hours (overnight) and darkened the mahogany and maple the most. It also created a slight reddish cast on the maple.
3) Watco Danish oil, natural. This one is still not dry and feels oily, even after 24 hours. Will probably take several days to feel dry to the touch. This one produced the least amount of grain darkening and a slight yellow casting appeared on the maple (but no reddish cast at all).
This is only the first phase of this test. I now need to let the oil dry thoroughly, and then apply a finish over the oil. I will be doing wipe on poly over the 1:1:1 mix and a brush on lacquer over the Arm-R-Seal and Danish oil. Hopefully we will get another 55 degree day roughly two weeks from now.
Thanks for the tips & vid. Brushing lacquer is out; will switch to spray semi-gloss lacquer for the Arm-R-Seal and Watco samples. For the 1:1:1 BLO sample, I think I will mask it off into two parts and apply wipe on poly to one side and spray lacquer to the other side.
Update on drying process: It has now been about 40 hours since I applied the three different oils. The Watco Danish oil is still not dry. It still feels a little oily and has yet to develop any nibs to be sanded off (it has not hardened yet). The 1:1:1 and Arm-R-Seal samples are completely dry with lots of dry sanding nibs.
Thanks, Kornbread. I agree, lacquer is much easier to build up multiple coats. Poly is probably a little more durable, but it takes more time. In terms of appearance, I like the look of lacquer over poly. There is something about the look of lacquer that I cannot seem to replicate with wipe on poly.
Bill, if you intend to do a semi gloss or satin finish with the lacquer, I would laye the initial coats in full gloss and the final coat in semi or satin. If you do it this way there is less of a cloudy effect and it will be super clear, but just not full on shiny. Just my two cents.
Thanks, Nick. My plan is to do semi-gloss or satin. I do not plan to use a grain filler, so the final finish of the mahogany will not be completely flat. The wood pores will fill up a little bit from multiple coats of lacquer, but the surface will still be a little rough. I therefore need to stay away from gloss, but, as you suggest, I'll spray the inital coats in gloss and then finish up with satin.
@Nicholas_23 said:
I wonder if satin or gloss helps with the grain popping unsanded . You have voids in the grain, then fill it with a satin/gloss and get a 3D holographic view when finished and dried. Bounces the light around a bit if you will. Really sharp! Im curious when and how you do the woofers.
In my experience, the satin or gloss does improve the overall contrast quite a bit. The oil finish alone can look very dull and lifeless. The problem is, gloss over unfilled woods like oak or mahogany can give you too much contrast and actually look kind of gritty. Satin tones down the contrast and gives it more of a "real wood" type of appearance, IMO.
I'm having problems with one of the woofers due to a slightly torn paper cone situation near the dust cap, so I may have to tear it apart and repair or replace it. Will post pics when this happens. I bought 8 of these woofers from Audio Concepts back in the 90's, so I have plenty of spare woofers to cut apart and re-cone/re-foam as needed.
It was a real struggle matching up the maple grain structure for the baffles and backs. The boards they sent me have a wide variety of twisted tones, branches, and even a few knots. I did the best I could to get some good matches and avoid any obvious orientation problems.
Here I am gluing up two of the 6x36" maple boards to make a single 12x36" board. To make things easier to clean off the glue squeeze out, I installed a criss-crossed type dual rail platform between the workbench and workpiece. This holds the boards about 5 inches above the workbench surface, giving me easy access to clean up the glue line.
After the initial glue up, I again separated the boards with thin, equally spaced sticks and tightly clamped them into a drying rack for final curing and acclimation. I will be keeping them in this rack for at least 72 hours before gluing them onto the main cabinets.
Since everything is 10% off, I ordered ferrofluid kits and new Morel MDT-33 voice coils from PE today. I've never done this before, but I watched a bunch ferrofluid youtube videos, so now I am technically a technical expert on the subject! Will post pics and details when I get them. The most difficult part appears to be carefully removing the voice coil without damaging it.
Got up to 50 degrees yesterday, so I took my sample cabinet outside and sprayed 4 coats of rattle can semi-gloss lacquer over the dried oils. All the samples except one were completely dry. so I sanded off the nibs with a 3M finishing pad. Even after 6 days, the Danish oil sample was still not completely dry. But I sprayed over the top of it anyhow. I split the BLO sample into two parts with masking tape and sprayed 4 coasts of lacquer on one half and then applied 3 coats of Minwax wipe-on poly (clear satin) over the other half. All samples need to be sanded down again for another 3 to 4 coats, but here is how I would rank the samples so far, from best to worst:
1) Arm-R-Seal for the win (so far): Medium level of darkening and very good "redness" toning to the mahogany. A slight red toning to the maple, but this red toning is not real. The red toning is a reflection off the nearby mahogany. The Arm-R-Seal seals the mahogany well, so the lacquer starts to build up quickly. Surface is starting to become smooth, but will probably need another 4 coats, min.
2) BLO mix (2nd place) (so far): Highest level of darkening, with about the same fake red toning to the maple that Arm-R-Seal produces. Because it darkens the wood more, there is just a little "blotchy-ness" in spots, but this may be due to variation in the sampled areas. I prefer the lacquer half over the wipe-on poly half as it seems a little smoother.
3) Clear Lacquer only (John's suggestion, 3rd place so far): I sprayed 4 coats of clear lacquer over a completely unfinished but well sanded sample. This produced a medium level of darkening with the same fake red toning on the maple. Not quite as smooth as the Arm-R-Seal or BLO+ lacquer samples. Needs to be sanded down and several additional coats to build up the surface.
4) Danish oil (natural), last place, so far: This one was a real eye opener. This produced the least amount of darkening with a slight yellow (not red) toning of the maple. At first I thought this was the best looking one, until I realized what was happening. This oil was creating a yellow casting in the mahogany, which was reflecting onto the maple. With 4 coats of lacquer, the mahogany does not look very good at all.
Here I am gluing up one of the widest portions of the maple baffles and backs. As you can see, I trimmed all panels slightly oversize with a jigsaw in preparation for flush trimming on the router table.
Thanks, Ken. I now have a bunch of scrap curly maple remnants, so I did another test to see how the various oil finishes react to the curly maple. This time the BLO mix was the clear winner, making the the grain pop much better than either the Arm-R-Seal or Danish oil. See pic.
Baffles and backs are now flush trimmed and rounded over. I experienced a few small burn marks here and there, but I should be able to sand them out completely. I had a small end-grain tear out situation on one corner, but was able to fix the mishap quickly with a few drops of titebond and clamps. Time to cut the holes and mount the drivers.
Comments
Rockler also sells General Finishes.
Good to know, we have one Rockler store in my area. I had been searching around for a local place that sells General Finishes so that I can experiment with Arm-R-Seal. Today I found a local hardware store (Neu's) that carries the complete line of General Finishes. Picked up a pint of oil based semi-gloss for $14.
Arm-R-Seal is what I used on the Mnemosyne build, just to give you an idea of the color.
I now have a stereo pair of open speaker shells, ready for baffles & backs.
The miters came out almost perfect. After 3 hours of drying, I carefully removed the masking tape on each miter and thoroughly cleaned off any glue that accidently squeezed onto the surface. This is extremely important to do, because any glue left on the surface of the wood will ruin the finish.
I did not clean up the glue on the inside. All the miters are tight and fairly strong, but I will be adding a few glue blocks along the miters and a couple criss-cross type braces for good measure.
Your mitres must be good, I don't see what you've done to make sure that the cabinet is kept straight and symmetrical, other than the mitre fit-up.
My skills are not as good, I wasn't confident in my ability to keep the cabinet straight during glue up, not as easy to just hold a carpenter square next to it like a normal rectangular box, so I had built a frame from scraps and clamped the boards to it during glue-up to make sure they kept to the shape and I didn't end up with a cabinet that was off kilter. They ended up a little off-kilter anyway, but not enough to care about, just enough to let you know it was made by hand.")
Ya, I saw that frame in your Northern Pikes write up. There was also a small amount of "run out" on my miters as well, which I corrected with clamping pressure as I went along. If you look back at my first glue-up picture, you will see a few small blocks clamped to the bench around the speaker. These functioned the same as your frame system. I also had longer clamps holding the cabinet down tightly to the bench, but I had removed these clamps before I took that first picture. The 2nd glue up picture shows the longer clamps forcing the frame flat to the bench, but the lower blocks were no longer needed because I was only gluing the bottom panel in place. So, my miters were a little off as well. I made a final "course correction" when I tweaked the bottom panel miters to fit like a glove.
"Awesome" is way overused adjective these days, but your work quality really is awesome!
Yup, looking good!
Thanks guys. It got up to 55 degrees yesterday, so I mixed up a batch of BLO/Poly/MS and compared it to Danish oil and Arm-R-Seal. I sanded and tacked the inside surfaces of one of the cabinet shells to use for the test.
1) Arm-R-Seal oil based semi-gloss. This dried to the touch in about 2 hours and produced a medium level of darkening and a very slight reddish cast to the maple.
2) 1:1:1 BLO/gloss poly/mineral spirits mix. This dried to the touch in about 12 hours (overnight) and darkened the mahogany and maple the most. It also created a slight reddish cast on the maple.
3) Watco Danish oil, natural. This one is still not dry and feels oily, even after 24 hours. Will probably take several days to feel dry to the touch. This one produced the least amount of grain darkening and a slight yellow casting appeared on the maple (but no reddish cast at all).
This is only the first phase of this test. I now need to let the oil dry thoroughly, and then apply a finish over the oil. I will be doing wipe on poly over the 1:1:1 mix and a brush on lacquer over the Arm-R-Seal and Danish oil. Hopefully we will get another 55 degree day roughly two weeks from now.
If possible, I will never brush on lacquer again. IMO, spraying is so much easier and betterer.
I've had some tremendous fails with brushing lacquer. This was in my YouTube feed
Thanks for the tips & vid. Brushing lacquer is out; will switch to spray semi-gloss lacquer for the Arm-R-Seal and Watco samples. For the 1:1:1 BLO sample, I think I will mask it off into two parts and apply wipe on poly to one side and spray lacquer to the other side.
Update on drying process: It has now been about 40 hours since I applied the three different oils. The Watco Danish oil is still not dry. It still feels a little oily and has yet to develop any nibs to be sanded off (it has not hardened yet). The 1:1:1 and Arm-R-Seal samples are completely dry with lots of dry sanding nibs.
Watco recommends 72 hours before top coating. It's what I use with wipe on poly.
Ron
If you spray the lacquer, it dries very quickly. Poly not so much. Something to consider if you plan on adding several coats.
Anyhow, in fear of repeating what others have said, you guys make some killer looking stuff.
Thanks, Kornbread. I agree, lacquer is much easier to build up multiple coats. Poly is probably a little more durable, but it takes more time. In terms of appearance, I like the look of lacquer over poly. There is something about the look of lacquer that I cannot seem to replicate with wipe on poly.
Bill, if you intend to do a semi gloss or satin finish with the lacquer, I would laye the initial coats in full gloss and the final coat in semi or satin. If you do it this way there is less of a cloudy effect and it will be super clear, but just not full on shiny. Just my two cents.
Thanks, Nick. My plan is to do semi-gloss or satin. I do not plan to use a grain filler, so the final finish of the mahogany will not be completely flat. The wood pores will fill up a little bit from multiple coats of lacquer, but the surface will still be a little rough. I therefore need to stay away from gloss, but, as you suggest, I'll spray the inital coats in gloss and then finish up with satin.
In my experience, the satin or gloss does improve the overall contrast quite a bit. The oil finish alone can look very dull and lifeless. The problem is, gloss over unfilled woods like oak or mahogany can give you too much contrast and actually look kind of gritty. Satin tones down the contrast and gives it more of a "real wood" type of appearance, IMO.
I'm having problems with one of the woofers due to a slightly torn paper cone situation near the dust cap, so I may have to tear it apart and repair or replace it. Will post pics when this happens. I bought 8 of these woofers from Audio Concepts back in the 90's, so I have plenty of spare woofers to cut apart and re-cone/re-foam as needed.
It was a real struggle matching up the maple grain structure for the baffles and backs. The boards they sent me have a wide variety of twisted tones, branches, and even a few knots. I did the best I could to get some good matches and avoid any obvious orientation problems.
Here I am gluing up two of the 6x36" maple boards to make a single 12x36" board. To make things easier to clean off the glue squeeze out, I installed a criss-crossed type dual rail platform between the workbench and workpiece. This holds the boards about 5 inches above the workbench surface, giving me easy access to clean up the glue line.
After the initial glue up, I again separated the boards with thin, equally spaced sticks and tightly clamped them into a drying rack for final curing and acclimation. I will be keeping them in this rack for at least 72 hours before gluing them onto the main cabinets.
Probably already said this but I'm lazy. What kind of glue?
Titebond II
Since everything is 10% off, I ordered ferrofluid kits and new Morel MDT-33 voice coils from PE today. I've never done this before, but I watched a bunch ferrofluid youtube videos, so now I am technically a technical expert on the subject! Will post pics and details when I get them. The most difficult part appears to be carefully removing the voice coil without damaging it.
Got up to 50 degrees yesterday, so I took my sample cabinet outside and sprayed 4 coats of rattle can semi-gloss lacquer over the dried oils. All the samples except one were completely dry. so I sanded off the nibs with a 3M finishing pad. Even after 6 days, the Danish oil sample was still not completely dry. But I sprayed over the top of it anyhow. I split the BLO sample into two parts with masking tape and sprayed 4 coasts of lacquer on one half and then applied 3 coats of Minwax wipe-on poly (clear satin) over the other half. All samples need to be sanded down again for another 3 to 4 coats, but here is how I would rank the samples so far, from best to worst:
1) Arm-R-Seal for the win (so far): Medium level of darkening and very good "redness" toning to the mahogany. A slight red toning to the maple, but this red toning is not real. The red toning is a reflection off the nearby mahogany. The Arm-R-Seal seals the mahogany well, so the lacquer starts to build up quickly. Surface is starting to become smooth, but will probably need another 4 coats, min.
2) BLO mix (2nd place) (so far): Highest level of darkening, with about the same fake red toning to the maple that Arm-R-Seal produces. Because it darkens the wood more, there is just a little "blotchy-ness" in spots, but this may be due to variation in the sampled areas. I prefer the lacquer half over the wipe-on poly half as it seems a little smoother.
3) Clear Lacquer only (John's suggestion, 3rd place so far): I sprayed 4 coats of clear lacquer over a completely unfinished but well sanded sample. This produced a medium level of darkening with the same fake red toning on the maple. Not quite as smooth as the Arm-R-Seal or BLO+ lacquer samples. Needs to be sanded down and several additional coats to build up the surface.
4) Danish oil (natural), last place, so far: This one was a real eye opener. This produced the least amount of darkening with a slight yellow (not red) toning of the maple. At first I thought this was the best looking one, until I realized what was happening. This oil was creating a yellow casting in the mahogany, which was reflecting onto the maple. With 4 coats of lacquer, the mahogany does not look very good at all.
Great info Bill! Thanks for your write ups.
Here I am gluing up one of the widest portions of the maple baffles and backs. As you can see, I trimmed all panels slightly oversize with a jigsaw in preparation for flush trimming on the router table.
Looking amazing!
Thanks, Ken. I now have a bunch of scrap curly maple remnants, so I did another test to see how the various oil finishes react to the curly maple. This time the BLO mix was the clear winner, making the the grain pop much better than either the Arm-R-Seal or Danish oil. See pic.
Baffles and backs are now flush trimmed and rounded over. I experienced a few small burn marks here and there, but I should be able to sand them out completely. I had a small end-grain tear out situation on one corner, but was able to fix the mishap quickly with a few drops of titebond and clamps. Time to cut the holes and mount the drivers.

Those are going to be awesome.
Thanks, Kornbread! The plan is starting to come together.