Site Links
Howdy, Stranger!
It looks like you're new here. If you want to get involved, click one of these buttons!
Quick Links
Categories
In this Discussion
Who's Online (0)
Up next: higher end 6.5" standmount
Drivers will be the Eclipse W6520R-6 (High Q version) and Viawave GRT-145 in a custom waveguide. Both drivers are effectively NLA at this point - so the name of the speaker will be "Enelae" (NLA, get it?).
Both drivers are very low distortion and my experience with the bass quality from the Eclipse in my Taiga build is highly positive. Feedback from various DIY events confirms that.
The Viawave in a waveguide will cross easily at 2000Hz and I may even be able to drive it a little lower yet. We will see what the measurements produce.
Cabinet plans as for now are to target a 9.5" baffle width to accommodate 1" round-overs and the 0.5 net cubic feet. Bracing will be substantial, similar to how I braced the Nemo build. Baffle will be my favorite 1-1/8: thick PB and the rest of the cabinet will be MDF with PB bracing.
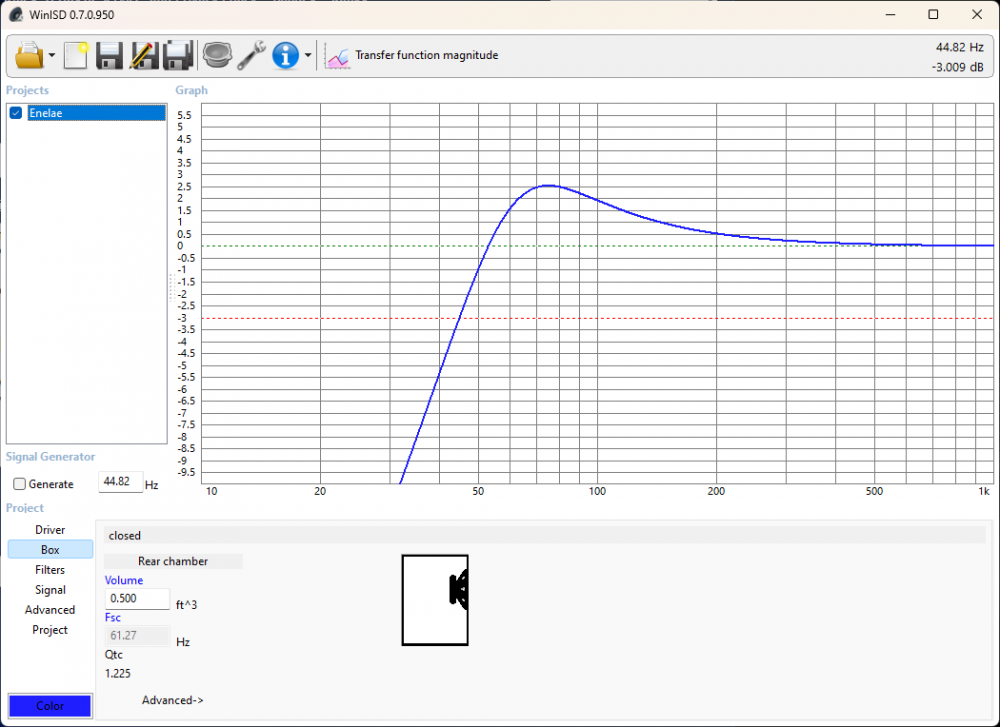
F3/F6/F10 of 44/38/31Hz with a 2.5db ripple centered at 75Hz. This should provide adequate low end response, especially with some boundary reinforcement. The ripple at 75Hz should give a nice "kick in the pants" feel to the overall tonality.
These will be used as part of my desktop rotation stock, my primary speakers for that application are currently the Nemo build (Motus 6 and the same GRT-145). That is a very high end design, and I am under no illusions that the Eclipse is in the same league as the Motus but it should be very close (that ol' law of diminishing returns). The Eclipse is a very nice driver on it's own and maybe the distortion is under the threshold where it doesn't matter any longer. If that is the case, the waveguide on the Viawave may be the tie-breaker.
Here is the modeled response, modeling done at 25 watts with 0.5 ohm series resistance:


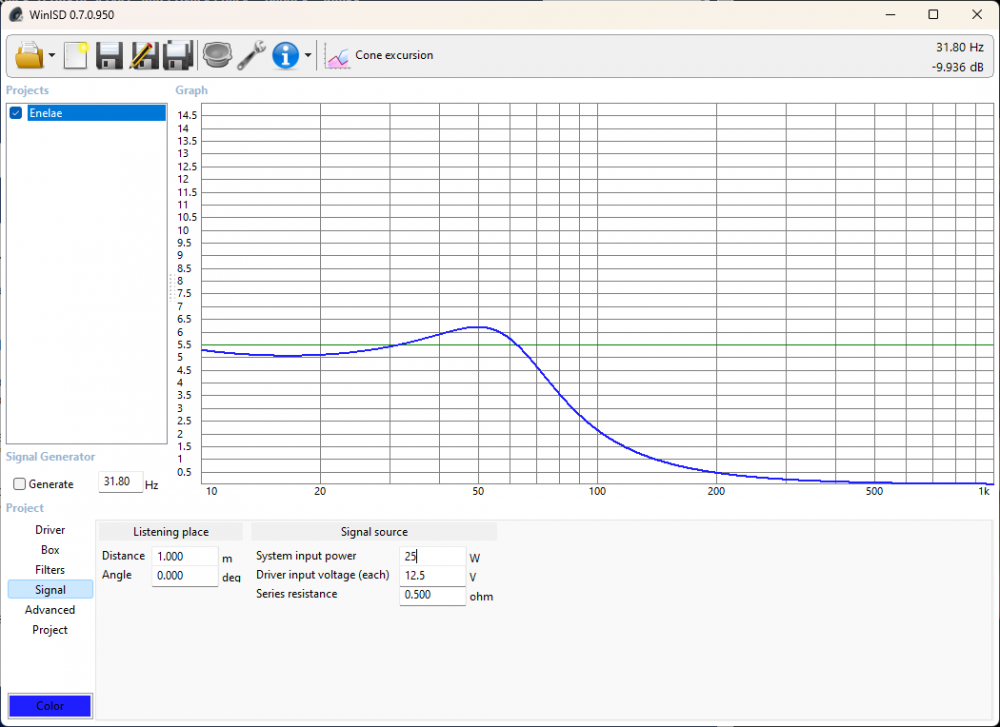
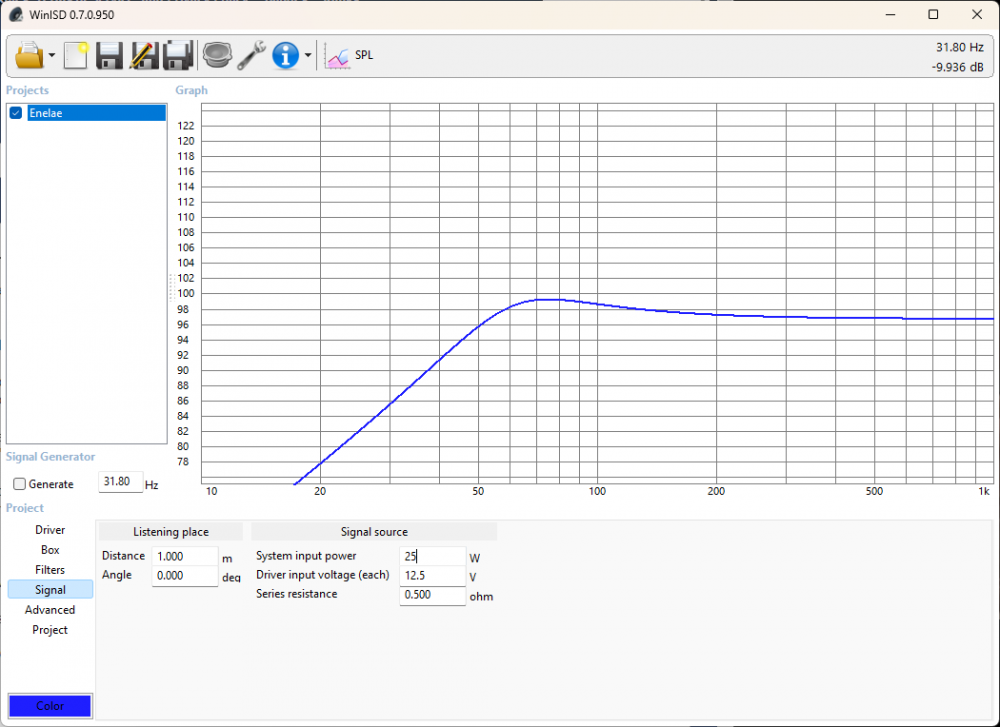
However, that produces SPL levels in excess of what we set levels for DIY events, not to mention my personal listening habits which rarely exceed 82db unless the wife is gone. Then I have pizza, beer, and listen to music at unreasonable volumes (I'll often set max levels at 88db - gasp!). For example, she is gone most of next week so the O'Ryans will get a workout. At DIY event levels, the woofer will be using about 1/2 of its Xmax with zeroconcerns about unloading. Given that this is a sealed alignment with a F3 similar to most vented 6.5" drivers which along with the shallower roll-off it should present very well.
These will largely be used nearfield, after an appropriate break-in period in our primary listening space. I will voice these until the wife gives me her famous "thumbs up".
Sawdust will begin Saturday mid-morning. More to come.


Comments
Looks very nice. Have you considered aperiodic loading to lower the Qtc?
If I went smaller with the enclosure I would consider it, as-is it will be pretty nice. My experience with this type of alignment is pretty positive.
Jr, do you do any.mixing at your desk, and if so, which are your favorite speakers that you get the best translation with? I've always been interested in hearing a Viawave, and a Raal. That model has a great looking FR, to my eyes, for listening, but I wonder if the 3 db bump at 75 would be something that you would have to adjust a mix for with the low end of bass and kick? Would you still keep the alignment the same if you were designing it as a dedicated mix monitor, or try to flatten it? Glenn
I do some mixing, and I generally eq bass anomalies out in the mix.
So far the best mixing monitors I've built are actually no longer in-house, it used a waveguide loaded beast mode XT25 and a Dynavox 6.5" in a sealed alignment F3 of 60hz. I fattened up the bottom end with some EQ. I also faceted the baffle so diffraction was nearly non-existent and it had well controlled directivity. This project will be similar.
My existing desktop speakers though are the best sounding bookshelves I've done.
Have not started on this yet, still debating what cabinet type I want to use and if I waveguide the tweeter or not. Decisions, decisions.
Some small progress on these, decided on a standard cabinet design with a 1" radius round-over.
Binding posts showed up:
I predict 47% fewer veils, 26% blacker black spaces, 98% more inner detail, 56% more accurate pace, 23% better rhythm, double the accuracy, and overall timing will slow down increasing warmth and presence.
Just kidding, they look cool and that matters.
Build has officially started.
These will have an external crossover, so there is still some bracing to come.
Two projects in queue before this, though. Finish my bar remodel and another 2-way.
Glue up is complete, if I get a wild hair up my ass I'll machine baffles after the gym tomorrow.
Advanced CAD technology:
I see you're using the SAE Metric system as well.
Drivers are metric and my table saw is SAE, so... yeah
My HS physics teacher had a poster of Raquel Welch in her 1 million bc outfit on the wall - titled ‘think metric’ (with her metric measurements). It worked for most of the class 😎 those were the days!
Down with Metrics... we don't need foreign rulers! lol
A little more modern drawing. I still use AutoCAD 2002 so... yeah. I can do solid modeling in it, but it always looks weird to me.
Up next is marching baffles, then parking it to finish bar remodel.
Machine, not marching. Fucking "smart" phones.
So I screwed up the tweeter depth, woofer depth is spot on but the rebate is a touch too big. Otherwise, looks like a speaker.
However, I did not fuck this up:
That can't be good... it looks terminal.
I've been there before. A sharp chisel and some patience can fix a "too shallow" driver rebate. Not fun work, but it can fix it.
I can also leave it, I don't have the dexterity these days to do that. I might try very slowly removing material with the router, however. Body filler is my friend there.
No top bevel?
Use the router at correct depth by hand to get the bulk out and provides a reference to finish up with chisel.
No top bevel, that part of the faceting is, imho, least important. Also why tweeter is as close as it is.
Make a template and stick it to the front baffle with double sided tape and use a top bearing bit to re-route the rebate to the proper depth. Leave the tweeter mounted while you position the template and then remove it to cut the rebate. Set the router on the template and plunge the bit until it's resting on the current rebate and set the gap for the plunge stop to the distance the tweeter is proud and route away.
Very sound advice for a good woodworker. I am a better body man than I am a woodworker, however.
I like a making through hole and using an adjustable router rebate bit for the final diameter and depth. There are hole saws and rebates combination that work great for many tweeters.
A rebate bit might help you hog out some material before the chisel.
To be honest, I'll probably leave it proud.