@jr@mac said:
I use 1/8" thick basswood and glue components directly to it, and then do as much point-to-point wiring as possible, all above the components.
I then hot glue the assembly in the cabinet.
Yeah, me too. As much as I like the very clean construction of all connections under the crossover board, I like being able to see and verify the connections by having them on top of the board. I've screwed stuff up at times.....
But Chahly - Stahkist don't want speakers that look good, Stahkist wants speakers that sound good!
@ugly_woofer said:
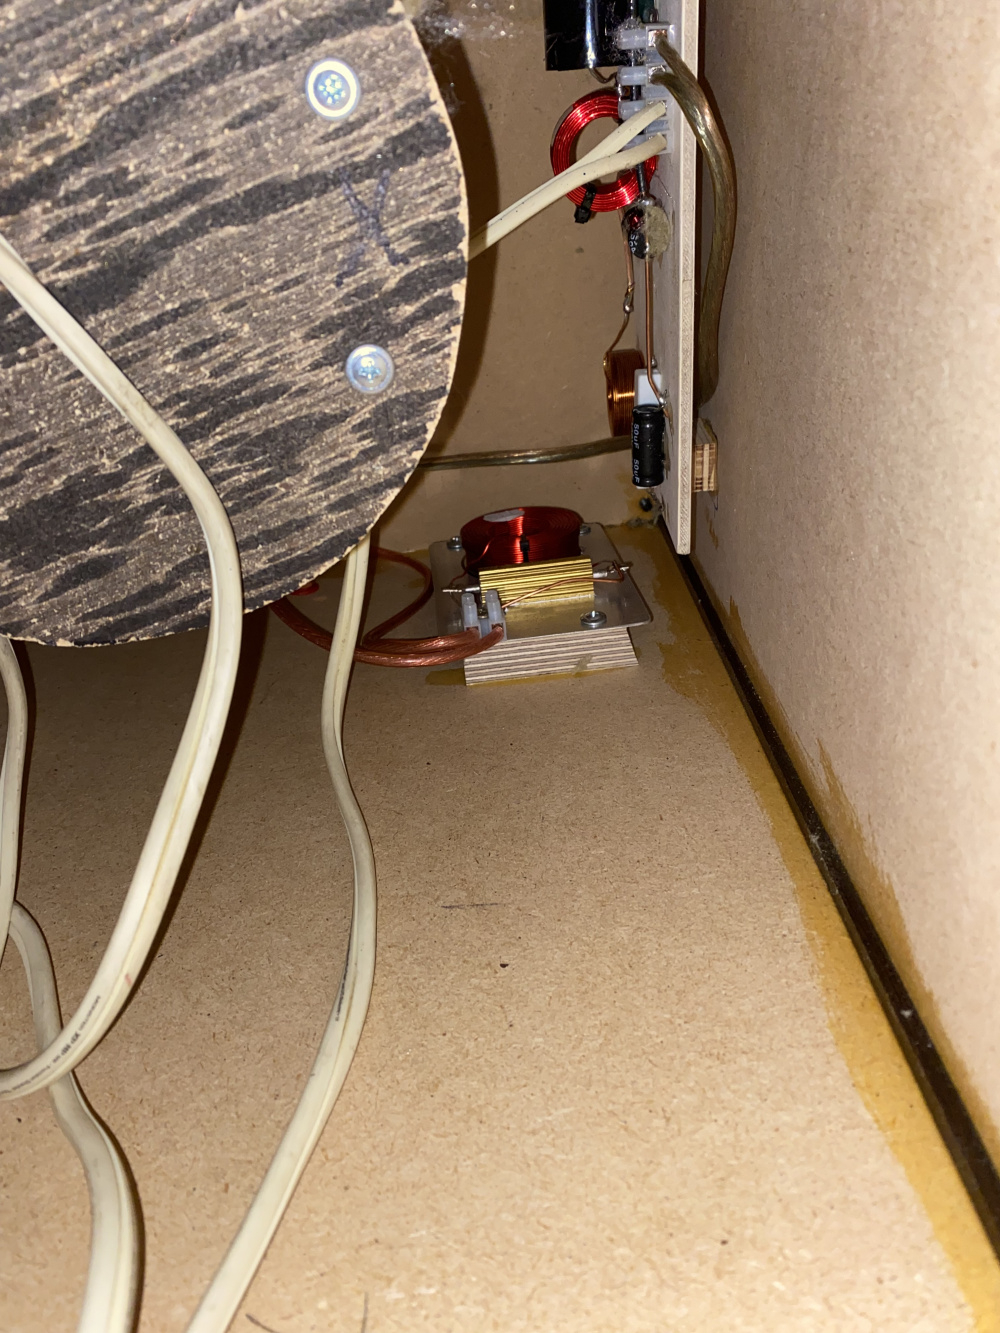
This is how I attach crossovers to the inside of cabinets if there is room. I like this method because it's simple and there is no chance of driving a screw through a cabinet wall. I cut 1 x 1 blocks from 1/2 or 3/4 particle board or plywood and screw the crossover to the blocks and just apply epoxy to the blocks and stick it to the inside wherever I choose.![]
Cool idea. So after the epoxy sets, the xover can still be removed by simply taking out the 4 screws. I'm going to give this a try on my next build. Thanks for sharing.
I countersunk T-nuts into the bottom plate and attached the top plate on standoffs. I stack the plates and drill all the holes at once so they all align and enough of the T-nut is proud of the bottom plate that the standoffs press fit on them. I glue the bottom plate to the cabinet and I'm good to go.
I really like the Freud Sandnet products. The velcro and adhesive circles are fantastic. Last Christmas, HD had a deal on a huge container drum of various velcro grits, 60 to 400, for a great price. They don't clog up either. For reference, I use the round 6" variable speed Ridgid orbital sander.
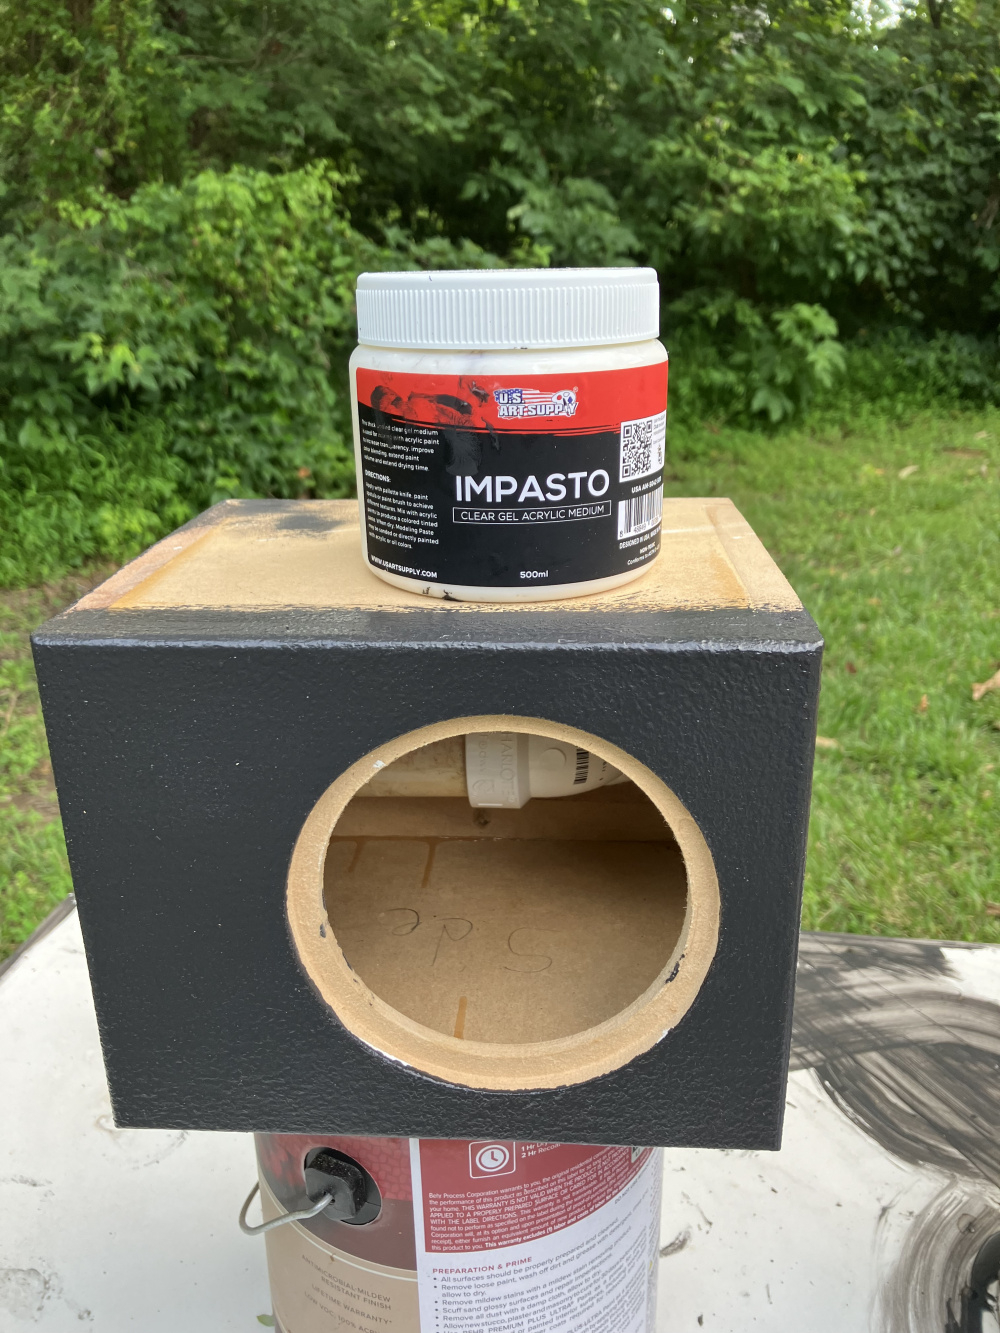
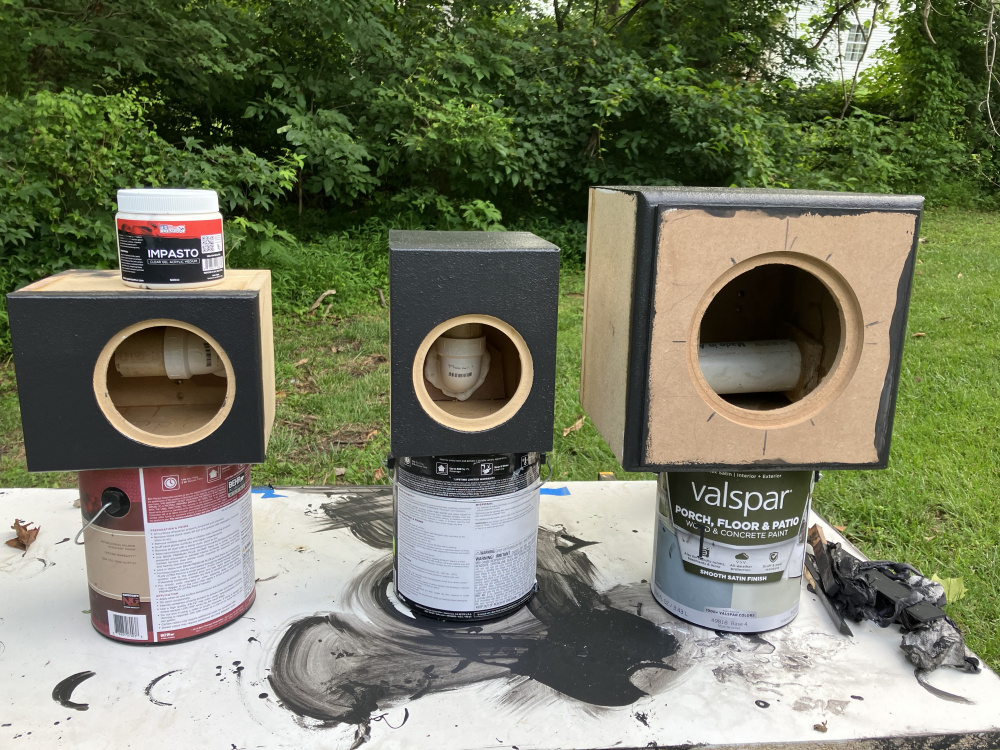
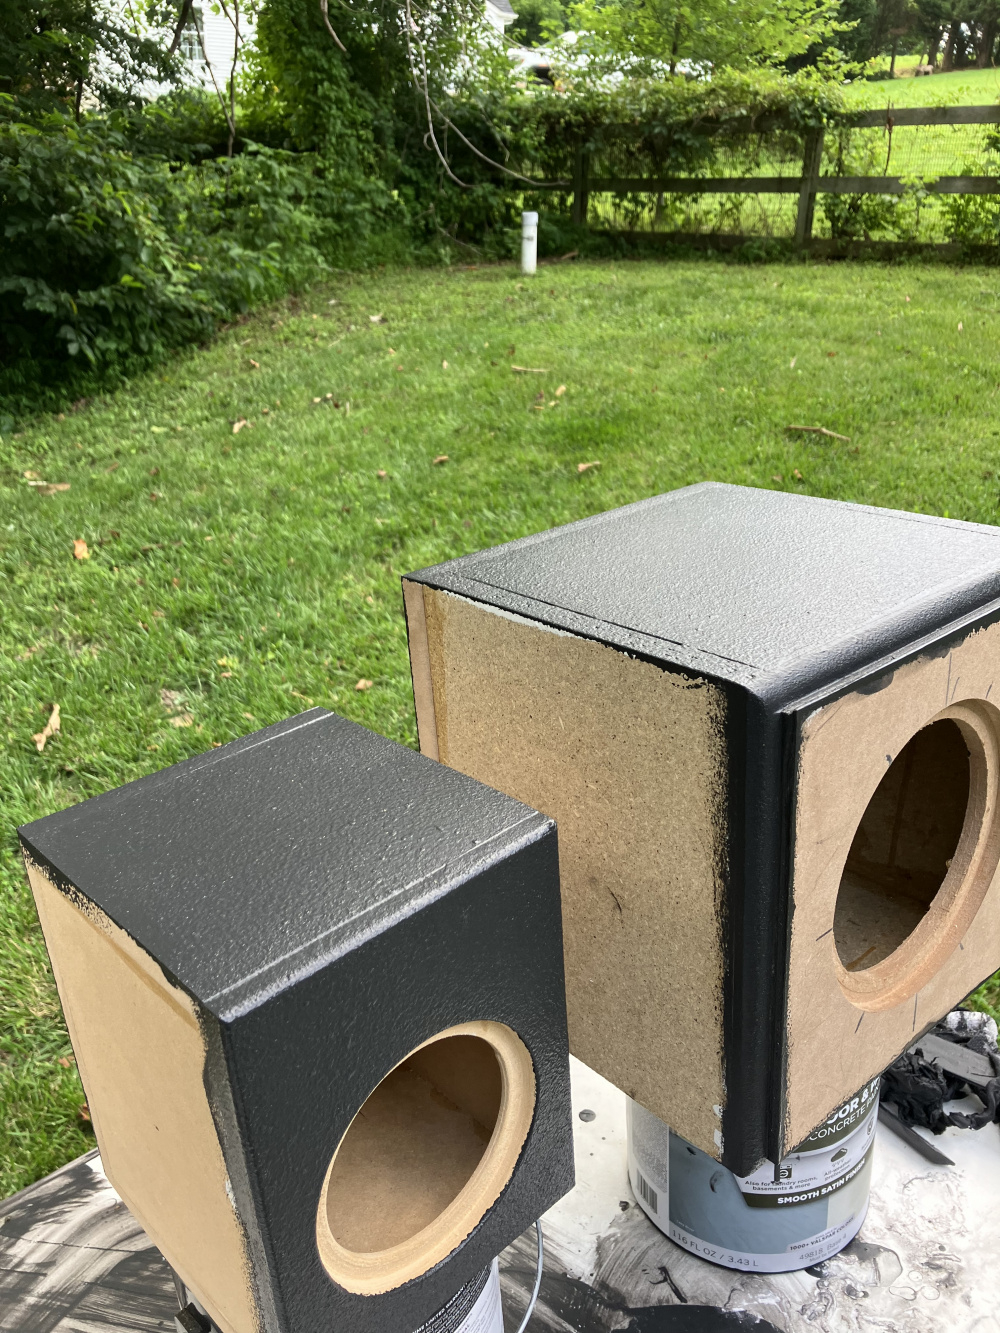
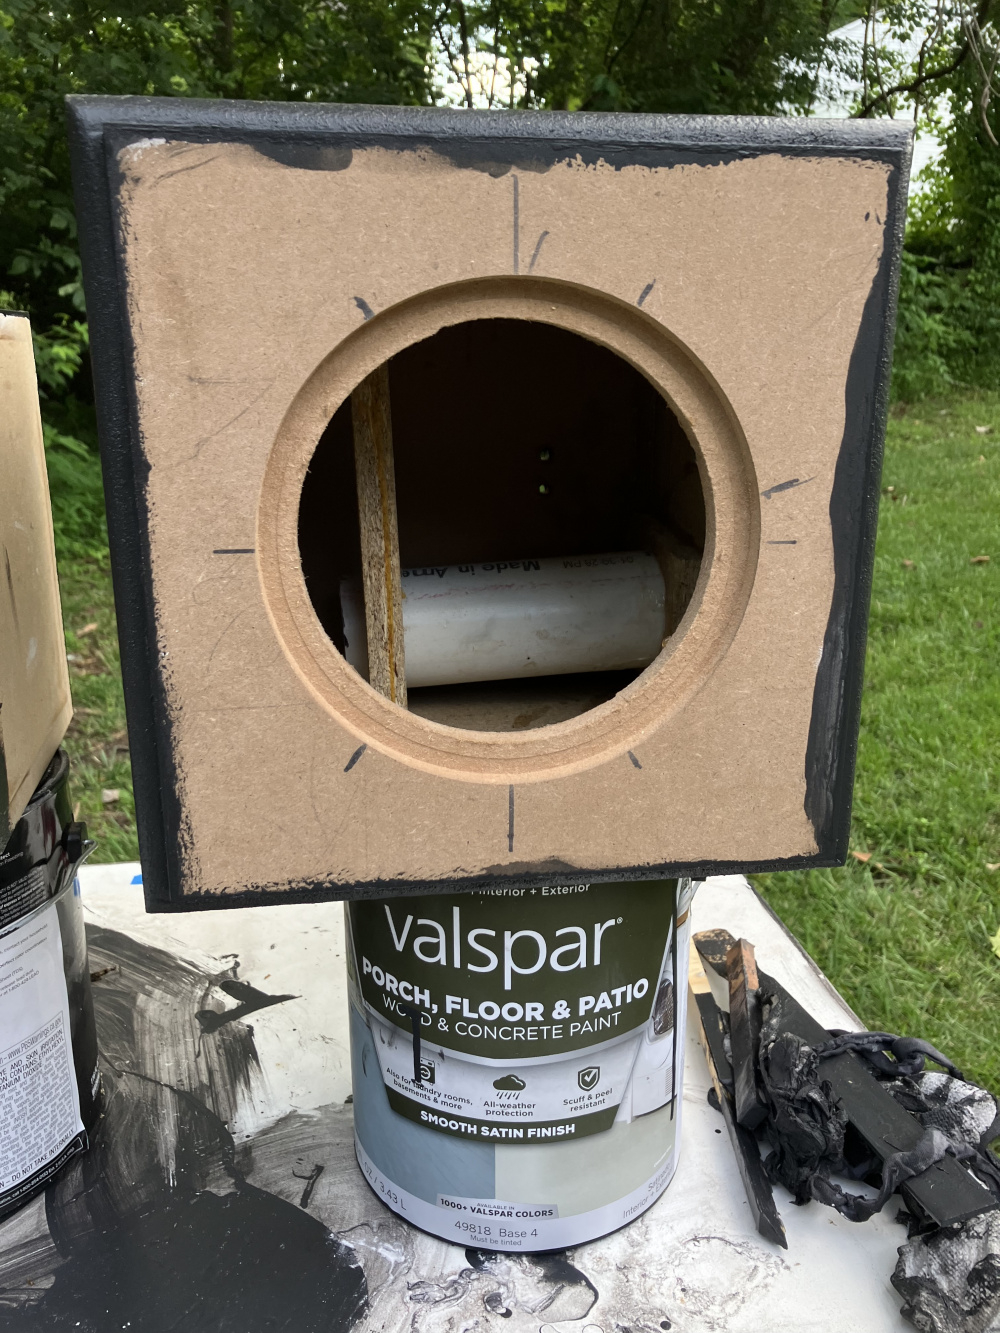
I tried to find a substitute for Duratex because I’m cheap and I like the look. I figured porch paint is tough so why not try that. To my surprise It was thin as water and not like 35 years ago which was the last time I used it. After some research I ordered a $15 jar of medium impasto from Amazon to experiment and it at least seems to have gone on well. Impasto comes in all kinds of strengths and finishes. I used maybe 1/2 the jar with 2 coats but I would use much, much less of both products now that I’ve had a trial run. Probably 60/40 paint to impasto, and I’ve got enough to last for a lot of cabs. I won’t get back to these for awhile so they’ll have at least a week and probably 2 to cure. I didn’t fill the larger painted surface because that is the bottom. I’m going to veneer the rest in walnut. I’ll report back if there’s anything disappointing but right now I’m satisfied.
I recently stumbled on a large retractable desk lamp/magnifier at my local Habitat re-store (see pics below). It was dirt cheap and marked "As is - no returns - not tested." The device has a GIANT magnification lens, measuring 7.5" in diameter, together with a super heavy duty swing arm to hold it steady. The magnifier produces a sharply focused, wide angle view with just the right amount of magnification for small PCB and SMT chip soldering work. When I got it home and plugged it in, I discovered that one of the two 7W G23 compact fluorescent lamps was dead. So I got out my DMM and traced the fault to an open ballast transformer. You can still get these xformers on-line, but I decided to do an "LED conversion" instead. This involved rewiring the lamp to bypass the ballasts and then installing two new "plug-in-replacement" 4W G23 style LED lamps. The new LED replacment lamps were a little pricy, ($7 each @ Amazon), but well worth the price considering that they last up to 30,000 hours. So now the lamp has the same light output as the original bulbs, yet consumes 43% less power. I'm very happy with the outcome and and am currently using it to populate another 6J1 preamp board.
Below is a comparison of the old compact fluorescents next to the new LED bulbs:
Below is what the underside of the lamp looks like (with the old bulbs still in place):
Below is what the 6J1 preamp PCB looks like through the big 7 " lens:
I would be lost without my old magnifying visor. I don't know why they make some component markings so hard to read. Gray ink on a little black transistor? You have to have light coming in at an angle to even see the label, let alone read it.
@DrewsBrews said:
Argh that would come in super handy right now. Got some electrolytic caps in little plastic SMD saddles to reattach. To ebay!
Here is an Amazon link to a magnifier similar to the one that I found. The head unit and swing arm look the same as mine, but the bottom is different with a table top clamping device instead of the 7 x 11.5" base that my unit has. The base on mine is actually filled with sand, weighs about 5 lbs or so, and really holds the lamp steady. I know this because I took the base apart to find out why it was so heavy!
They work surprisingly well and have some nice digital options. One that I was using had the ability to measure what was under the scope. Made it a lot easier to know that I was ordering the correct size resistor.
My eyes are not what they used to be, and I need all the help I can get!
These rulers are high-visibility, easy read, start at 0 with metric and US scales
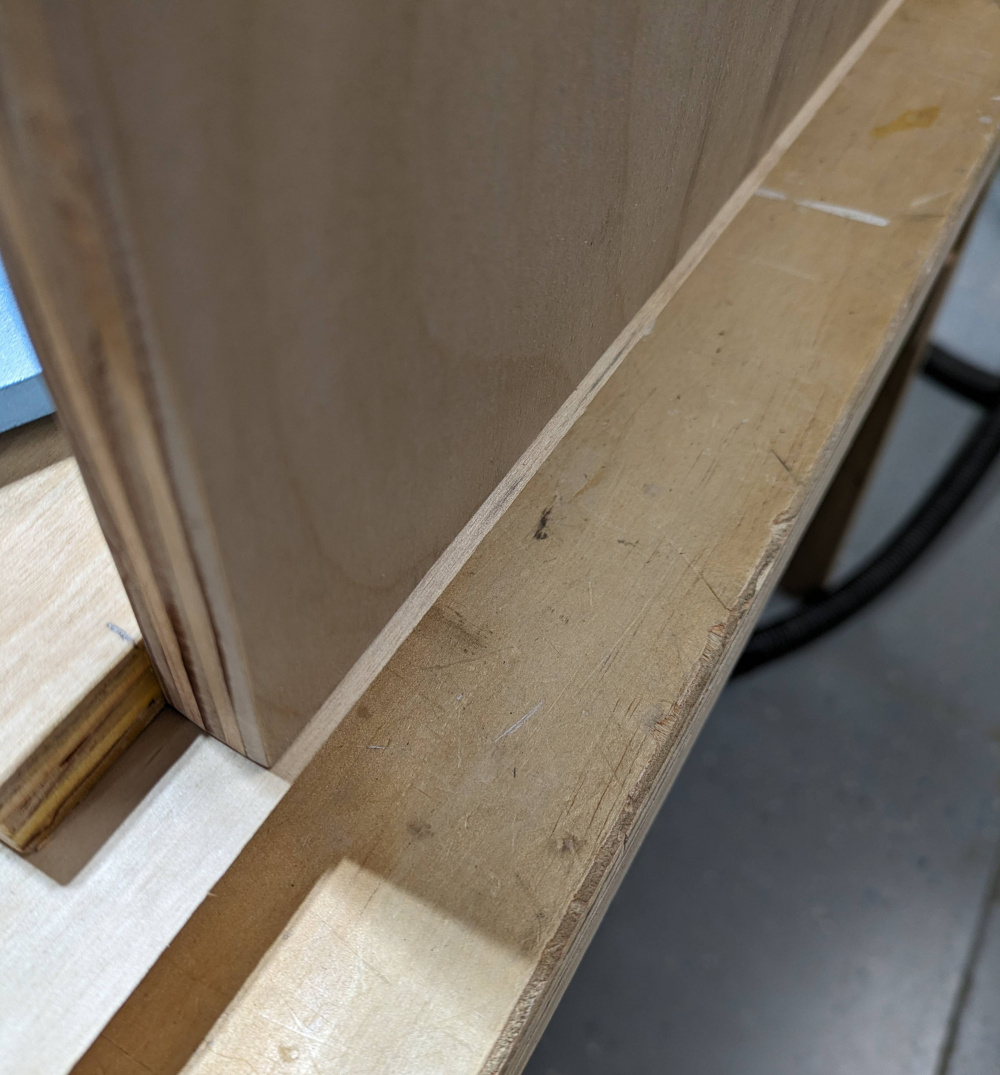
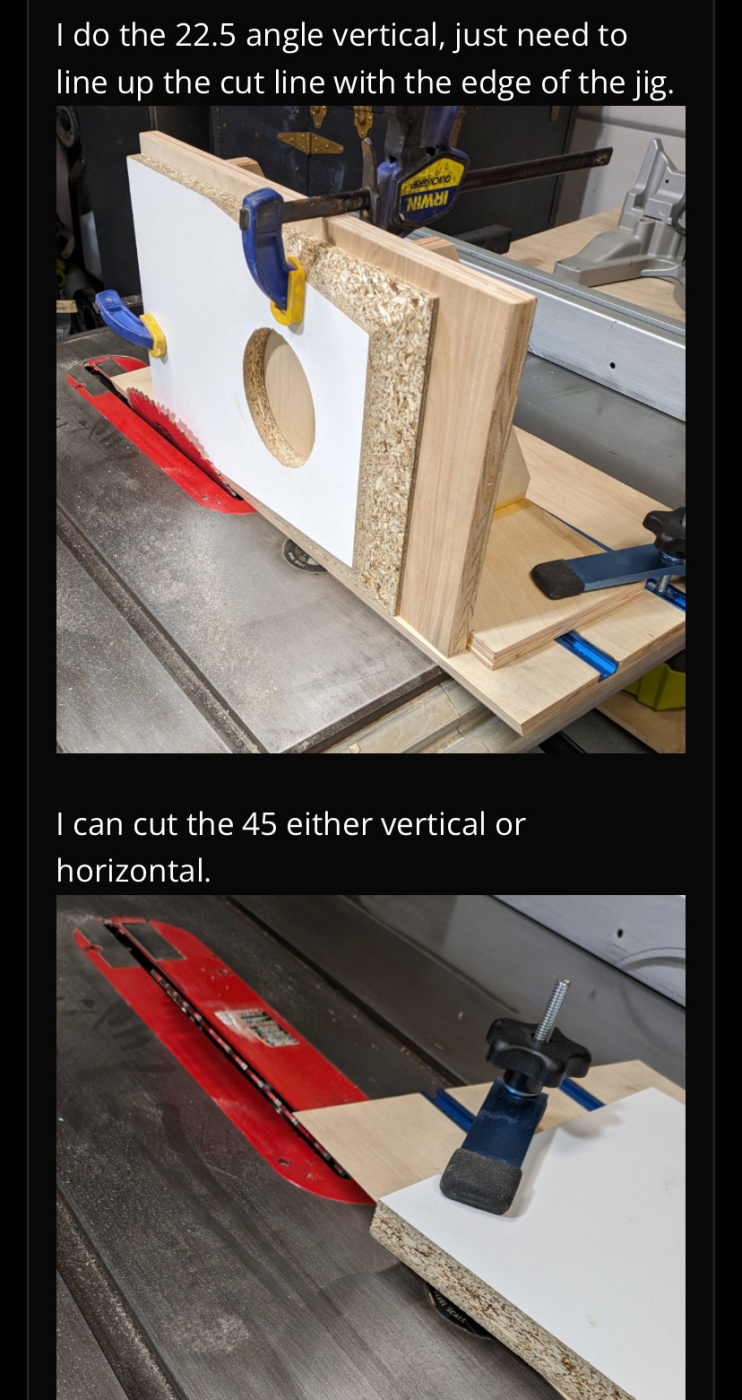
I needed a way to cut some shallow angle (22.5 degree) facets on the baffles for an upcoming project so I made this:
Runs in the miter slot on my table saw. I cut one side at the 22.5 angle and turned it around and cut the other side at 45.
I do the 22.5 angle vertical, just need to line up the cut line with the edge of the jig.
I can cut the 45 either vertical or horizontal.
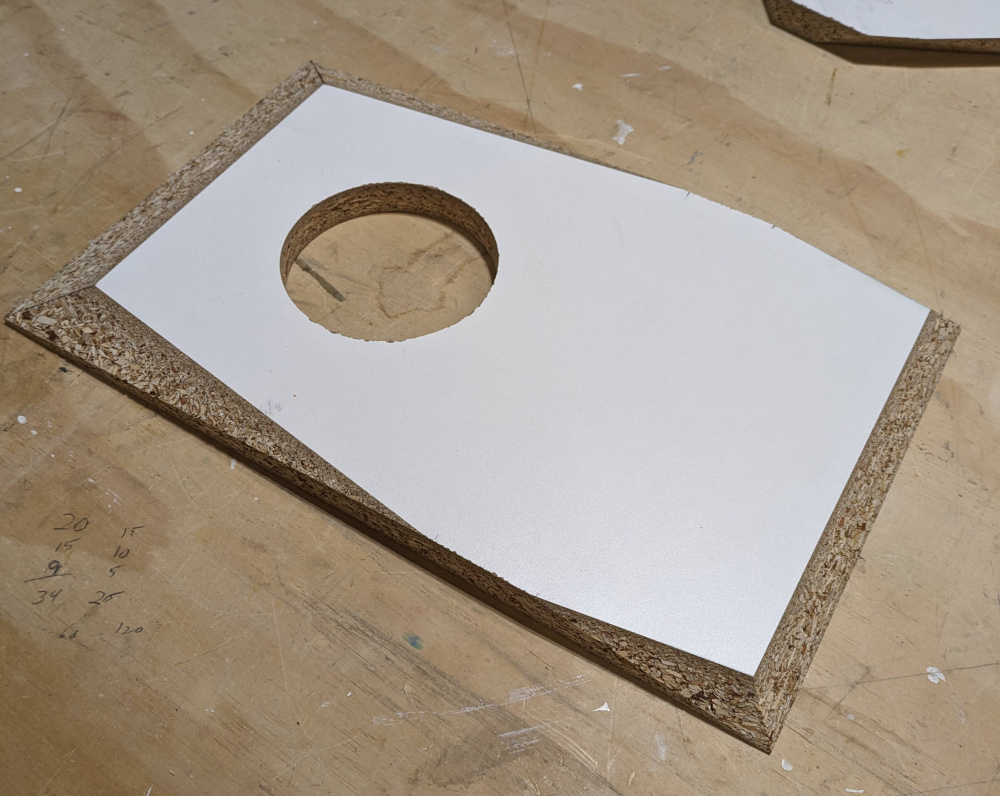
Test baffle.
I like it, but how do you set-up the cuts?
Don't see any marks for angularity - do you set it up [with an angle finder] and cut each time in a custom fashion?
@rjj45 said:
My eyes are not what they used to be, and I need all the help I can get!
These rulers are high-visibility, easy read, start at 0 with metric and US scales
I was pretty excited when I got home today. Several Amazon boxes, but specifically a large, long one and I couldn't remember what I ordered that was very big...this is the 18" ruler so this box is a little longer than 2 feet.
The packing paper was just as funny to me. All it was doing was stopping the metal ruler from banging around, probalby so no one realized that they just stuck a small ruler in a huge box!
This is my patent-pending IRMMJ - Infinitely Repeatable Mic Measurement Jig. If anyone is interested in building one, I can license the IP for a reasonable fee.
@Steve_Lee said:
I like it, but how do you set-up the cuts?
Don't see any marks for angularity - do you set it up [with an angle finder] and cut each time in a custom fashion?
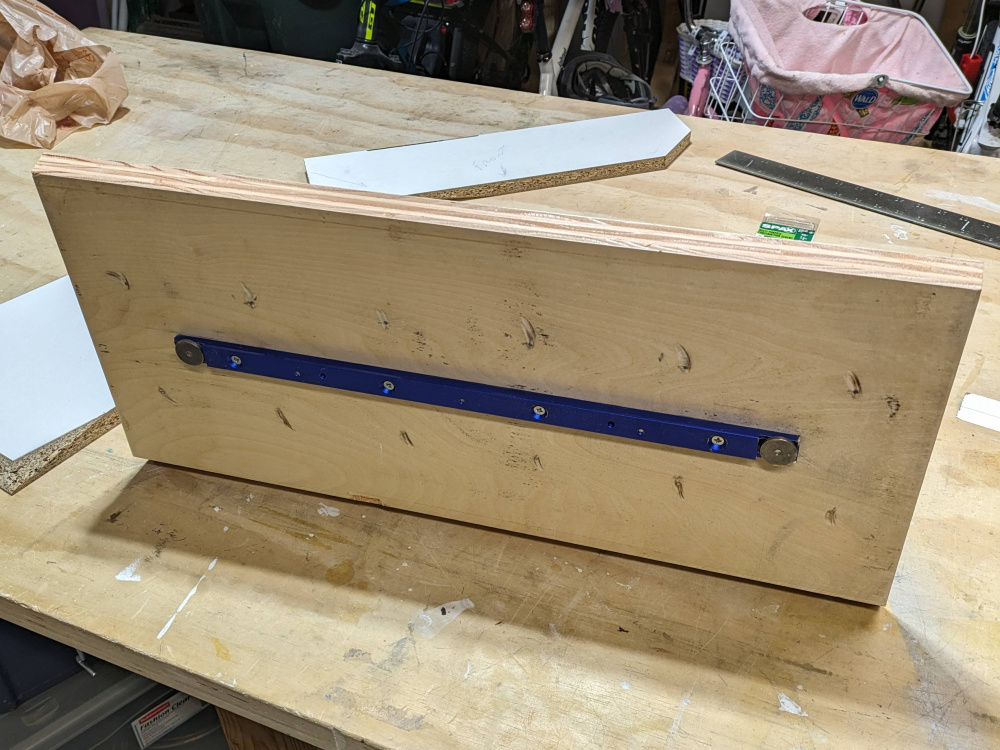
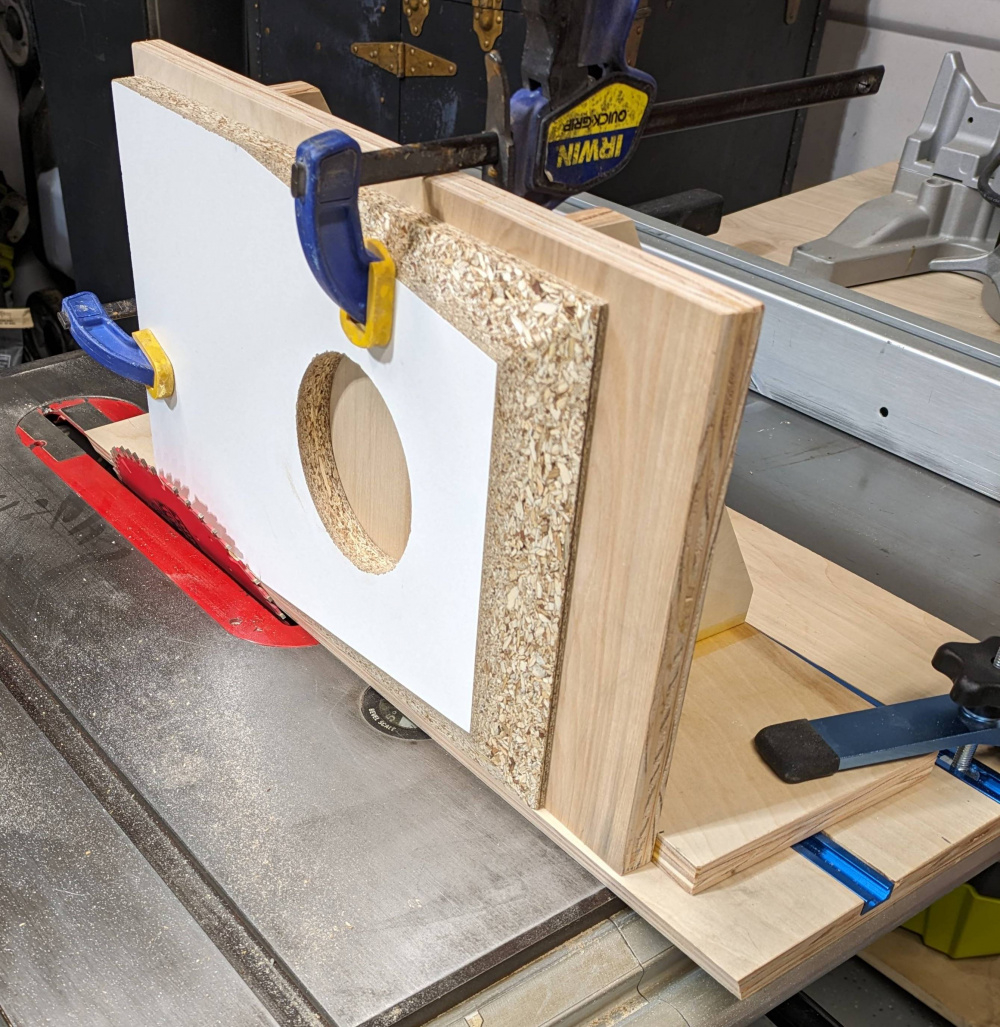
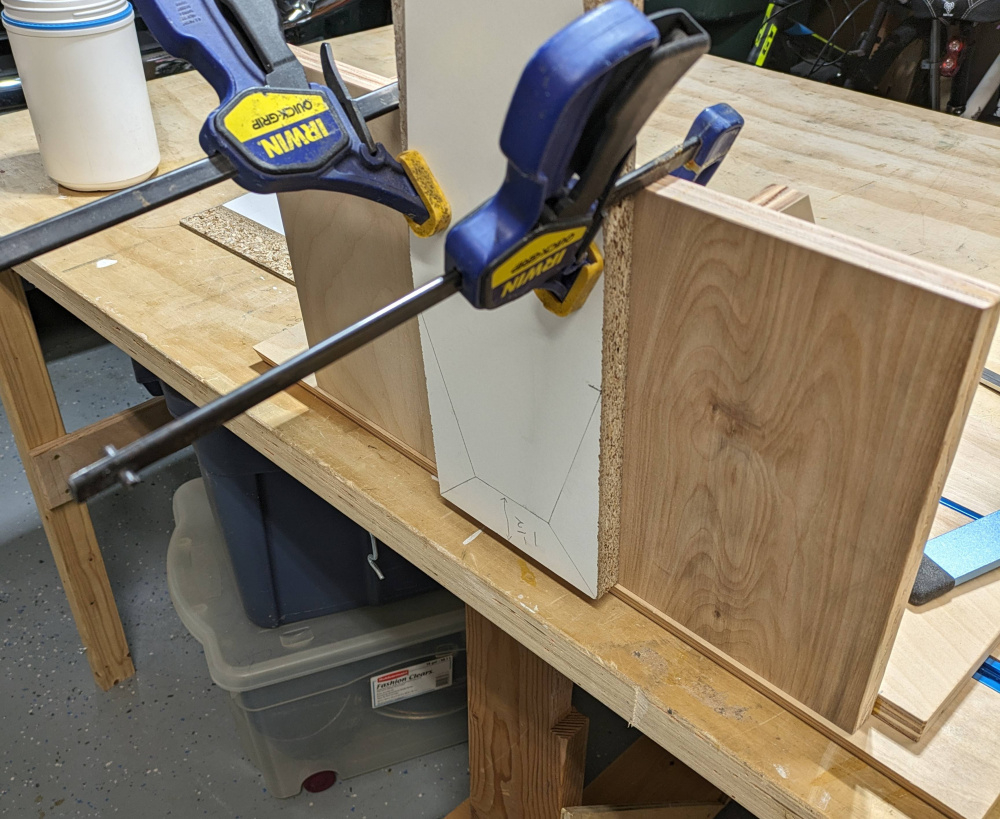
This is the best way I have found so far. I have a hard time explaining these things, so bear with me.
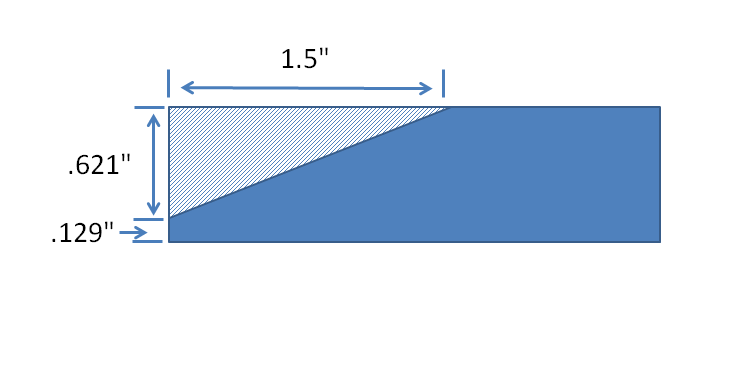
I am going to cut a sample baffle out of 3/4" material. The top facet is going to be 1-1/2" wide.
The shaded area is the material to remove, I used an online right angle calculator to find the dimensions on the left.
I set the fixture .129" from the edge of the jig.
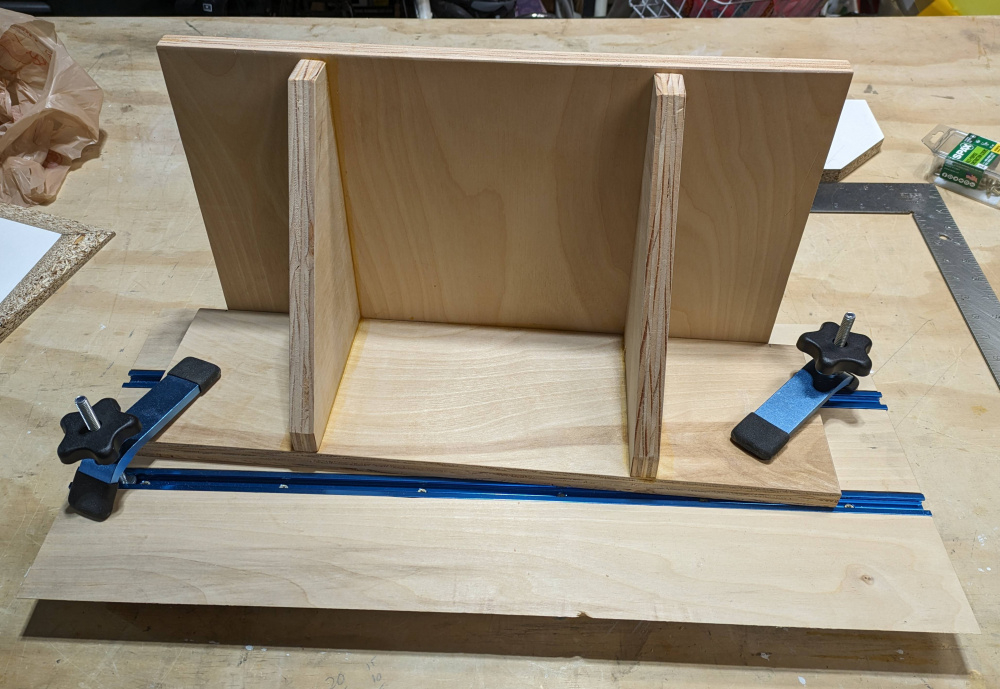
Attach the baffle to the jig
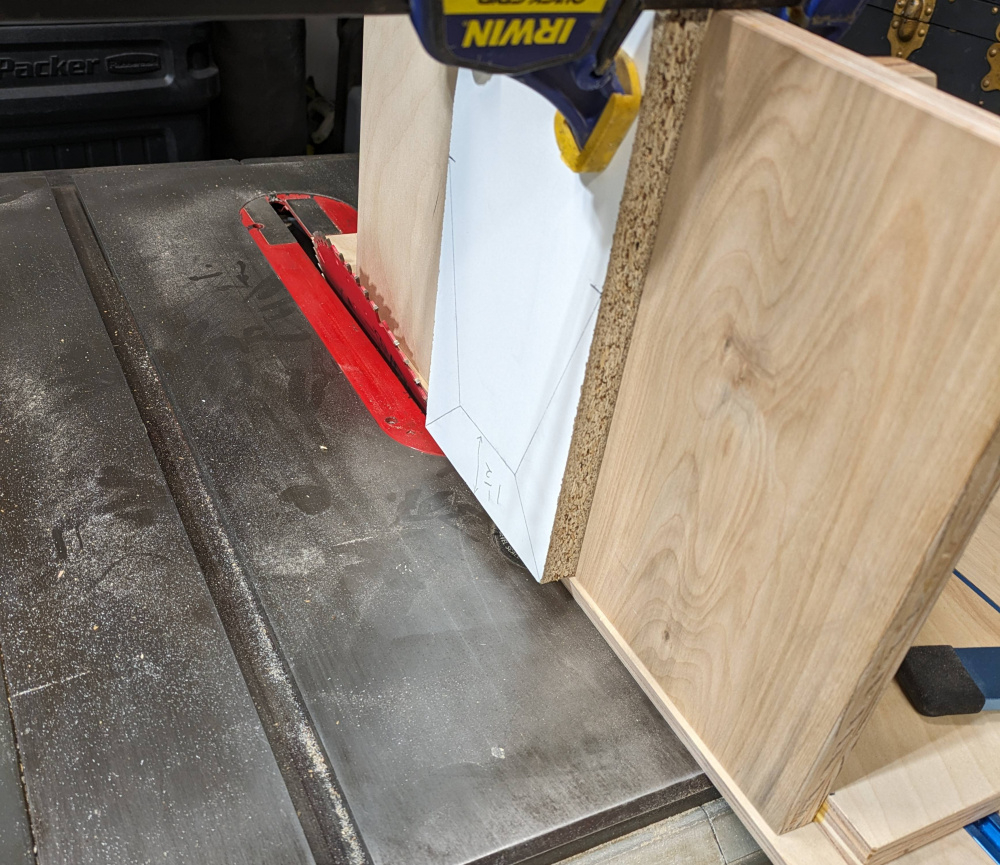
Make the cut
Came pretty close to the line I marked at 1.5"
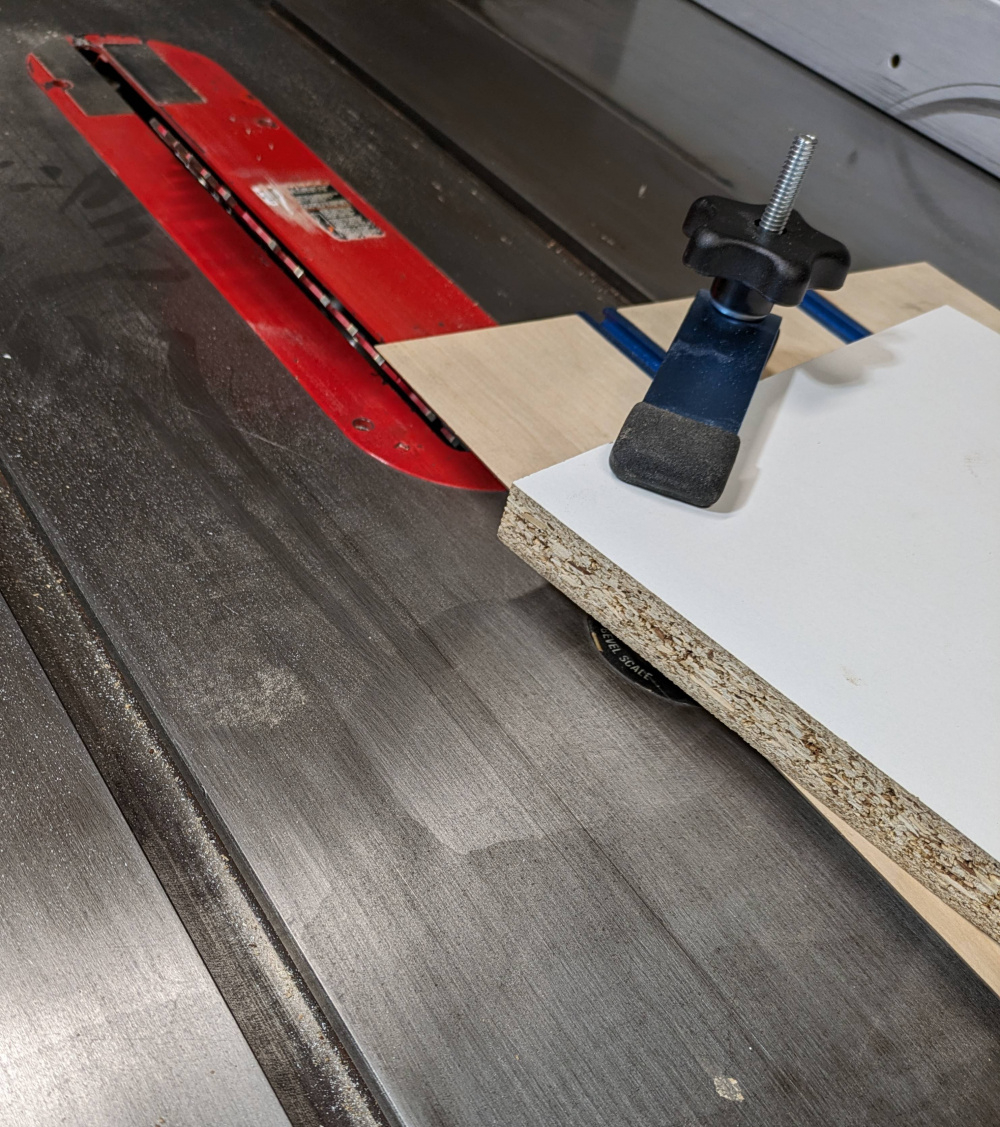
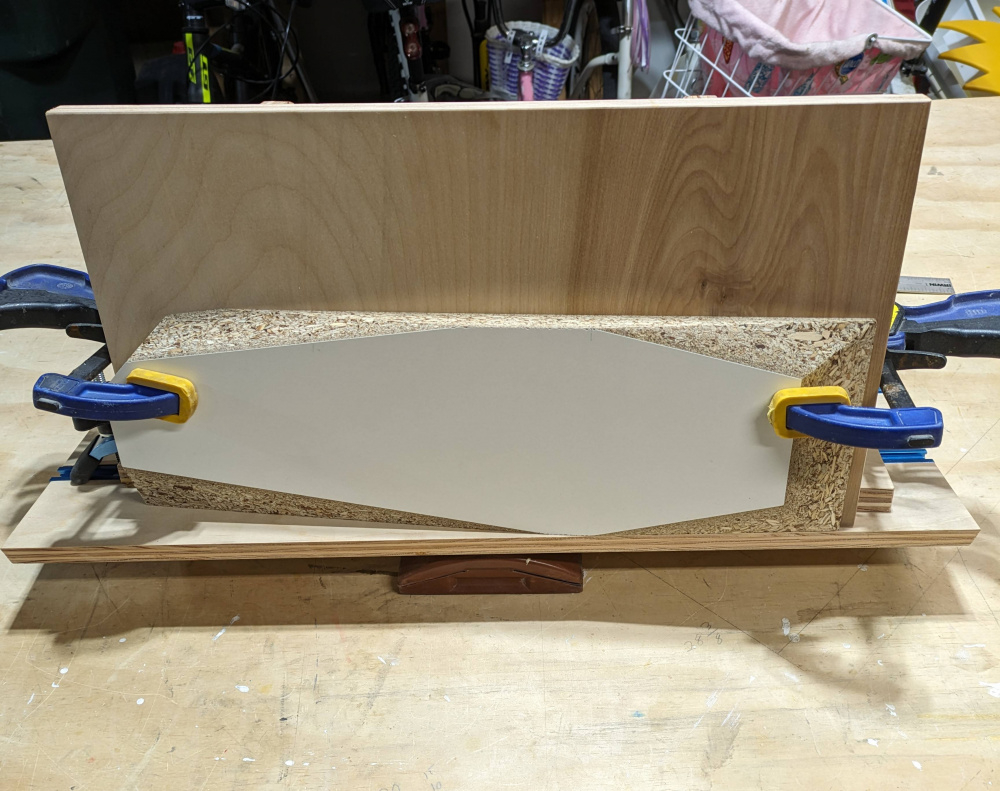
Then I attach the baffle on its side to the jig (this phot was taken after all of the cuts were made, but you get the idea)
I line up the top corner with the edge of the jig.
And I line up the point where I want the facet to end on the side of the baffle.
After the cut I flip the baffle over and repeat.
If I was careful lining up those points, the facets meet at the top corners and they end at the same point on both sides.
A little hard to see with this particle board, but they line up pretty good
That's probably as clear as mud, let me know if you have any questions and or suggestions.
@6thplanet said:
So the jig is angled back 22.5 and the blade is tilted the opposite way 22.5?
It's a two-sided jig, one side is cut flush with the blade when the blade is set at 22.5, the other side is cut to be flush with the blade when the blade is set at 45.
Comments
Yeah, me too. As much as I like the very clean construction of all connections under the crossover board, I like being able to see and verify the connections by having them on top of the board. I've screwed stuff up at times.....
Cool idea. So after the epoxy sets, the xover can still be removed by simply taking out the 4 screws. I'm going to give this a try on my next build. Thanks for sharing.")
I countersunk T-nuts into the bottom plate and attached the top plate on standoffs. I stack the plates and drill all the holes at once so they all align and enough of the T-nut is proud of the bottom plate that the standoffs press fit on them. I glue the bottom plate to the cabinet and I'm good to go.
Ron
Same, sept I just used wood glue.
I recently found this sandpaper at the local Ace Hardware. It has an open weave instead of a solid back and seems really durable. I like it a lot.
https://acehardware.com/departments/paint-and-supplies/painting-tools-and-supplies/sandpaper/1018144?store=11520&gclid=EAIaIQobChMIxo_YkZTv_wIVQv3jBx3T2Q3cEAQYAyABEgKhNPD_BwE&gclsrc=aw.ds
Ron
Good stuff - Look in the drywall finishing section of your local big box lumber store for drywall sanding cloth.
Very Interesting.
I never thought about using those on actual wood.
I guess I'm showing my age with that picture.
This product is marketed as sandpaper with no mention of drywall.
I really like the Freud Sandnet products. The velcro and adhesive circles are fantastic. Last Christmas, HD had a deal on a huge container drum of various velcro grits, 60 to 400, for a great price. They don't clog up either. For reference, I use the round 6" variable speed Ridgid orbital sander.
InDIYana Event Website
See link --> https://www.homedepot.com/p/3M-4-3-16-in-x-11-1-4-in-10-6-cm-x-28-5-cm-220-Grit-Fine-Drywall-Sanding-Screens-Pro-Pak-10-Sheets-per-Pack-99436P/301118039
I've used mirka abranet in the past and liked it a lot.
https://buymirka.com/collections/abranet
I tried to find a substitute for Duratex because I’m cheap and I like the look. I figured porch paint is tough so why not try that. To my surprise It was thin as water and not like 35 years ago which was the last time I used it. After some research I ordered a $15 jar of medium impasto from Amazon to experiment and it at least seems to have gone on well. Impasto comes in all kinds of strengths and finishes. I used maybe 1/2 the jar with 2 coats but I would use much, much less of both products now that I’ve had a trial run. Probably 60/40 paint to impasto, and I’ve got enough to last for a lot of cabs. I won’t get back to these for awhile so they’ll have at least a week and probably 2 to cure. I didn’t fill the larger painted surface because that is the bottom. I’m going to veneer the rest in walnut. I’ll report back if there’s anything disappointing but right now I’m satisfied.
I recently stumbled on a large retractable desk lamp/magnifier at my local Habitat re-store (see pics below). It was dirt cheap and marked "As is - no returns - not tested." The device has a GIANT magnification lens, measuring 7.5" in diameter, together with a super heavy duty swing arm to hold it steady. The magnifier produces a sharply focused, wide angle view with just the right amount of magnification for small PCB and SMT chip soldering work. When I got it home and plugged it in, I discovered that one of the two 7W G23 compact fluorescent lamps was dead. So I got out my DMM and traced the fault to an open ballast transformer. You can still get these xformers on-line, but I decided to do an "LED conversion" instead. This involved rewiring the lamp to bypass the ballasts and then installing two new "plug-in-replacement" 4W G23 style LED lamps. The new LED replacment lamps were a little pricy, ($7 each @ Amazon), but well worth the price considering that they last up to 30,000 hours. So now the lamp has the same light output as the original bulbs, yet consumes 43% less power. I'm very happy with the outcome and and am currently using it to populate another 6J1 preamp board.")
Below is a comparison of the old compact fluorescents next to the new LED bulbs:
Below is what the underside of the lamp looks like (with the old bulbs still in place):
Below is what the 6J1 preamp PCB looks like through the big 7 " lens:
Great score and refurb!
Argh that would come in super handy right now. Got some electrolytic caps in little plastic SMD saddles to reattach. To ebay!
https://duckduckgo.com/?q=magnifying+headset&atb=v350-1&ia=web
I would be lost without my old magnifying visor. I don't know why they make some component markings so hard to read. Gray ink on a little black transistor? You have to have light coming in at an angle to even see the label, let alone read it.
Here is an Amazon link to a magnifier similar to the one that I found. The head unit and swing arm look the same as mine, but the bottom is different with a table top clamping device instead of the 7 x 11.5" base that my unit has. The base on mine is actually filled with sand, weighs about 5 lbs or so, and really holds the lamp steady. I know this because I took the base apart to find out why it was so heavy!
https://www.amazon.com/Bemelux-Magnifying-Inches-Bigger-Magnifier/dp/B0CHB4WVFD/ref=mp_s_a_1_8?crid=MHNWNWTXKR8H&dib=eyJ2IjoiMSJ9.huDKSpG4TUr2UTfYAHiasl37MawPuBc2JphWwaPtpC9drXDExo4LatC3gsXdx7zQPgajnFCDdeZV7YY3eh8uOg.doWIMrg50oqwnagyk3JuHlYsab1iJc8JU-nc6wb5BFw&dib_tag=se&keywords=7+inch+magnifying+desk+lamp&qid=1705018635&sprefix=7+inch+magnifying+desk+lamp,aps,249&sr=8-8
That's a nice bench setup!
At work, we have all but given up on microscopes and switched over to cameras with screens like this one:
https://www.amazon.com/dp/B08BCBK6WX/ref=sspa_dk_detail_7?psc=1&pf_rd_p=f734d1a2-0bf9-4a26-ad34-2e1b969a5a75&pf_rd_r=N3PN1SJCCNKY7M85K9NN&pd_rd_wg=AlNkr&pd_rd_w=Q2KHO&content-id=amzn1.sym.f734d1a2-0bf9-4a26-ad34-2e1b969a5a75&pd_rd_r=29d98dff-9ca7-412c-b8f7-75644b42ff11&s=photo&sp_csd=d2lkZ2V0TmFtZT1zcF9kZXRhaWw
They work surprisingly well and have some nice digital options. One that I was using had the ability to measure what was under the scope. Made it a lot easier to know that I was ordering the correct size resistor.
My eyes are not what they used to be, and I need all the help I can get!
These rulers are high-visibility, easy read, start at 0 with metric and US scales
https://a.co/d/cjhi3qT
I'm with you on the eyesight not what it used to be. That ruler might be just what I need.
I made a thing.
I needed a way to cut some shallow angle (22.5 degree) facets on the baffles for an upcoming project so I made this:
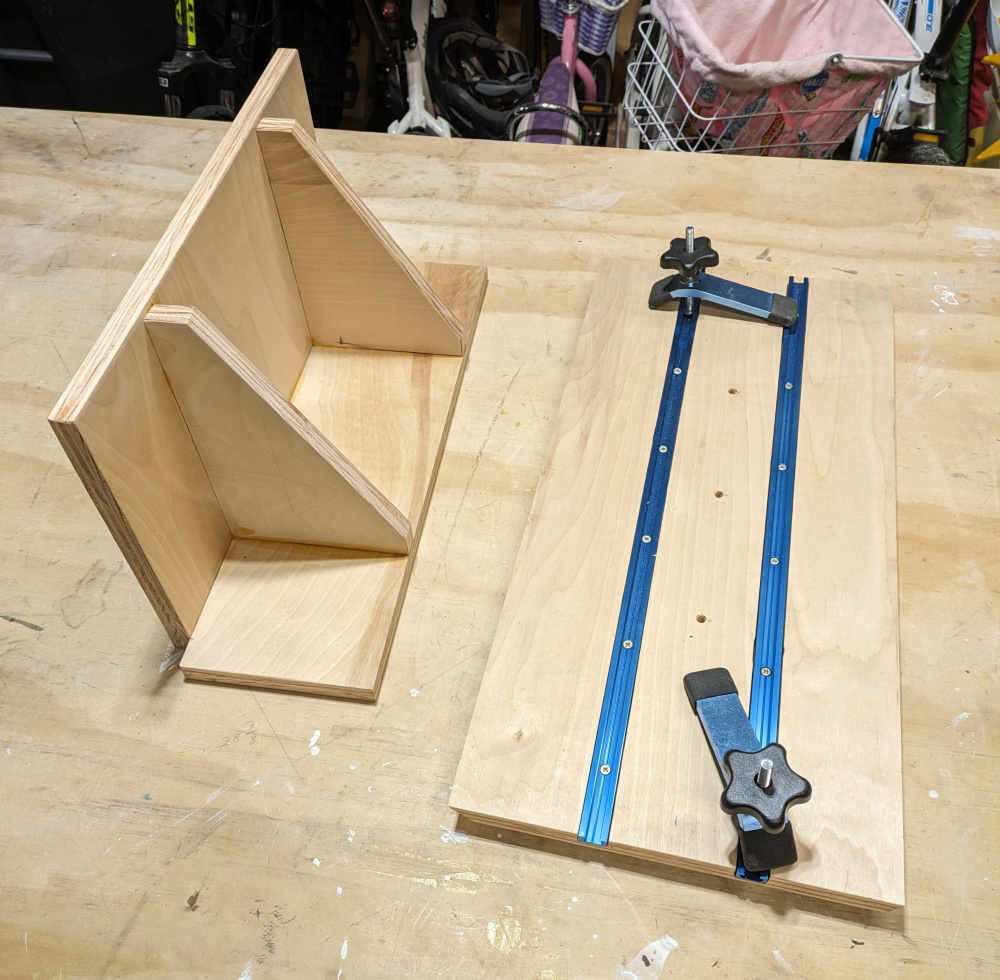
Runs in the miter slot on my table saw. I cut one side at the 22.5 angle and turned it around and cut the other side at 45.
I do the 22.5 angle vertical, just need to line up the cut line with the edge of the jig.
I can cut the 45 either vertical or horizontal.
Test baffle.
Seems to work OK.
Let me know what you think.
I like it, but how do you set-up the cuts?
Don't see any marks for angularity - do you set it up [with an angle finder] and cut each time in a custom fashion?
I was pretty excited when I got home today. Several Amazon boxes, but specifically a large, long one and I couldn't remember what I ordered that was very big...this is the 18" ruler so this box is a little longer than 2 feet.
The packing paper was just as funny to me. All it was doing was stopping the metal ruler from banging around, probalby so no one realized that they just stuck a small ruler in a huge box!
This is my patent-pending IRMMJ - Infinitely Repeatable Mic Measurement Jig. If anyone is interested in building one, I can license the IP for a reasonable fee.
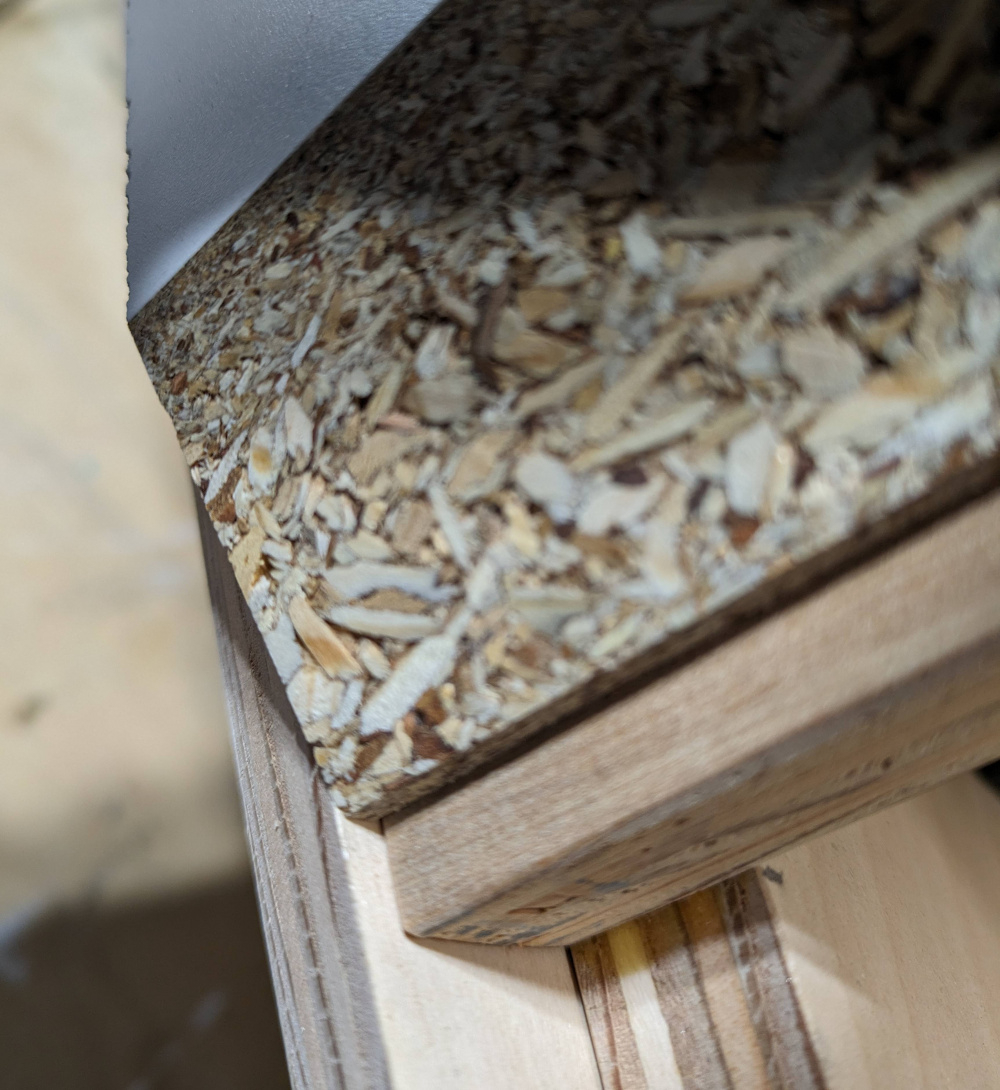
This is the best way I have found so far. I have a hard time explaining these things, so bear with me.
I am going to cut a sample baffle out of 3/4" material. The top facet is going to be 1-1/2" wide.
The shaded area is the material to remove, I used an online right angle calculator to find the dimensions on the left.
I set the fixture .129" from the edge of the jig.
Attach the baffle to the jig
Make the cut
Came pretty close to the line I marked at 1.5"

Then I attach the baffle on its side to the jig (this phot was taken after all of the cuts were made, but you get the idea)
I line up the top corner with the edge of the jig.
And I line up the point where I want the facet to end on the side of the baffle.
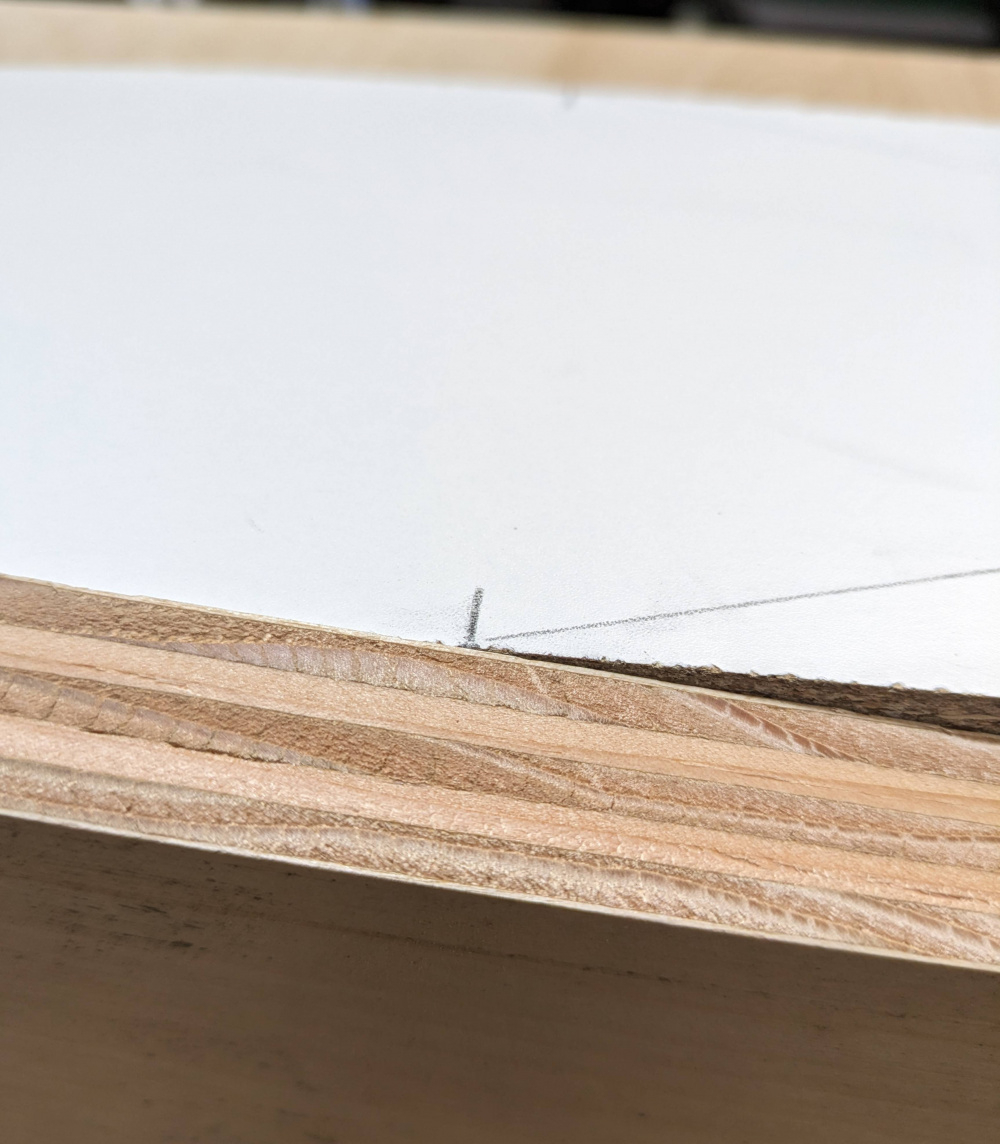
After the cut I flip the baffle over and repeat.
If I was careful lining up those points, the facets meet at the top corners and they end at the same point on both sides.
A little hard to see with this particle board, but they line up pretty good
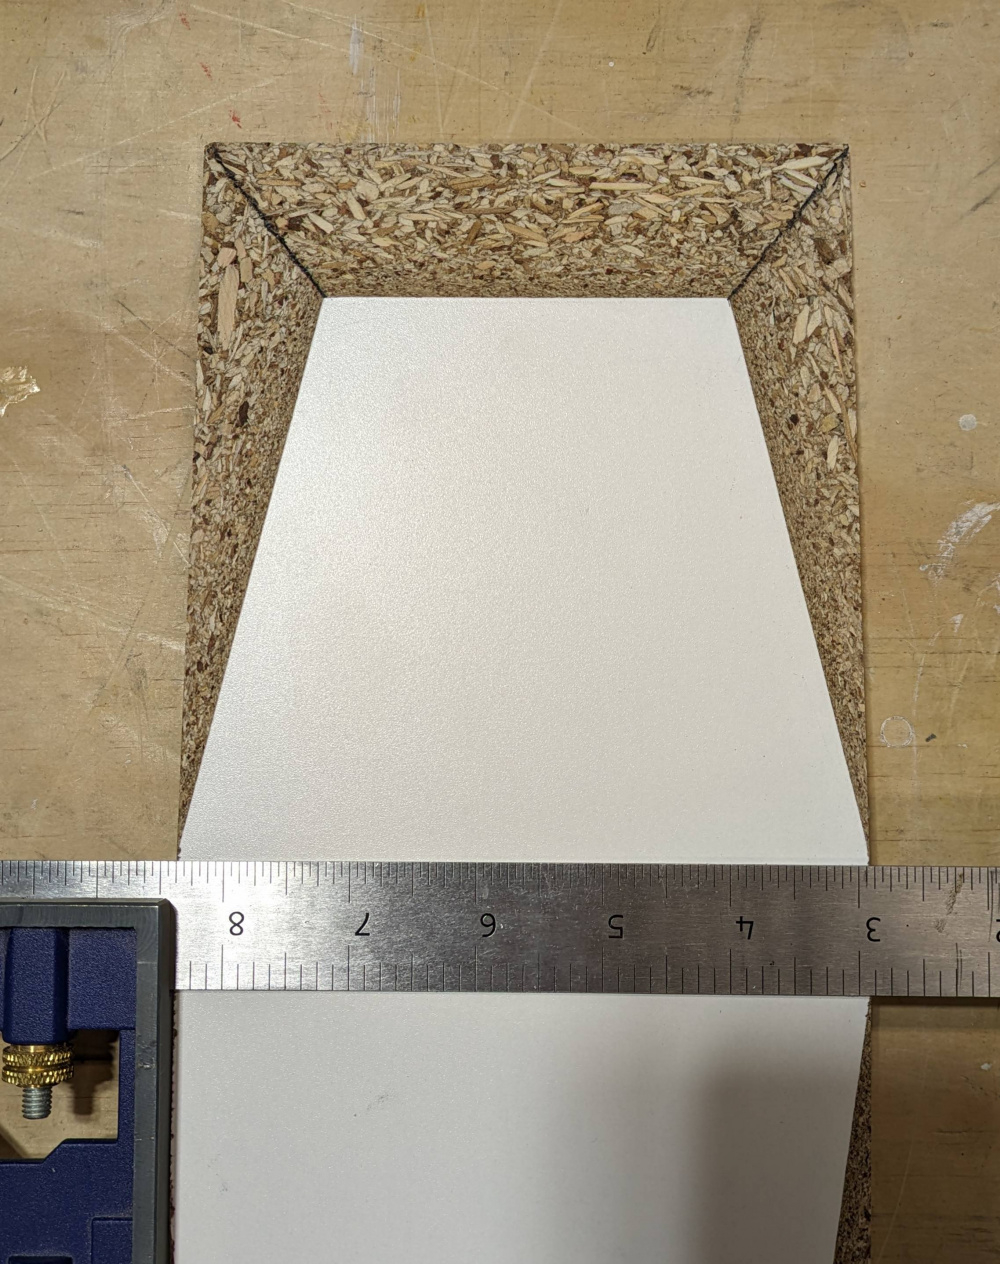
That's probably as clear as mud, let me know if you have any questions and or suggestions.
You did a good job of explaining and the pics fill in all of the details - I can figure it out from here - thanks for this, Jake's_dad!
I like the grain in that particle board too - it appears to be like looking downward into a box lined with Rice Crispies . . . forever - clearcoat it.
So the jig is angled back 22.5 and the blade is tilted the opposite way 22.5?
Ok, so top picture. Baffle is 90 to the table, blade is tilted 22.5?