Oh I see, thought you were referencing me getting freebies from manufacturers like I did from TB.
I did not realize you were not asking directly and speaking in this way.
First and inner chamber is constructed, awaiting driver holes and rebates. Baffles are double thick poplar, and the boxes are Meniscus made 3 ltr boxes of half inch, backs are 3/4", veneered with cherry. Integrity/longevity of veneer was questionable as it was, corners had minor damage, so 2 coats of epoxy were applied. Entire cabs were sanded after the baffles were flush trimmed. Inner PR holes are cut. After driver holes, secondary chambers will be started by adding or adapting these volumes to the end design.
The poplar square 'dowels' from HD are 1.75" square, 3' long. They are 14 smackers each, and it takes almost 4 of them to do these cabs like this in a pair. I still have yet to do the other cab as above. Serendipitous that with this dimension of stock, it provides the perfect dims in finale to make everything fit JUST as it should. It was also the simplest way in my head to make the construction materialize.
Doing this as shown also fills the niche of building a cabinet with exterior bracing. That's something I've wanted to do for a while now...
I'm interested in their results. I've thought about how I would entertain doing it, but I don't know how long the polepiece is, nor want aluminum in the gap.
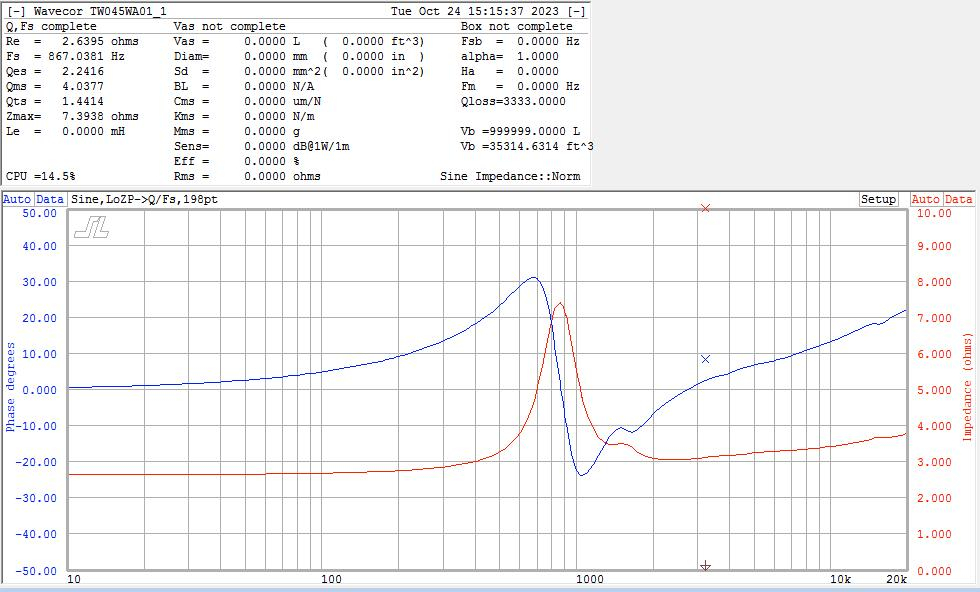
Contact made and information received. The person told me he is okay with me sharing the process and results. Essentially, an exacto knife is used to carefully cut 2 holes (each opposed to the other at 180° positions), just forward of the neck or former to cone junction in the aluminum cone from the back side of the driver. Zmax at resonance goes up, as well as Qms, and the H3 and H5 peaks below 200Hz are subdued to a much lower magnitude. I plan to measure mine stock first, and decide if I feel they need modded.
To preface, this is in no way a criticism of your design, just a curious observation/question. There appears to be an odd ratio of volume consumed by the enclosure materials vs actual volume of usuable air space to the driver. What is the actual volume of the two internal air spaces vs the total outside dimensional volume?
I calculated the inside to 3 ltrs (prior the double baffle addition, so a little less than 3 ltrs net inside 1st chamber) and outside to between 2.6 and 2.8 ltrs. Total volume of the design will be more than 6 ltrs external. Now that it is constructed, I do need to double verify the secondary volume. I have not yet done so. I have also not added the rear boards to have the total external dimensions able to be verified as yet.
Okay, the entire cabinet will be approximately 9x9x10.75 HWD. This includes the 3/8" side panels and the possibly 0.75" thick rear panel. This comes out to 13.6 ltrs gross including everything.
The inner portion is 8x4x6 without the double baffle included. With the magnet of the 4" subtracted or crammed into the driver recess molecule by molecule, it nets out to 3 ltrs.
The outer volume dims consist of 2 volumes at 5.5x1.75x8, and a rear section of 5.5x5x1.75. This total volume nets out to 3.15 ltrs, however, the rear 8" PR will likely remove a 1/3 to 1/2 of the rear portion volume, which yields a total of 2.7-2.8 ltrs.
So, it turns out my math is pretty good. What was your concern with the ratio of materials to volumes? Is it that I'm sacrificing volume for materials and that it could actually be smaller? I'm just trying to figure out exactly what it is you want to know.
Additionally, the rear 8" PR is about 8.5" in diameter. The inner cab width is 5", and with the 3.5" added width of the 2x2 poplar, the PR has enough width to be placed there. The depth on the rear is not enough depth for the PR unless I use a thick rear board to mount it, or it will not seat to the surface and hit the inside rear of the inner box. Literally, I had to use the 2x2 poplar pieces to make this fit "just so", or it would not have physically held all of the pieces involved.
I got the other one to the same point as pictured above this afternoon. Then I power sanded with 320 and 800. The poplar currently feels like glass, and looks great! Tomorrow, I plan on applying some oil based polyurethane to seal and add the amber color. Then it's sealing some cracks prior to applying the epoxy to fill in the spots needed.
When we build our speakers from timber, the internal volume:exterior(gross) volume is sizeable, particualrly with if use 3/4” to 1.5" stock.
For smaller (<1/4 cu ft) cabinets, 1/2” to 3/4" stock may be used, but the internal volume to external volume ratio gets smaller, with smaller cabinets.
That is to say, the cabinet material takes up a lot of space!
One of the benefits of polymer or aluminium enclosures (with ribbing or bracing, of course) is the high internal volume to external volume. The thin cabinet material allows for a smaller overall size.
If you have a chance to look under the hood (or listen to) at the Google Nest Audio, made for them by Peerless, you can see what can be done with aluminium enclosures, DSP, amps, wave-guided tweeters, built in microphones, wifi and BT for speech recognition and streaming. All for just $200 a stereo pair.
It must be some kind of loss leader for Google...
DIYers can use 3D printed enclosures, of course. I've seen some pretty amazing desktop-style speakers for use @1 or 2 ft, that are smaller than a hand soap dispenser, and the enclosure is about as thick too.
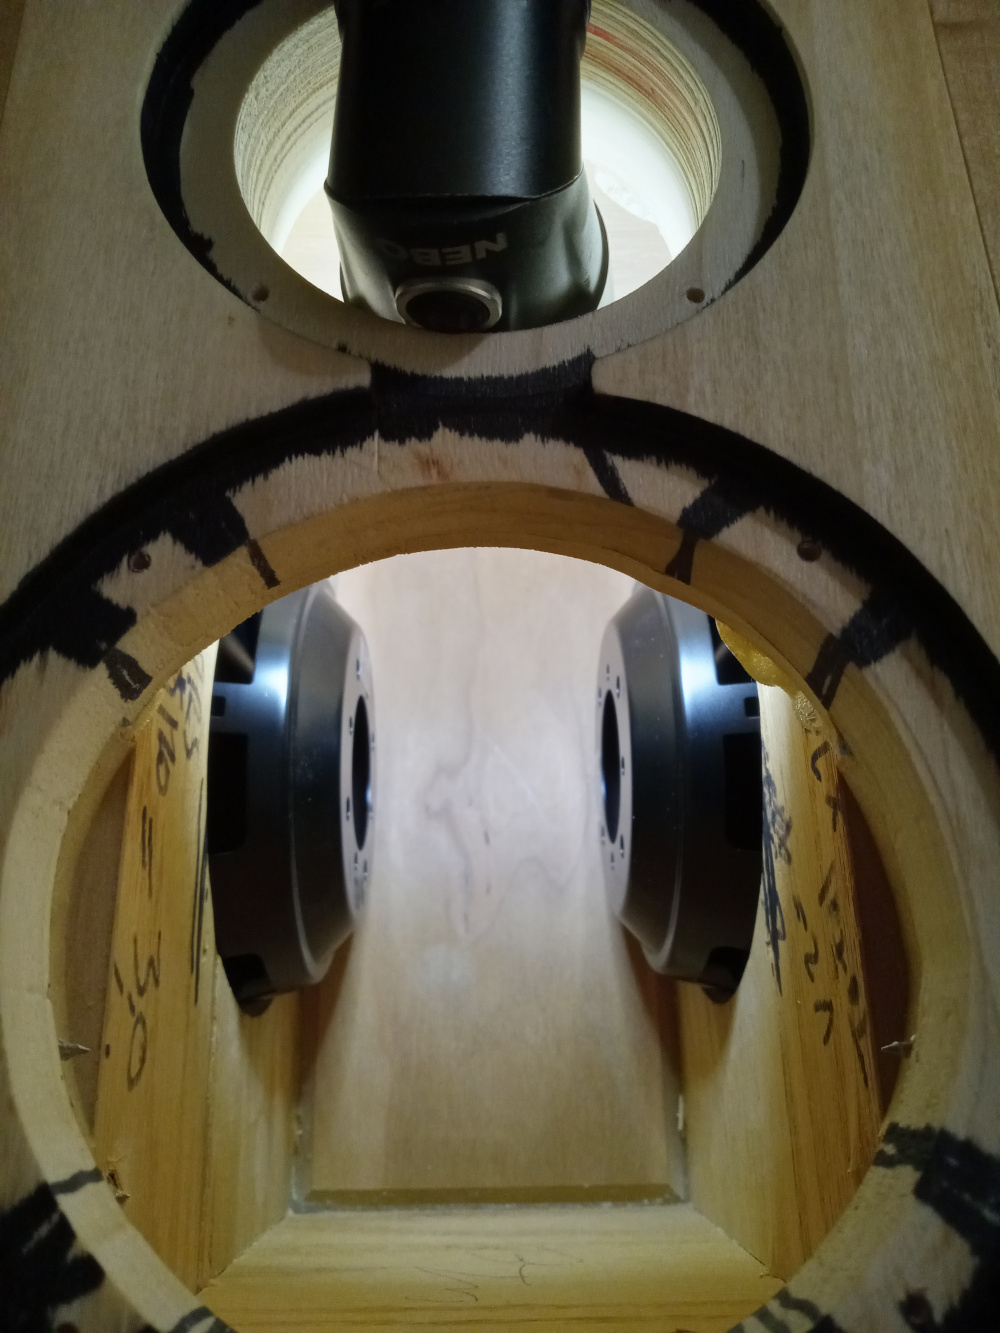
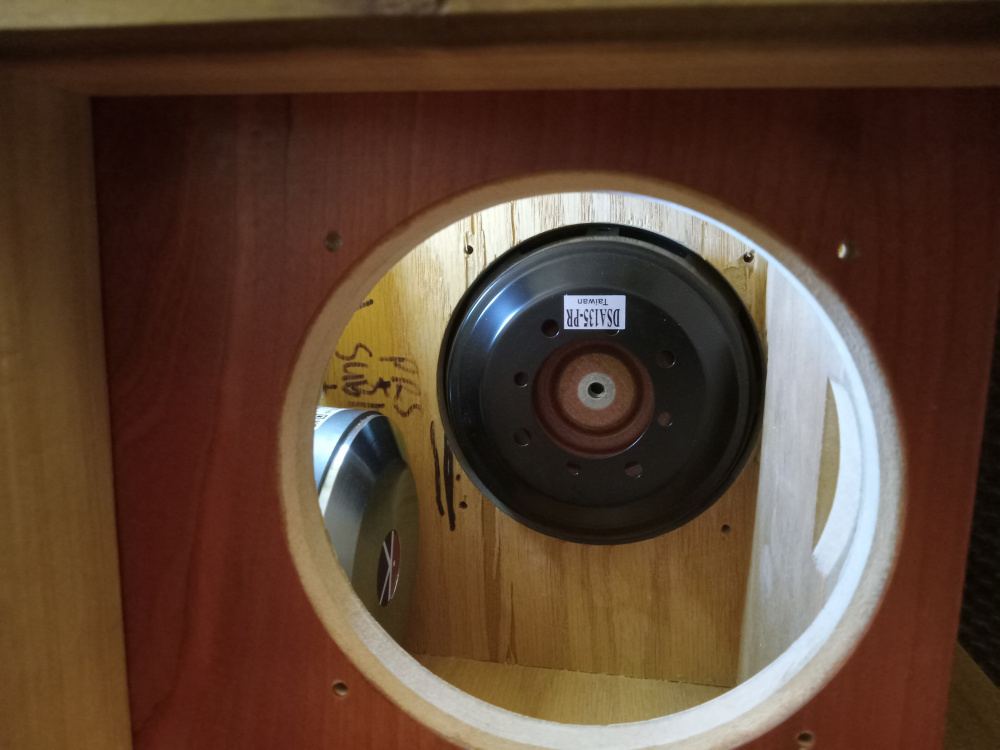
So you can see how packed this pair of enclosures will be, ive taken some in situ photos for a visual representation. Likely, the xovers will be positioned in a capital I shaped fashion in and around the smaller PRs. I hope it doesn't take too many parts, but I'm hoping for a low order AR-SXO if possible. There will be a parallel resistor across the tweeter to reduce resonance magnitude and tweeter level, of that I'm certain. The relative 95 vs 82 sensitivity specs will need to be closer adjusted.
And now to the main reason I'm posting this. I am having trouble figuring out where the input terminals will go. In the one photo, you can see how the rear PR will be positioned. It unfortunately will not leave much real estate available for binding posts, etc. I may be able to squeeze in a Speakon on a lower corner. If I decide to use binding posts, I'd rather not have them on opposing corners or underneath on the bottom. This means I have to get creative with an extended plinth from underneath, or an exterior rear plate aft of the big PR. If I do that, I can see a curved arc mounted at the lower corners. Routing of wires just involves some creative drilling of channels or routings, and should not be a problem.
How would you incorporate input terminals on these?
Yes, SpeakOns, 0.25" TRS or TS, HAM style, etc, have been considered. I'd rather not use TS plugs if possible. I'm focused more on SpeakOns or binding posts.
Another idea I have is a poplar X mounted on all 4 corners aft the PR. That will look the part more than anything else, and likely be pretty simple. I'll mount the binding posts on the X. The more I think about it, this is the path I'll travel...
Comments
Uh, no. I bought them....
InDIYana Event Website
And?
InDIYana Event Website
Oh I see, thought you were referencing me getting freebies from manufacturers like I did from TB.
I did not realize you were not asking directly and speaking in this way.
InDIYana Event Website
Alright Ben! Looking forward to seeing information on the TW045WA01.
T/S Q/Z test, obviously Vas isn't important.


InDIYana Event Website
First and inner chamber is constructed, awaiting driver holes and rebates. Baffles are double thick poplar, and the boxes are Meniscus made 3 ltr boxes of half inch, backs are 3/4", veneered with cherry. Integrity/longevity of veneer was questionable as it was, corners had minor damage, so 2 coats of epoxy were applied. Entire cabs were sanded after the baffles were flush trimmed. Inner PR holes are cut. After driver holes, secondary chambers will be started by adding or adapting these volumes to the end design.

InDIYana Event Website
InDIYana Event Website
WooHOO! [Manic Miter saw work].
Looking forward to your feedback on that interesting tweeter . . .
I was wondering how you were going to make this cabinet shape happen internally. Poplar 2x2"s nice. Dang this is going to be compact.. as always lol.
The poplar square 'dowels' from HD are 1.75" square, 3' long. They are 14 smackers each, and it takes almost 4 of them to do these cabs like this in a pair. I still have yet to do the other cab as above. Serendipitous that with this dimension of stock, it provides the perfect dims in finale to make everything fit JUST as it should. It was also the simplest way in my head to make the construction materialize.
Doing this as shown also fills the niche of building a cabinet with exterior bracing. That's something I've wanted to do for a while now...
InDIYana Event Website
You'll have plenty of noise playing bass tones. If measuring, this will manifest as elevated H3 and H5 under 200Hz.
Let me know if you'd like to improve the performance and I'll put you in contact with someone who vented the cone under the dust cap.
It's a shame Kartesian felt the need to omit this feature...
The TOTL model DOES have under dust cap venting...
https://www.kartesian-acoustic.com/copie-de-wib90-vhp
BR,
Thanh
I'm interested in their results. I've thought about how I would entertain doing it, but I don't know how long the polepiece is, nor want aluminum in the gap.
InDIYana Event Website
This should be very interesting.
I've requested permission for you to contact him directly. I'm sure he'll be glad to share his findings with you...
Contact made and information received. The person told me he is okay with me sharing the process and results. Essentially, an exacto knife is used to carefully cut 2 holes (each opposed to the other at 180° positions), just forward of the neck or former to cone junction in the aluminum cone from the back side of the driver. Zmax at resonance goes up, as well as Qms, and the H3 and H5 peaks below 200Hz are subdued to a much lower magnitude. I plan to measure mine stock first, and decide if I feel they need modded.
More as this develops...
InDIYana Event Website
To preface, this is in no way a criticism of your design, just a curious observation/question. There appears to be an odd ratio of volume consumed by the enclosure materials vs actual volume of usuable air space to the driver. What is the actual volume of the two internal air spaces vs the total outside dimensional volume?
I calculated the inside to 3 ltrs (prior the double baffle addition, so a little less than 3 ltrs net inside 1st chamber) and outside to between 2.6 and 2.8 ltrs. Total volume of the design will be more than 6 ltrs external. Now that it is constructed, I do need to double verify the secondary volume. I have not yet done so. I have also not added the rear boards to have the total external dimensions able to be verified as yet.
Ya know what, give me a few minutes...
InDIYana Event Website
Okay, the entire cabinet will be approximately 9x9x10.75 HWD. This includes the 3/8" side panels and the possibly 0.75" thick rear panel. This comes out to 13.6 ltrs gross including everything.
The inner portion is 8x4x6 without the double baffle included. With the magnet of the 4" subtracted or crammed into the driver recess molecule by molecule, it nets out to 3 ltrs.
The outer volume dims consist of 2 volumes at 5.5x1.75x8, and a rear section of 5.5x5x1.75. This total volume nets out to 3.15 ltrs, however, the rear 8" PR will likely remove a 1/3 to 1/2 of the rear portion volume, which yields a total of 2.7-2.8 ltrs.
So, it turns out my math is pretty good. What was your concern with the ratio of materials to volumes? Is it that I'm sacrificing volume for materials and that it could actually be smaller? I'm just trying to figure out exactly what it is you want to know.
InDIYana Event Website
Additionally, the rear 8" PR is about 8.5" in diameter. The inner cab width is 5", and with the 3.5" added width of the 2x2 poplar, the PR has enough width to be placed there. The depth on the rear is not enough depth for the PR unless I use a thick rear board to mount it, or it will not seat to the surface and hit the inside rear of the inner box. Literally, I had to use the 2x2 poplar pieces to make this fit "just so", or it would not have physically held all of the pieces involved.
InDIYana Event Website
Not as extreme as I assumed.
I got the other one to the same point as pictured above this afternoon. Then I power sanded with 320 and 800. The poplar currently feels like glass, and looks great! Tomorrow, I plan on applying some oil based polyurethane to seal and add the amber color. Then it's sealing some cracks prior to applying the epoxy to fill in the spots needed.
InDIYana Event Website
When we build our speakers from timber, the internal volume:exterior(gross) volume is sizeable, particualrly with if use 3/4” to 1.5" stock.
For smaller (<1/4 cu ft) cabinets, 1/2” to 3/4" stock may be used, but the internal volume to external volume ratio gets smaller, with smaller cabinets.
That is to say, the cabinet material takes up a lot of space!
One of the benefits of polymer or aluminium enclosures (with ribbing or bracing, of course) is the high internal volume to external volume. The thin cabinet material allows for a smaller overall size.
If you have a chance to look under the hood (or listen to) at the Google Nest Audio, made for them by Peerless, you can see what can be done with aluminium enclosures, DSP, amps, wave-guided tweeters, built in microphones, wifi and BT for speech recognition and streaming. All for just $200 a stereo pair.
It must be some kind of loss leader for Google...
DIYers can use 3D printed enclosures, of course. I've seen some pretty amazing desktop-style speakers for use
@1 or 2 ft, that are smaller than a hand soap dispenser, and the enclosure is about as thick too.
Got a coat of Danish oil on them, wiped off, applied polyurethane, wiped it off, and now they are drying pending next steps.
InDIYana Event Website
Can't wait to see the culmination of your thoughts and efforts . . .
Plexiglass sides to show off dem passives?
whistling I have no idea what you are talking about...
InDIYana Event Website
So you can see how packed this pair of enclosures will be, ive taken some in situ photos for a visual representation. Likely, the xovers will be positioned in a capital I shaped fashion in and around the smaller PRs. I hope it doesn't take too many parts, but I'm hoping for a low order AR-SXO if possible. There will be a parallel resistor across the tweeter to reduce resonance magnitude and tweeter level, of that I'm certain. The relative 95 vs 82 sensitivity specs will need to be closer adjusted.


And now to the main reason I'm posting this. I am having trouble figuring out where the input terminals will go. In the one photo, you can see how the rear PR will be positioned. It unfortunately will not leave much real estate available for binding posts, etc. I may be able to squeeze in a Speakon on a lower corner. If I decide to use binding posts, I'd rather not have them on opposing corners or underneath on the bottom. This means I have to get creative with an extended plinth from underneath, or an exterior rear plate aft of the big PR. If I do that, I can see a curved arc mounted at the lower corners. Routing of wires just involves some creative drilling of channels or routings, and should not be a problem.
How would you incorporate input terminals on these?
InDIYana Event Website
How would you incorporate input terminals on these?
Ever think of using a ¼ connector (or smaller) with its small footprint?
Yes, SpeakOns, 0.25" TRS or TS, HAM style, etc, have been considered. I'd rather not use TS plugs if possible. I'm focused more on SpeakOns or binding posts.
Another idea I have is a poplar X mounted on all 4 corners aft the PR. That will look the part more than anything else, and likely be pretty simple. I'll mount the binding posts on the X. The more I think about it, this is the path I'll travel...
InDIYana Event Website
You know how much I dig SpeakOns