Look up Mr. Clean - Magic eraser. There are many off-brands selling it too now. As I understand it the material is slightly abrasive to wear stains away, but the foam keeps the abrasion gentle.
I guess it is made of melamine foam. I didn't know that.
The Great Value brand I'll be trying out are 4.6" long (2.4" x 1"), instead of the 3.9" like a majority of these for sale, and a 12 pack was about 8 bucks. If I had needed more than that, i would have bought the large lot. I just don't need that much with these.
Epoxy poured the tops last weekend.
Got the bottoms covered with an epoxy pour today.
Will hopefully brush a coat on the baffles tomorrow.
Sanding followed by wet sanding to follow.
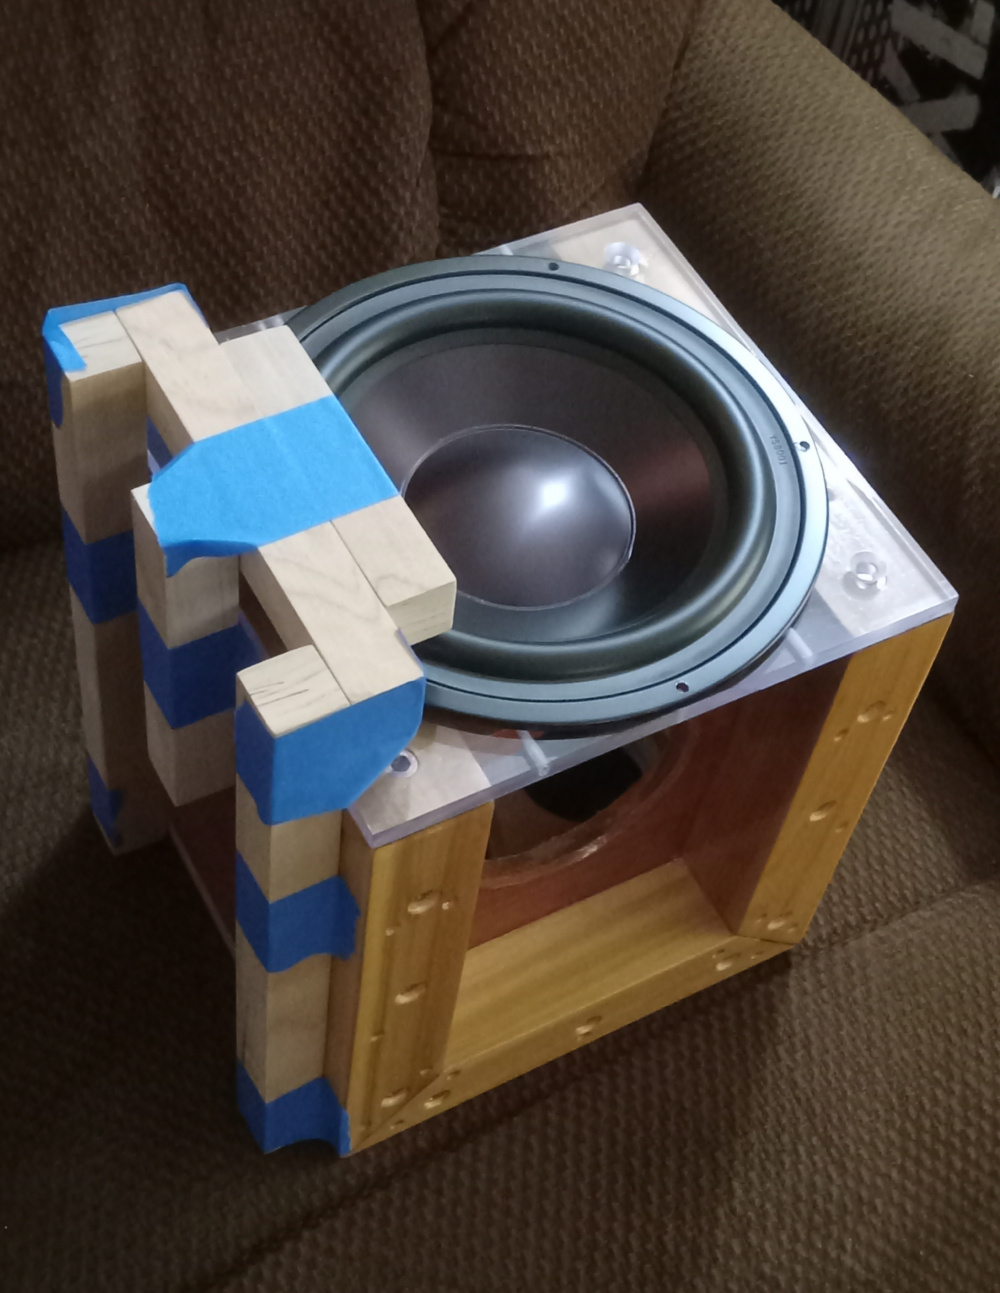
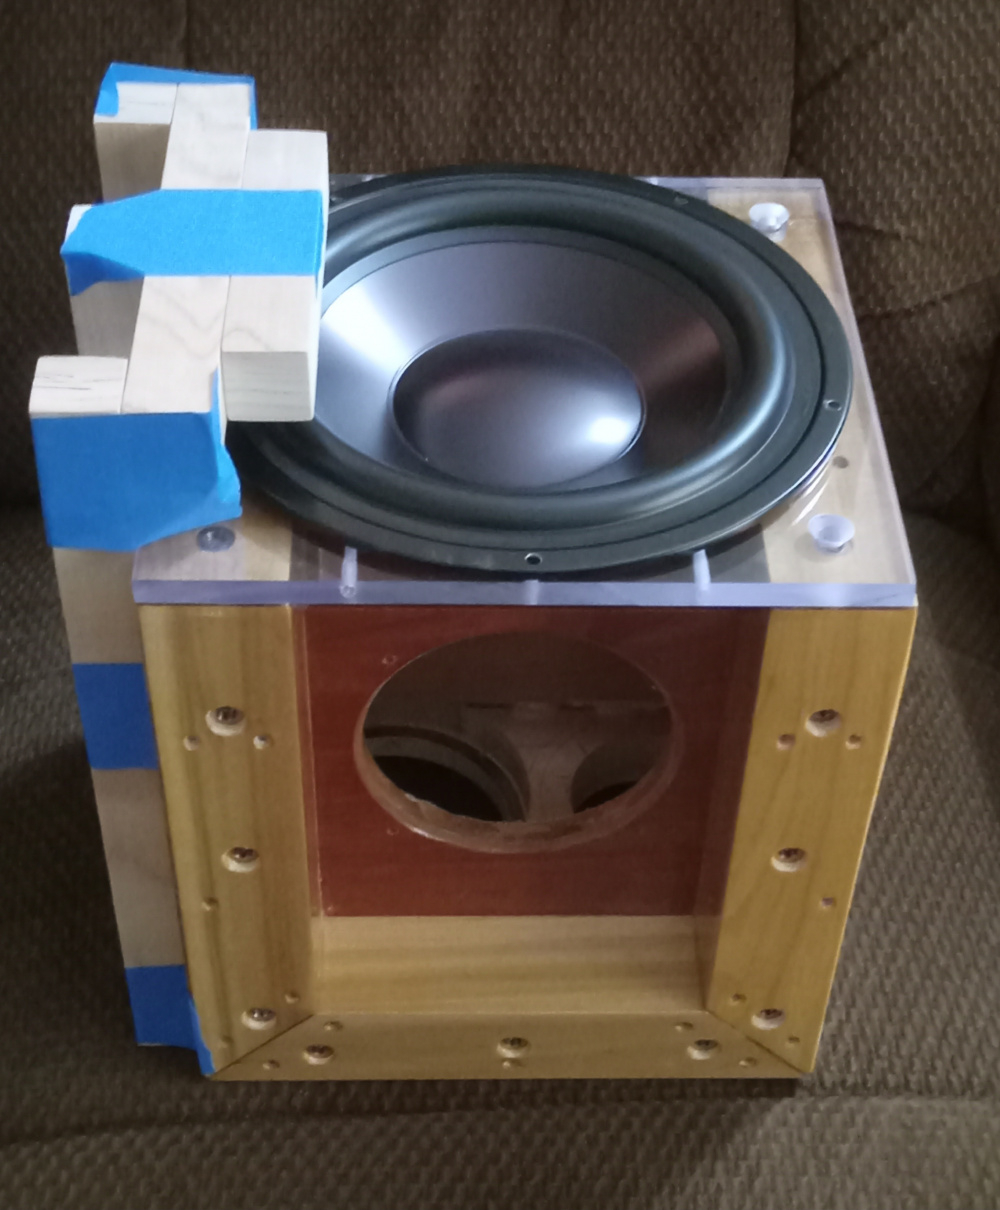
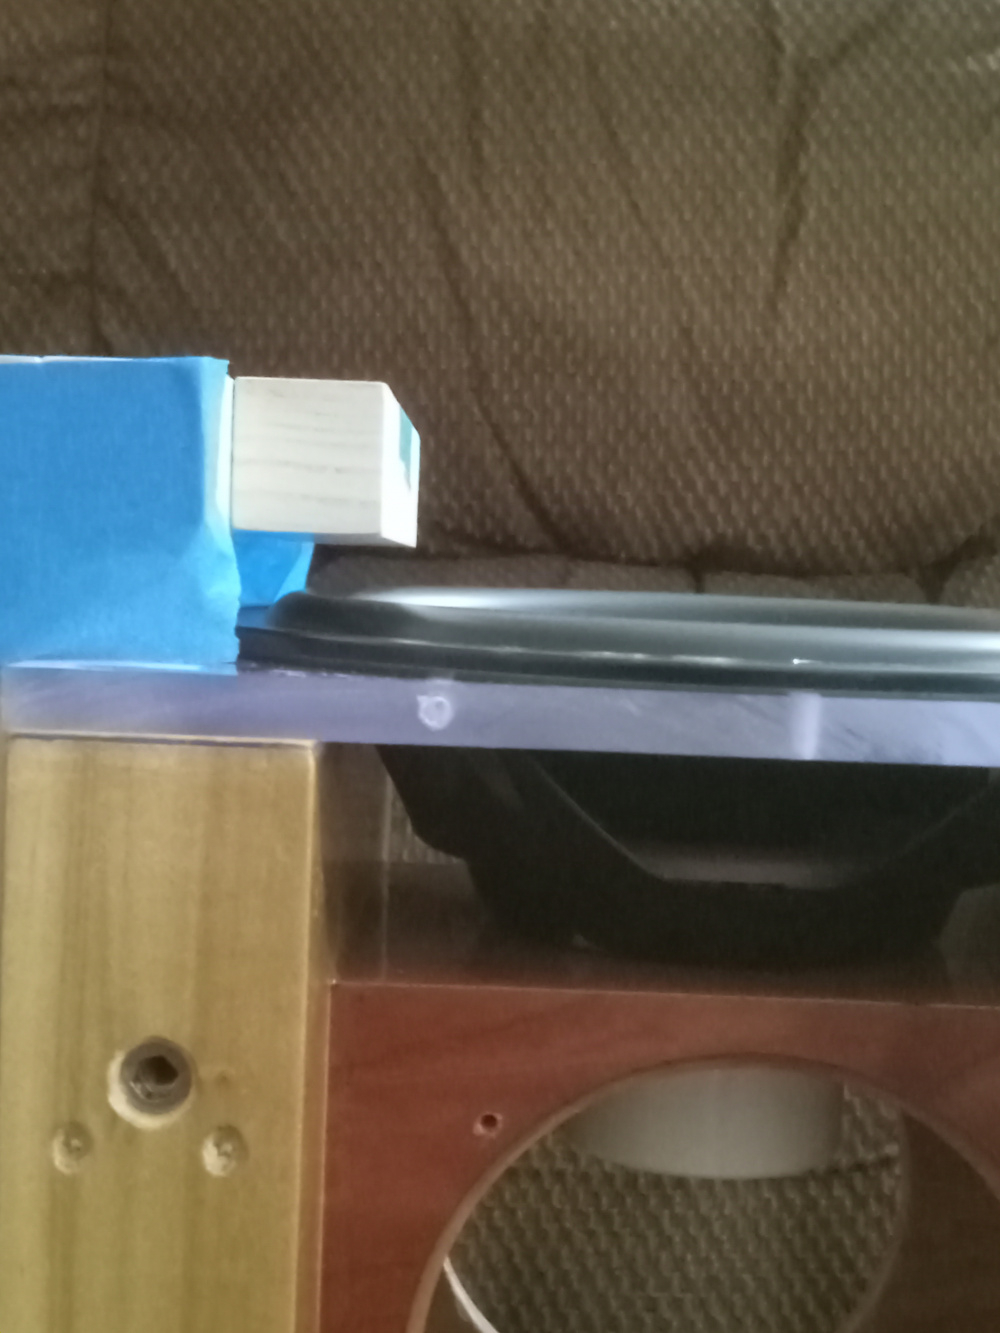
I have cut the lexan pieces to brace the side panels, but need to shape them to clear the inner passives and allow better air flow. I found a new E6000 Premium (red tube) that is for bonding plastics to attach those.
If I haven't said it prior, the posts will exit below and to the rear of the back panel. Thick feet will be added to make this possible.
Basically, you tape off the area you want to apply it, and don't pour very thick. Do it in multiples if thick. I've been using West Systems for a few years now to both seal and finish boxes. My Missing Link Versaboxes were 2 coats of epoxy brushed on and sanded. It's GREAT for this purpose. I usually brush on for coverage.
It is about $125 for the small sizes of this brand at local place I get jt. Metering pumps are a VERY good idea, as you get the right amount in the mix of each use. I usually use a 1 or 2 pump each mix per use, and i use all of it in various places in case it's too much for my main focus. It's expensive so I don't waste it. IE, inside sealing of the cabs, etc. It is like a thinned honey in viscosity, and will soak into cracks, etc. That is why I'm using it here. I will have to fill some low spots too. Nick has been a valuable resource for me in using it, and i am no pro at it like he is. My first pair of small cans lasted me about 3 years, so it goes a long way.
I use a plastic spatula to mix, spread, and sometimes move for low spots, etc. The epoxy cracks off and is easily removed from it. It is self leveling.
Sanded out the rough today, first chance I had and good Temps. Recommended 3days cure before sanding to eliminate health hazards.
I then brushed on a coat on the fronts and sides, as these were only Danish oiled before, quite a while ago. I was even able to epoxy overcoat the E6000 I used to seal the inside aft chamber to finish it off, and seal the small PR through holes; all with a 1 pump pot.
I will brush on the second coat on the tops when this is dry, followed by finishing the rest of the rear faces, and maybe some of the inner box seams.
Then it's feet and integrate terminals, finish those, and start real measurements....
Oh, blemishes thus far;
Broken drill bit in one rear. Can't remove it, too expensive and time to redo is too costly.
The baffle breakaway between drivers. Oh well, I don't mind the look.
Too deep bore in one rear screw adjoining close Lexan panels. Filled with epoxy, need to rebore and apply screw head rebate to match the others.
When pouring one of the bottoms, apparently the miter was open to a threaded insert and filled it full. I was able to drill out the hole, and retap the insert successfully.
Rear PR mass protrudes too far without needing more depth, bored a recess in rear inner wall with a Forstner bit. Will examine further to see if it is enough.
At least they have been minor....
This was the list for the course, not just today. (Closest I get to those is Knob Creek for a bad cold.)
I just thought I should point out my issues so others know I have them too.
Here is where I am in the progress. They need rubbed out, but they are epoxy coated.
The backs have been bored, shown before epoxy coating, but that still was not enough depth to avoid smacking under operation. I want the PR to handle its whole travel unimpeded for a worst case use. I will bore through the rest and see if it will protrude completely through before the suspension stops the movement. I also will likely have to add an air channel under the frame to make sure it doesn't whistle.
Fixed the rear PR excursion limits. I finished boring through the board and added a PVC cap inside. I will likely place a disc of felt in the cap for a soft stop if it gets that far, as well as damp the cavity.
Comments
whats a magic eraser melamine foam and what is it used for?
https://www.realsimple.com/home-organizing/cleaning/magic-eraser-uses
Look up Mr. Clean - Magic eraser. There are many off-brands selling it too now. As I understand it the material is slightly abrasive to wear stains away, but the foam keeps the abrasion gentle.
I guess it is made of melamine foam. I didn't know that.
Yes. And supposedly melamine foam measures great as speaker cabinet lining material.
suff the cabinet and cleen them up too... got to try this out
You can buy a box of 100 generic pads on Amazon for around $12. They are 10 cm x 6 cm x 20 mm.
The Great Value brand I'll be trying out are 4.6" long (2.4" x 1"), instead of the 3.9" like a majority of these for sale, and a 12 pack was about 8 bucks. If I had needed more than that, i would have bought the large lot. I just don't need that much with these.
InDIYana Event Website
Sounds magical.
https://www.jfcomponents.com/
I was thinking they would erase the 'magic' counterpart and leave a more realistic soundstage.")
InDIYana Event Website
Epoxy poured the tops last weekend.
Got the bottoms covered with an epoxy pour today.
Will hopefully brush a coat on the baffles tomorrow.
Sanding followed by wet sanding to follow.
I have cut the lexan pieces to brace the side panels, but need to shape them to clear the inner passives and allow better air flow. I found a new E6000 Premium (red tube) that is for bonding plastics to attach those.
If I haven't said it prior, the posts will exit below and to the rear of the back panel. Thick feet will be added to make this possible.
InDIYana Event Website
Epoxy poured as in what I've seen online that folks do for bar tops and such? If yes how difficult was it to do and is it pricey?
Epoxy is pricey and mistakes are expensive.
Basically, you tape off the area you want to apply it, and don't pour very thick. Do it in multiples if thick. I've been using West Systems for a few years now to both seal and finish boxes. My Missing Link Versaboxes were 2 coats of epoxy brushed on and sanded. It's GREAT for this purpose. I usually brush on for coverage.
It is about $125 for the small sizes of this brand at local place I get jt. Metering pumps are a VERY good idea, as you get the right amount in the mix of each use. I usually use a 1 or 2 pump each mix per use, and i use all of it in various places in case it's too much for my main focus. It's expensive so I don't waste it. IE, inside sealing of the cabs, etc. It is like a thinned honey in viscosity, and will soak into cracks, etc. That is why I'm using it here. I will have to fill some low spots too. Nick has been a valuable resource for me in using it, and i am no pro at it like he is. My first pair of small cans lasted me about 3 years, so it goes a long way.
I use a plastic spatula to mix, spread, and sometimes move for low spots, etc. The epoxy cracks off and is easily removed from it. It is self leveling.
I'll show images when I get further along.
InDIYana Event Website
Sanded out the rough today, first chance I had and good Temps. Recommended 3days cure before sanding to eliminate health hazards.
I then brushed on a coat on the fronts and sides, as these were only Danish oiled before, quite a while ago. I was even able to epoxy overcoat the E6000 I used to seal the inside aft chamber to finish it off, and seal the small PR through holes; all with a 1 pump pot.
I will brush on the second coat on the tops when this is dry, followed by finishing the rest of the rear faces, and maybe some of the inner box seams.
Then it's feet and integrate terminals, finish those, and start real measurements....
InDIYana Event Website
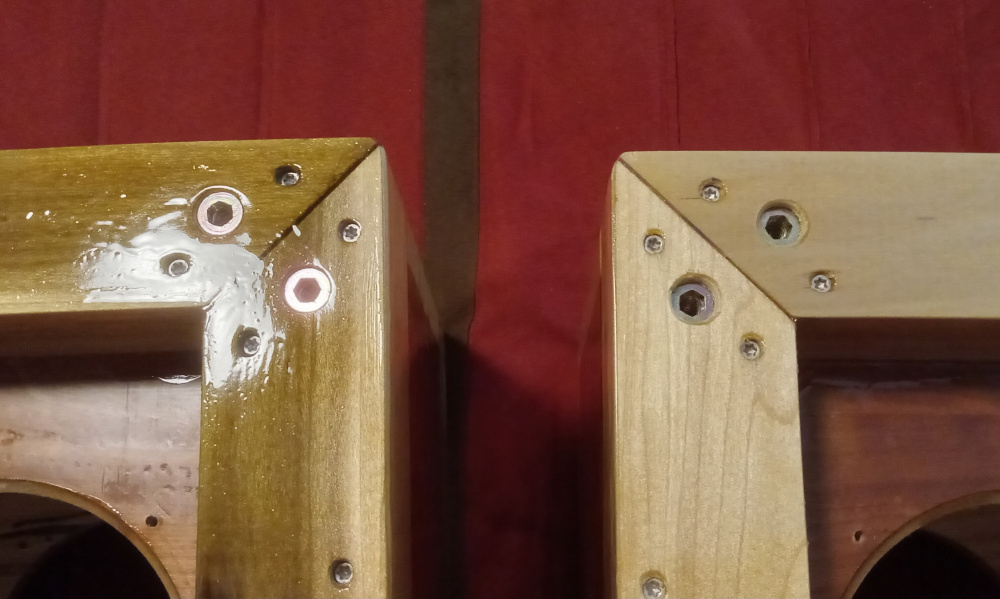
Oh, blemishes thus far;
Broken drill bit in one rear. Can't remove it, too expensive and time to redo is too costly.
The baffle breakaway between drivers. Oh well, I don't mind the look.
Too deep bore in one rear screw adjoining close Lexan panels. Filled with epoxy, need to rebore and apply screw head rebate to match the others.
When pouring one of the bottoms, apparently the miter was open to a threaded insert and filled it full. I was able to drill out the hole, and retap the insert successfully.
Rear PR mass protrudes too far without needing more depth, bored a recess in rear inner wall with a Forstner bit. Will examine further to see if it is enough.
At least they have been minor....
InDIYana Event Website
A day to end with a couple of adult refreshments!
This was the list for the course, not just today. (Closest I get to those is Knob Creek for a bad cold.)
I just thought I should point out my issues so others know I have them too.
InDIYana Event Website
We have issues.
This Knob Creek?
https://www.knobcreekrange.com/machine-gun-shoot
It'll clear your mind after your sinuses . . .
That there is a crazy display of ammunition.
Knob Creek is whiskey, as far as I know, and great for a sore throat and cough.
InDIYana Event Website
Was planning on garage time today, but too cold and dumped some snow.
InDIYana Event Website
I think we got that same snow last night. Very weird weather cycles this winter.
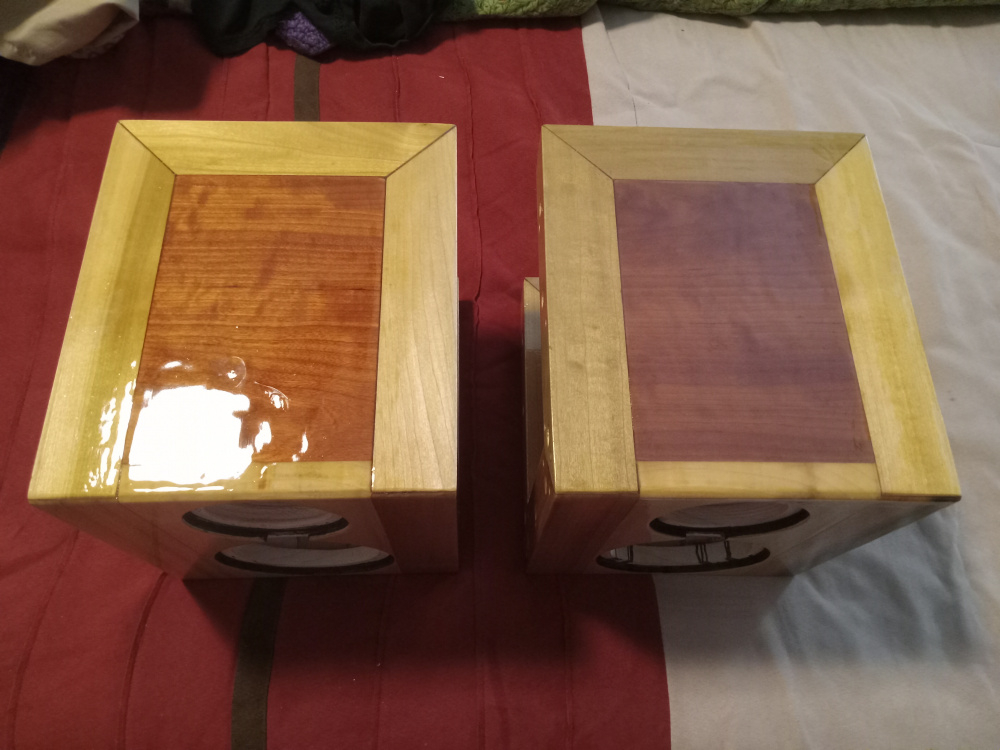
Here is where I am in the progress. They need rubbed out, but they are epoxy coated.
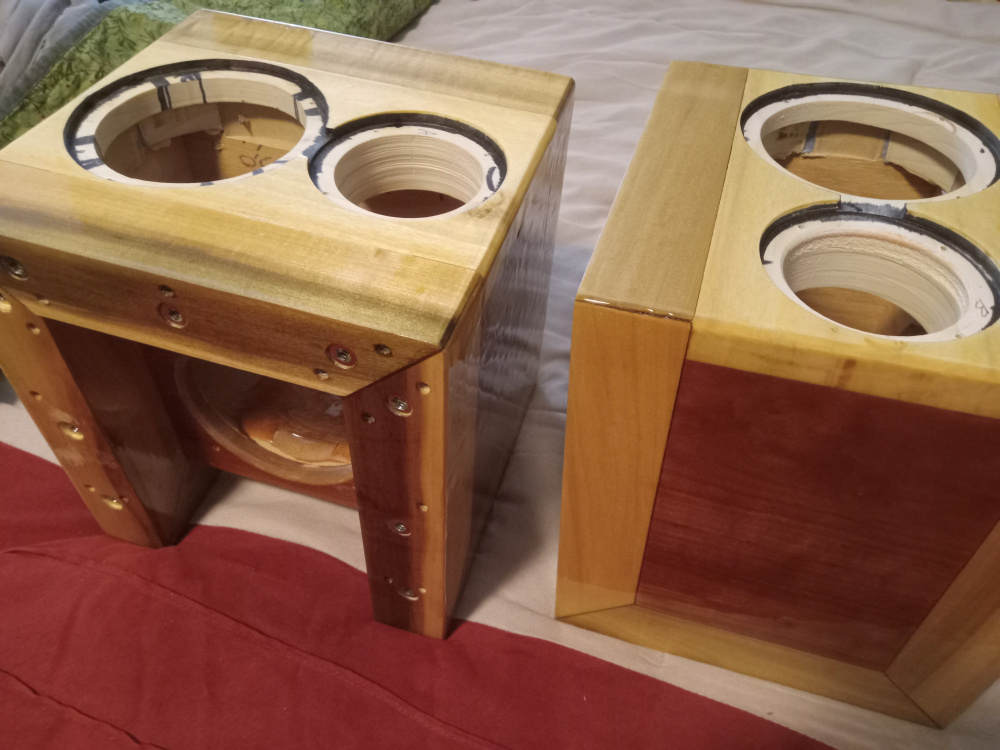

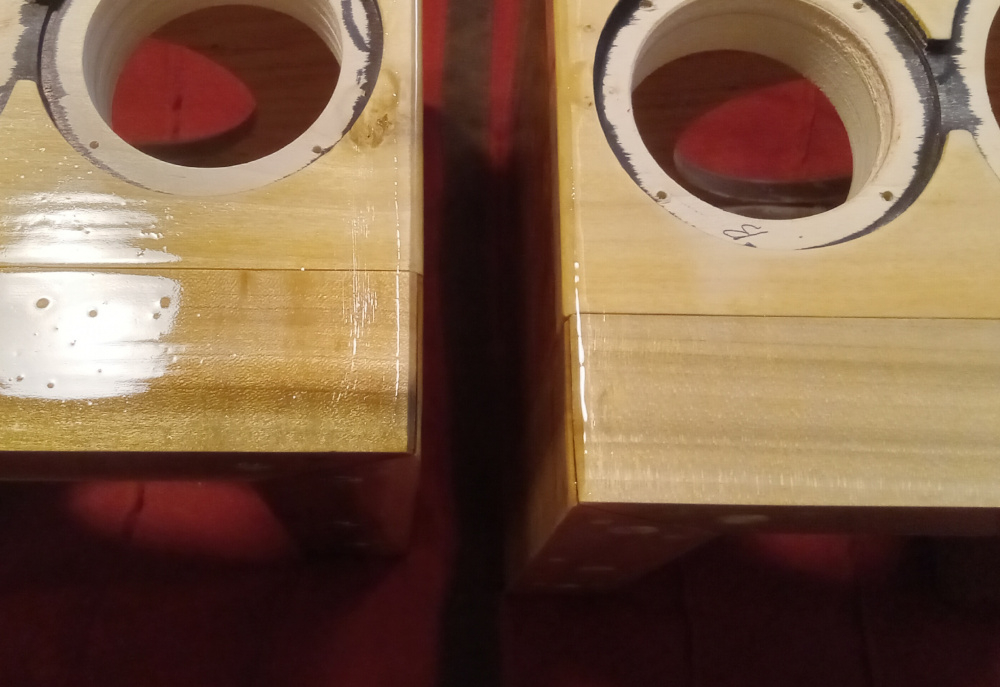
The backs have been bored, shown before epoxy coating, but that still was not enough depth to avoid smacking under operation. I want the PR to handle its whole travel unimpeded for a worst case use. I will bore through the rest and see if it will protrude completely through before the suspension stops the movement. I also will likely have to add an air channel under the frame to make sure it doesn't whistle.
InDIYana Event Website
Complex and interesting build, Wolf.
A solid 10 for originality on this build!
With cars they often list hp/weight ratios, and I'm thinking this Anomalies build may set a high-bar for weight/cu ft.
Fixed the rear PR excursion limits. I finished boring through the board and added a PVC cap inside. I will likely place a disc of felt in the cap for a soft stop if it gets that far, as well as damp the cavity.
If I can figure out feet, that is the next step.
InDIYana Event Website
Figured out feet....
The binding posts will mount vertically in the 'tongue'.
I also found a better way to mount the middle of the lexan panels than making the lexan reinforcement ribs. More on this later....
InDIYana Event Website
Very interesting design, and a few challenges addressed.