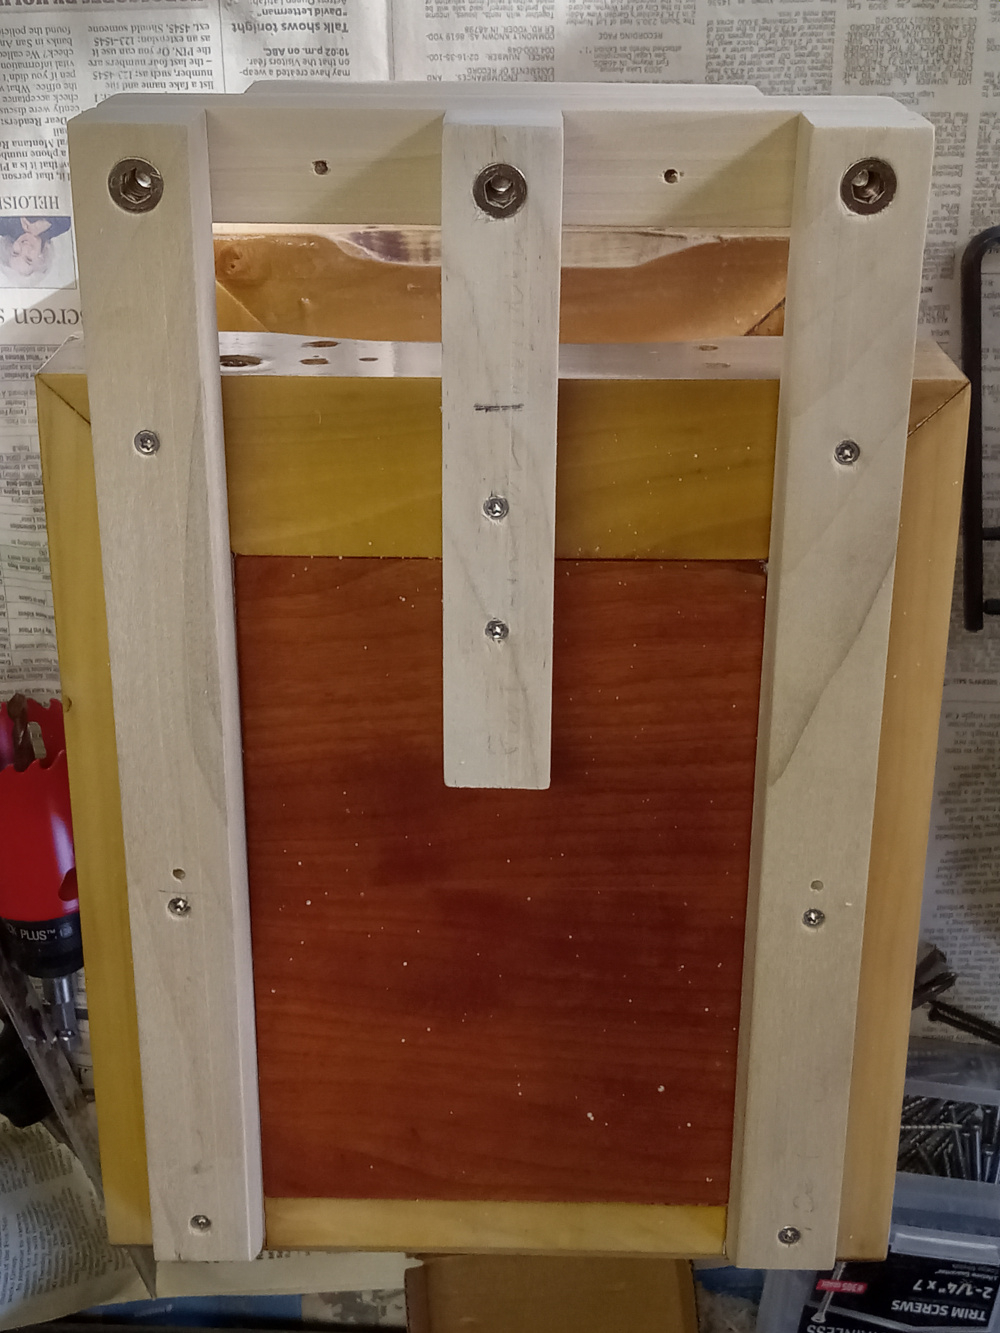
I plan on placing a cross-member in front of the middle foot to hide the wiring from the front if looking underneath, as well as solidify and strengthen the framing. I ran out of 1x1 poplar, so I need to go get one more piece to finish them.
Do you see the fresh chamfers on the rear of the cab? The 8" PR cone would actually smack the edges before i did that. I may not have needed the inner cup for increased xmax potential, but that was before I knew the real cause. Live, build, learn, adapt, and improve.
Oh, one more thought...
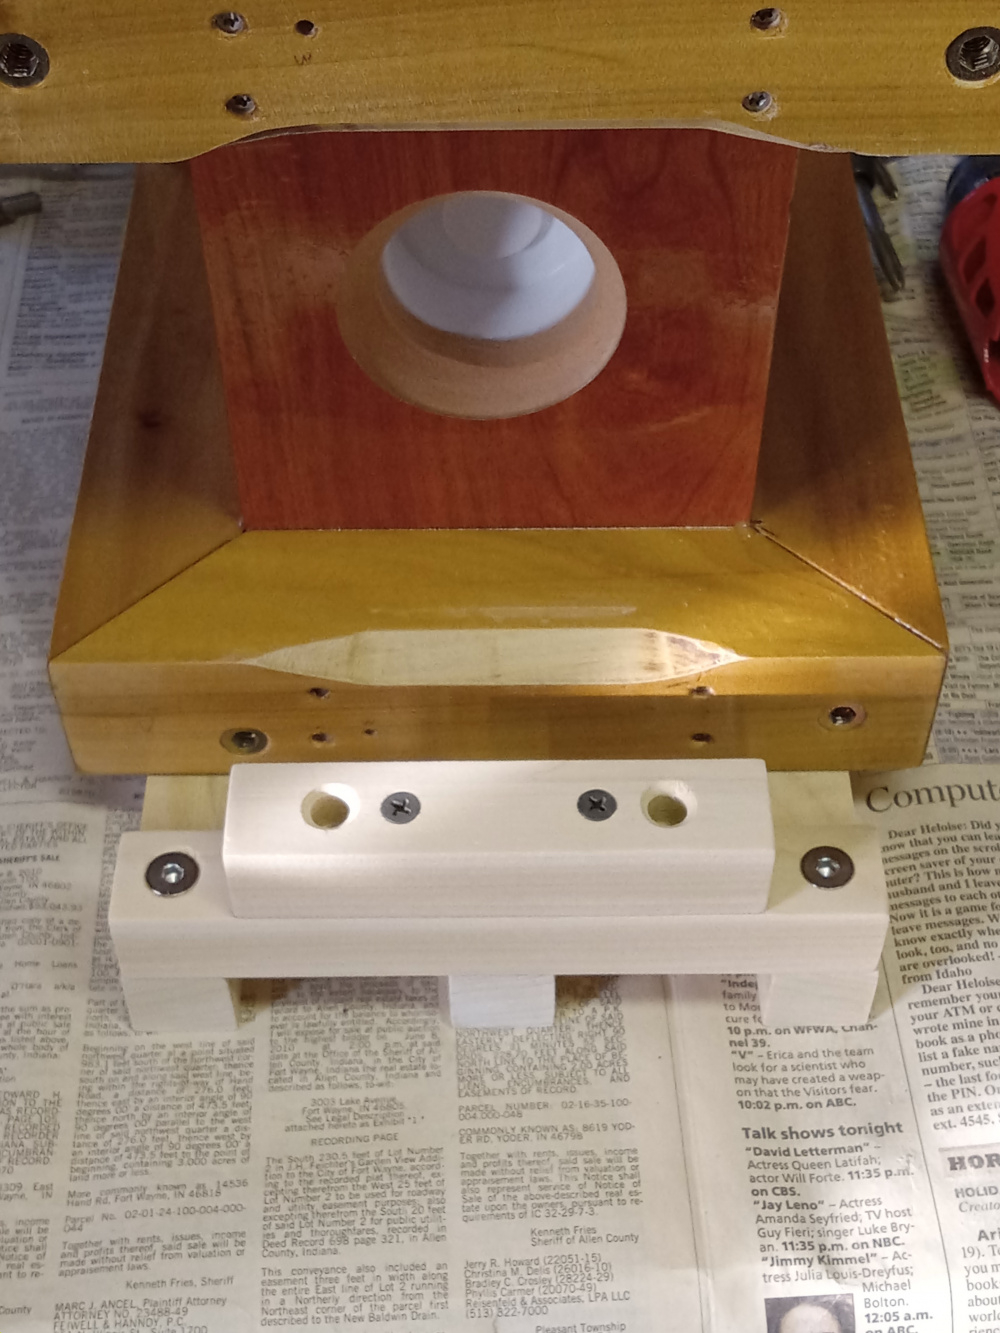
If anyone else wants to use threaded inserts in wood like I did in the feet above, please do like I did and use a clamp on the wood to either side of the piece or the wood may split during installation. Since this is poplar, it took it more forgivingly, but if i had used pine instead with no clamp, i would be on my way to get more wood supplies.
Need some epoxy coating/finishing yet, but made a LOT of progress today. Next weekend and the one between Axpona and Indy plus the 2 days before the event are about all I have left to work on these plus some hours through the weeks. I'm hoping for measurement ready by next weekend.
Soldered leads to the posts today, tinned a set of input wires, and applied Woolous self adhesive felt lining to 2 of the 3 secondary chamber surfaces (the rear of the front wall and the top of the bottom faces). This will allow connections next weekend for measuring, and keep the reflections or echos to a minimum internal to the (lined) secondary chamber. Basically, I lined 2 sides adjacent to a corner as if you were looking at a square.
The magic eraser pads will be used in the first chamber, and unseen.
I think I will have room for smaller parts in the base, and keep parts inside the first chamber to a minimum.
One coat on the feet, but not the tongues. They will need a second coat.
2 of the 4 sides of the crossmembers also have one coat. I epoxied and coated the upper crossmember mounts, need to do the lower 4 yet.
Attaching the driver disconnects to their leads are really all I need to do for commencing into measurement territory. The rear chamber tuning addition to the system response really is only applicable after the fact of the initial tuning. I will likely have to close-mic it to have it register on a measurement as it may not be visible in the final impedance measurement.
Went to test the woofers again, and one was VERY noisy. A spot in the spider somehow would POP further to the rear while in rearward motion. It almost sounds like the cone is oil-canning, but i looked and checked and operated them by hand and found nothing else awry. I smeared some Ailenes glue across the area it for rigidity. We'll see how it does when it's dry. The fact that I paid a little less than full price is helpful, but then on top of it I had to fix them both and then one a second time (if this works) is really disheartening about the brand for me.
In the mean time, I ordered the pair of SB12CAC-4 from Mad since they were still on sale in the possible chance these turn belly-up or do not work well with the design stage. I'm literally almost done with the cabs, and the trouble is with the drivers. Even if I have to make the recesses larger by 1.5mm radius to make the SB fit these cabs, I will have them playing by event time!
That is a great little woofer. If I hadn't already used it in the Bottleships, the midrange HD was lower, and the product wasn't end of line I might have considered using it here as well. With the tweeter currently selected for this build, and me really liking and not yet using the SB CAC line, the match of another ceramic driver is really the only other direction I would go. The SB driver also does well in this box size with a lot more sensitivity and decent xmax. I've heard the 12CAC in the little 'orange' kit with the SB19, and it really impressed me.
Got drivers and PRs installed to do some impedance sweeps. Just like in the Bottleships, the DSA135PRs are heavier massed than spec. I've already reduced the mass to half and they are still too heavy. I started at spec modeled added mass to yield a 55Hz tuning as stated prior in this thread. It came out at 42Hz.
I have to optimize to 55. I'm at 50 right now with half the initial mass.
Another problem occurred in the reduction process. I had longer screws for the initial mass, and the now shorter mass allowed a circular wrinkle to form on the dustcap from the end of the longer bolt. I swapped for one from the Bottleships and will replace it later. I also bought 20mm long bolts to replace the 25mm long ones.
Once I'm to the secondary tuning stages, I doubt these will come apart to even attempt a future PR replacement. I had to have a good looking set behind the lexan.
Started with 10 half-inch washers and a 25mm long M5 bolt.
Ended with 2(!) half-inch washers and a 10mm long M5 bolt. Quite a difference going from 35g to 10g.
I'd say within a half a cycle of each other is pretty good. I met my 2-3Hz tuning tolerance.
Next stage is whoop whoops for the FR, followed by the assembly of the Lexan pieces and all that entails.
Additionally, I found the new laptop can be noisy when running T/S if not done properly. I also found it can run at the faster buffering speed without any complaining if I want to do so. I tested all of the PC settings, and nothing eliminated the pops during the sweep with that direction. Then I thought, why not try the new 'super-speed' USB-C 3.0 port it has? Thing is, that involves a different interface through the external card/USB reader I purchased. I plugged the reader into the 3.0, the USB for the WT2 into the 3.0 output from the card reader. Guess what? Silence! No more popping.
Okay, this is sim2, I like it a lot better than the first one I did. Yes, it's a series xover, as nothing would go along with the 'Anomalies' theme better!
The 180Hz dip is floor bounce.
I know the phase does not look quite aligned, but the tracking is fairly close when you think about unwrapping the phase and following it. The woofer really does not want to wrap to match the tweeter in a 2D plane, but it is likely close enough here, and the reverse null tickles -15dB from reference.
At this point, the sensitivity is a guess as I added 3dB to all graphs for visual ease. Typical measurements are 39.5", and this is at 50", so the sensitivity showing mainly 76dB is likely closer to 75dB as displayed, but I don't know what voltage was taken at to further guess the actual number.
The LCR around the main padding resistor allowed the flattening of the tweeter curve. 7 parts are fairly small of the 12 shown.
Now to see if I need any parts, but I strongly doubt it...
Question: so when you go to measure one of the drivers do you replace the other with a resistor, or ? As my understanding (limited as I’ve not succeeded in getting a series Xover off the sim and into practice) is there is an interaction (the goal of a series).
Thx
Definitely want to hear those tweets (I drunk bought the same ones Vance was selling on ebay) and looks like taking all they can offer.
Oh those ASR peeps be all over you if mention <80 sensitivity hehe (opal convo's). Low sensitivity a boon for me as listening room small and have plenty of power amps ranging in gain and power to throw at it, benefit is I get to have more granular volume levels in room my situation.
The goal is to take these to the theme as intended, but I will likely make this a 2fer and also use the SB12-4 for more output potential and then relegate the SUB120 to a dual opposed sub of sorts. I don't like having a design under 80dB, and this would be the first that meets that criteria, or rather, doesn't meet the typical 80dB requirement.
I don't normally measure separately after xover application on SXO designs. I verify it matches, null looks same, and voice it for preference if needed.
Mind you, all of the sim stuff is WITHOUT the rear chamber and rear PR in play.
@PWRRYD said:
That sim looks really good Ben. I look forward to hearing these in a little less than a week!
Thank you, Craig, but it is over a week as it's only Wednesday. I would be more stressed if I'd crossed that time threshold at this point. I still have tomorrow to assemble the xovers and such. The weekend will be busy on these for sure....
Tried to voice in a single speaker this afternoon as it was measured prior. The response and network as modeled was a little forward to my ear. I ended up going back to 12 ohms from the 10 ohm resistor, and lowered the 12uF to 10uF and it seemed to level out. If anything, I dropped the 2k to 10k response a little. Due to my track record with voicing one speaker not being the greatest, I imagine the pair will sound bright when finished. I have a plan there as well if need be.
When playing around, I tried various capacitors in close values. The 12uF Q4 was a bit spitty here. The 10uF Russian K71 polystyrene 10uF was a little closed in on the lower treble. I even tried using 10uF with 1-2uF bypasses for value in case the 12 was more correct. The 10uf value just sounded more balanced in the end, and nothing up top to weird it out. I ended up with my last pair of Zen Cap 10uF here. The tweeter is worth it in combination, and it made it sound the best here.
It turns out the 10uF cap, 4 ohm resistor, and likely another resistor if needed will be going in the cabs behind the tweeters. It's a good place to put them, and the rest of the components will fit in the bottoms underneath- BARELY. I likely have to glue some of them in place, and then get a few bump-on feet for that last bit of clearance.
Then I documented the changes, tore it down, and went to the garage to attempt finishing their constructions. Good news is my sealing methods with neoprene tape will work here very well. However, I do have to add 2 more tapped holes and screws at the corners of the edge where the Lexan meets. The neoprene tape still seals without them but the corners bow just a smidge. I also fixed the rabbet to accept the SB12 on this one I almost completed. I will do the same on the other one too. It is minute enough it really shouldn't matter.
Comments
And one has feet now....
InDIYana Event Website
I plan on placing a cross-member in front of the middle foot to hide the wiring from the front if looking underneath, as well as solidify and strengthen the framing. I ran out of 1x1 poplar, so I need to go get one more piece to finish them.
Do you see the fresh chamfers on the rear of the cab? The 8" PR cone would actually smack the edges before i did that. I may not have needed the inner cup for increased xmax potential, but that was before I knew the real cause. Live, build, learn, adapt, and improve.
InDIYana Event Website
This build really is 'wood-focused' for looks, aside from the lexan.
InDIYana Event Website
Oh, one more thought...
If anyone else wants to use threaded inserts in wood like I did in the feet above, please do like I did and use a clamp on the wood to either side of the piece or the wood may split during installation. Since this is poplar, it took it more forgivingly, but if i had used pine instead with no clamp, i would be on my way to get more wood supplies.
InDIYana Event Website
Progress....
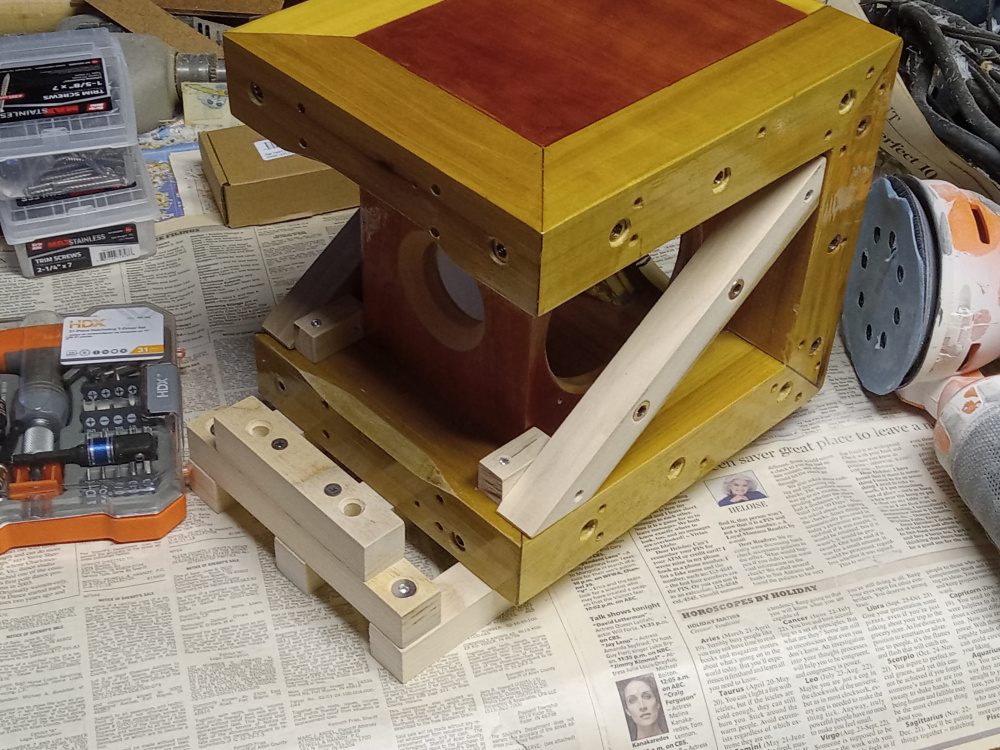
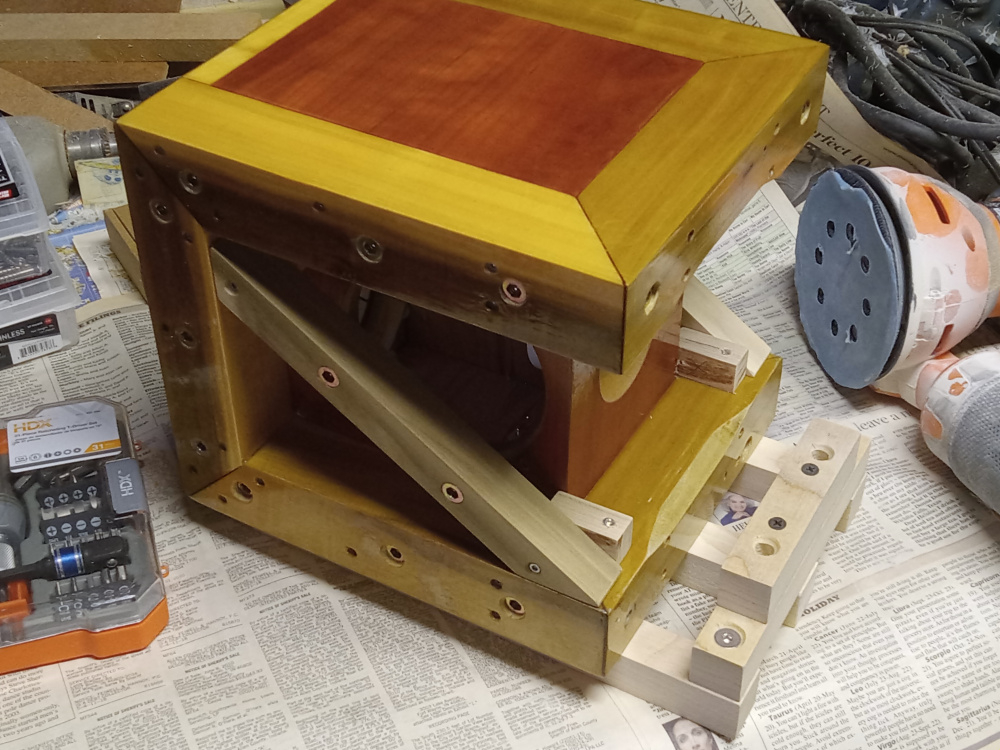


Need some epoxy coating/finishing yet, but made a LOT of progress today. Next weekend and the one between Axpona and Indy plus the 2 days before the event are about all I have left to work on these plus some hours through the weeks. I'm hoping for measurement ready by next weekend.
InDIYana Event Website
Soldered leads to the posts today, tinned a set of input wires, and applied Woolous self adhesive felt lining to 2 of the 3 secondary chamber surfaces (the rear of the front wall and the top of the bottom faces). This will allow connections next weekend for measuring, and keep the reflections or echos to a minimum internal to the (lined) secondary chamber. Basically, I lined 2 sides adjacent to a corner as if you were looking at a square.
The magic eraser pads will be used in the first chamber, and unseen.
I think I will have room for smaller parts in the base, and keep parts inside the first chamber to a minimum.
InDIYana Event Website
One coat on the feet, but not the tongues. They will need a second coat.
2 of the 4 sides of the crossmembers also have one coat. I epoxied and coated the upper crossmember mounts, need to do the lower 4 yet.
Attaching the driver disconnects to their leads are really all I need to do for commencing into measurement territory. The rear chamber tuning addition to the system response really is only applicable after the fact of the initial tuning. I will likely have to close-mic it to have it register on a measurement as it may not be visible in the final impedance measurement.
InDIYana Event Website
Went to test the woofers again, and one was VERY noisy. A spot in the spider somehow would POP further to the rear while in rearward motion. It almost sounds like the cone is oil-canning, but i looked and checked and operated them by hand and found nothing else awry. I smeared some Ailenes glue across the area it for rigidity. We'll see how it does when it's dry. The fact that I paid a little less than full price is helpful, but then on top of it I had to fix them both and then one a second time (if this works) is really disheartening about the brand for me.
In the mean time, I ordered the pair of SB12CAC-4 from Mad since they were still on sale in the possible chance these turn belly-up or do not work well with the design stage. I'm literally almost done with the cabs, and the trouble is with the drivers. Even if I have to make the recesses larger by 1.5mm radius to make the SB fit these cabs, I will have them playing by event time!
InDIYana Event Website
Its a shame on Kartesian for such poor production of these drivers, Wolf.
Good news, the Ailene's Tacky Glue provided the required holding power. No more Spider pop.
Onward I go...
InDIYana Event Website
That Ailene has been my go to for speaker repair. She fixes 'em good, and scolds them into submission.
InDIYana Event Website
I use a cotton swab to put it right where I want it.
InDIYana Event Website
Cool build Wolf.
Likes the Peerless 830855 be a could be a good candidate for this build. Maybe not enough Xmax.
What do you think?
That is a great little woofer. If I hadn't already used it in the Bottleships, the midrange HD was lower, and the product wasn't end of line I might have considered using it here as well. With the tweeter currently selected for this build, and me really liking and not yet using the SB CAC line, the match of another ceramic driver is really the only other direction I would go. The SB driver also does well in this box size with a lot more sensitivity and decent xmax. I've heard the 12CAC in the little 'orange' kit with the SB19, and it really impressed me.
InDIYana Event Website
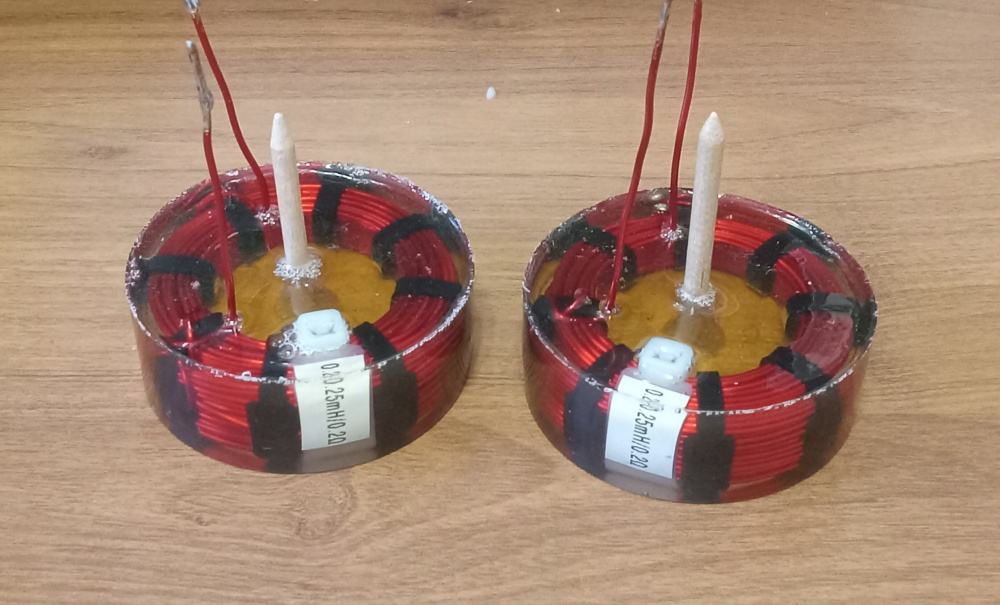
Got drivers and PRs installed to do some impedance sweeps. Just like in the Bottleships, the DSA135PRs are heavier massed than spec. I've already reduced the mass to half and they are still too heavy. I started at spec modeled added mass to yield a 55Hz tuning as stated prior in this thread. It came out at 42Hz.
I have to optimize to 55. I'm at 50 right now with half the initial mass.
Another problem occurred in the reduction process. I had longer screws for the initial mass, and the now shorter mass allowed a circular wrinkle to form on the dustcap from the end of the longer bolt. I swapped for one from the Bottleships and will replace it later. I also bought 20mm long bolts to replace the 25mm long ones.
Once I'm to the secondary tuning stages, I doubt these will come apart to even attempt a future PR replacement. I had to have a good looking set behind the lexan.
More to come...
InDIYana Event Website
Adapt and overcome
Started with 10 half-inch washers and a 25mm long M5 bolt.
Ended with 2(!) half-inch washers and a 10mm long M5 bolt. Quite a difference going from 35g to 10g.
I'd say within a half a cycle of each other is pretty good. I met my 2-3Hz tuning tolerance.
Next stage is whoop whoops for the FR, followed by the assembly of the Lexan pieces and all that entails.
Additionally, I found the new laptop can be noisy when running T/S if not done properly. I also found it can run at the faster buffering speed without any complaining if I want to do so. I tested all of the PC settings, and nothing eliminated the pops during the sweep with that direction. Then I thought, why not try the new 'super-speed' USB-C 3.0 port it has? Thing is, that involves a different interface through the external card/USB reader I purchased. I plugged the reader into the 3.0, the USB for the WT2 into the 3.0 output from the card reader. Guess what? Silence! No more popping.
InDIYana Event Website
CabA

CabB
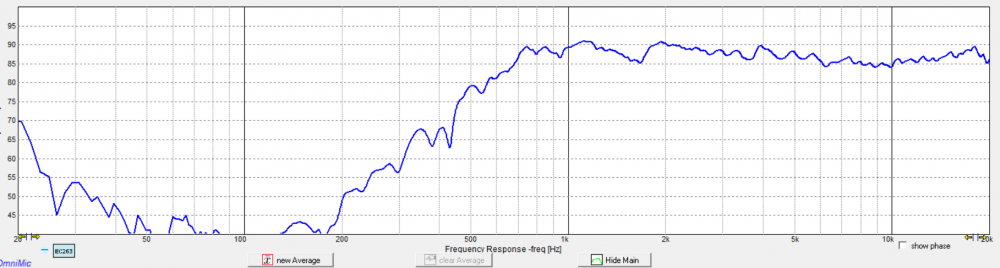
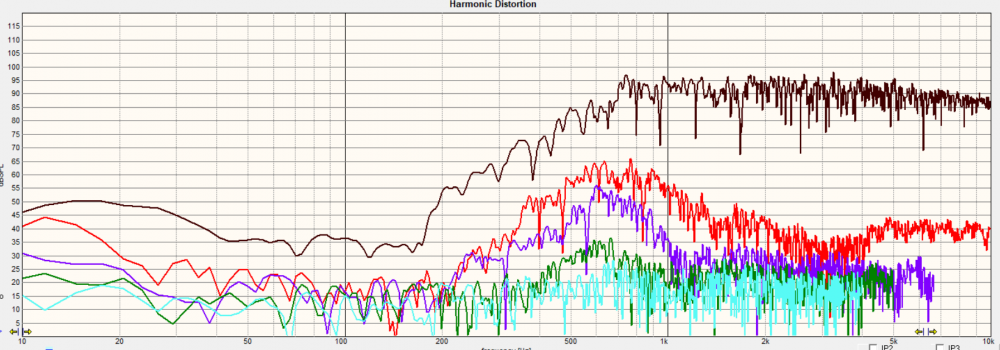
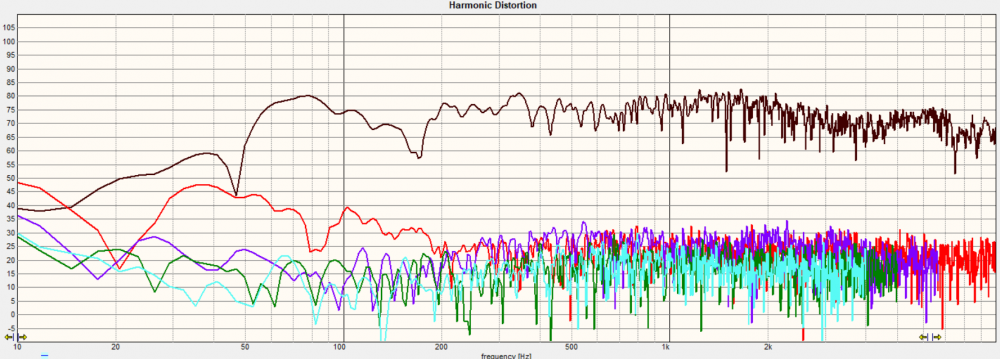
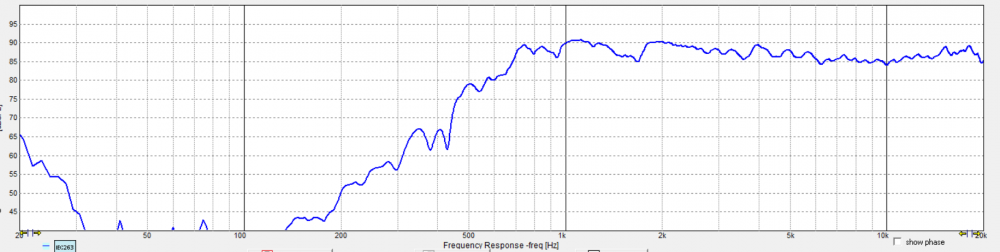
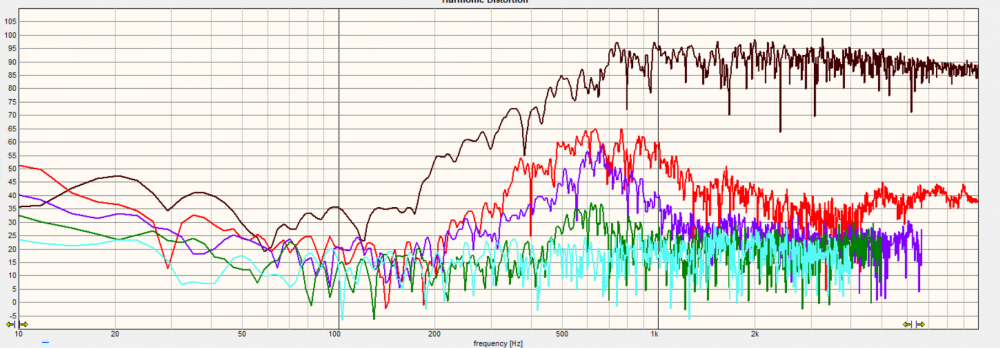
I must say the HD sweeps show the woofers as being -45dB or better, and the tweeter is good to about 1.4-1.5kHz with 2nd order being dominant.
More to come after AXPONA...
InDIYana Event Website
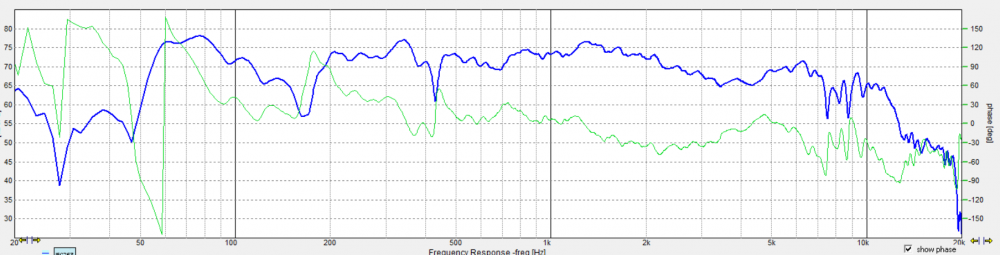
Forgot to say that these were taken a little above the tweeter axis at 50" length. I need to verify voltage sensitivity too for 2.83v/m.
InDIYana Event Website
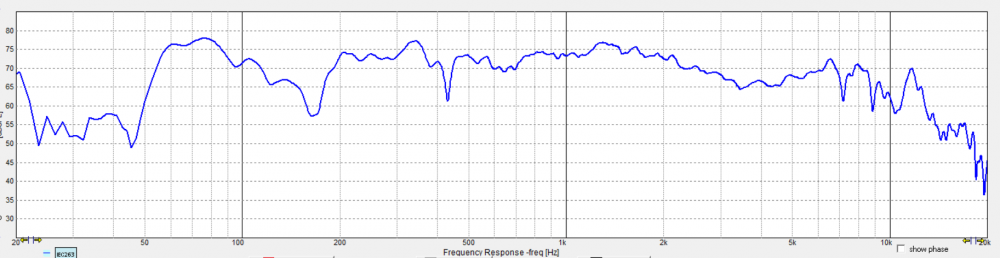
Okay, this is sim2, I like it a lot better than the first one I did. Yes, it's a series xover, as nothing would go along with the 'Anomalies' theme better!
The 180Hz dip is floor bounce.
I know the phase does not look quite aligned, but the tracking is fairly close when you think about unwrapping the phase and following it. The woofer really does not want to wrap to match the tweeter in a 2D plane, but it is likely close enough here, and the reverse null tickles -15dB from reference.
At this point, the sensitivity is a guess as I added 3dB to all graphs for visual ease. Typical measurements are 39.5", and this is at 50", so the sensitivity showing mainly 76dB is likely closer to 75dB as displayed, but I don't know what voltage was taken at to further guess the actual number.
The LCR around the main padding resistor allowed the flattening of the tweeter curve. 7 parts are fairly small of the 12 shown.
Now to see if I need any parts, but I strongly doubt it...
InDIYana Event Website
That sim looks really good Ben. I look forward to hearing these in a little less than a week!
Series Xover - nice !
Question: so when you go to measure one of the drivers do you replace the other with a resistor, or ? As my understanding (limited as I’ve not succeeded in getting a series Xover off the sim and into practice) is there is an interaction (the goal of a series).
Thx
Definitely want to hear those tweets (I drunk bought the same ones Vance was selling on ebay) and looks like taking all they can offer.
Oh those ASR peeps be all over you if mention <80 sensitivity hehe (opal convo's). Low sensitivity a boon for me as listening room small and have plenty of power amps ranging in gain and power to throw at it, benefit is I get to have more granular volume levels in room my situation.
The goal is to take these to the theme as intended, but I will likely make this a 2fer and also use the SB12-4 for more output potential and then relegate the SUB120 to a dual opposed sub of sorts. I don't like having a design under 80dB, and this would be the first that meets that criteria, or rather, doesn't meet the typical 80dB requirement.
I don't normally measure separately after xover application on SXO designs. I verify it matches, null looks same, and voice it for preference if needed.
Mind you, all of the sim stuff is WITHOUT the rear chamber and rear PR in play.
InDIYana Event Website
Thank you, Craig, but it is over a week as it's only Wednesday. I would be more stressed if I'd crossed that time threshold at this point. I still have tomorrow to assemble the xovers and such. The weekend will be busy on these for sure....
InDIYana Event Website
Lol I took next thursday off to hopefully nail down my 3-way crossovers. I bet that won't bite me in the ass
Oops! Yeah. I meant to type less than a week and a half
Tried to voice in a single speaker this afternoon as it was measured prior. The response and network as modeled was a little forward to my ear. I ended up going back to 12 ohms from the 10 ohm resistor, and lowered the 12uF to 10uF and it seemed to level out. If anything, I dropped the 2k to 10k response a little. Due to my track record with voicing one speaker not being the greatest, I imagine the pair will sound bright when finished. I have a plan there as well if need be.
When playing around, I tried various capacitors in close values. The 12uF Q4 was a bit spitty here. The 10uF Russian K71 polystyrene 10uF was a little closed in on the lower treble. I even tried using 10uF with 1-2uF bypasses for value in case the 12 was more correct. The 10uf value just sounded more balanced in the end, and nothing up top to weird it out. I ended up with my last pair of Zen Cap 10uF here. The tweeter is worth it in combination, and it made it sound the best here.
It turns out the 10uF cap, 4 ohm resistor, and likely another resistor if needed will be going in the cabs behind the tweeters. It's a good place to put them, and the rest of the components will fit in the bottoms underneath- BARELY. I likely have to glue some of them in place, and then get a few bump-on feet for that last bit of clearance.
Then I documented the changes, tore it down, and went to the garage to attempt finishing their constructions. Good news is my sealing methods with neoprene tape will work here very well. However, I do have to add 2 more tapped holes and screws at the corners of the edge where the Lexan meets. The neoprene tape still seals without them but the corners bow just a smidge. I also fixed the rabbet to accept the SB12 on this one I almost completed. I will do the same on the other one too. It is minute enough it really shouldn't matter.
InDIYana Event Website
I always enjoy and appreciate your posts re trials and subject results. Interesting insights- thx.
Muhahahaha....
InDIYana Event Website